License and attribution
© 2026 MORI University.
Except where otherwise noted, this textbook is licensed under a Creative Commons Attribution 4.0 International License (CC BY 4.0): https://creativecommons.org/licenses/by/4.0/
You are free to share (copy and redistribute in any medium or format) and to adapt (remix, transform, and build upon) this material for any purpose, including commercially. You must give appropriate credit, provide a link to the license, and indicate if changes were made. You may do so in any reasonable manner, but not in any way that suggests MORI University endorses you or your use.
Suggested attribution: “Geometry: Measure, Diagonals, and Scale (U03), MORI University, 2026, licensed under CC BY 4.0.”
About the text. All teaching text, worked examples, exercises, answers, and figures were written and drawn new for MORI University. Other open textbooks were consulted only for scope and accuracy, and no text was copied from them. No material comes from share-alike (CC BY-SA) sources. US government material (NIST, the US Geological Survey, the US Access Board, OSHA, and the National Archives’ copy of Executive Order 10834) is in the US public domain and is credited where used.
About the numbers. Every calculation in this book was checked by computer before publication, and every figure was drawn by computer from the same numbers the text uses. Rooms, furniture, prices, and measurements in the examples are illustrative unless a source is named. Official figures, such as map scales, flag proportions, and accessibility dimensions, are labeled with their source and the date they were checked. Standards are revised from time to time, so check the current edition before you rely on one for real work.
Corrections. If you find an error, please report it to MORI University so it can be fixed for every reader.
Preface
Welcome. Geometry is something you can hold in your hands.
If you have ever wondered whether a sofa will fit through a door, how much paint a room needs, whether a corner is really square, or how far a trail on a map really is, you have already asked a geometry question. This book answers questions like these with a ruler, a tape measure, a pencil, and a few dependable ideas. You will learn to measure carefully, to draw what you measured, and to check a result before you buy materials or move furniture.
Who this book is for. This book is for adults and older teenagers who learn best by seeing and doing. Perhaps you plan to fix up a room, lay out a garden, read a map, or start a trade course. Perhaps school geometry felt like a list of proofs with no point. Here, every idea starts with a picture or an object, and every formula is something you can test on a real shape. The only prerequisite is U01 Ratios, Proportions, and Percent, because scale and similarity are ratios at heart. Where this book uses an equation, it is the kind of formula you met in U02 Algebra: Expressions, Equations, and Models. You do not need to have studied U02 first.
What you need. You need a pencil, an eraser, plain and graph paper, and a ruler marked in both centimeters and inches. A tape measure (at least 16 feet or 5 meters), a protractor, a piece of string, and scissors are needed for some activities. A basic calculator with a square-root key helps from Chapter 5 onward, and a phone calculator is fine. Measurements are given in both US customary and metric units, because you will meet both on tape measures, in stores, and at work.
How each chapter works. Each chapter opens with a plain explanation of the idea and a short list of things you’ll be able to do by the end. Short sections follow, and each ends at a good place to stop. Worked examples show every step, end with a check, and say what the answer means in words. “Check yourself” questions let you test your understanding as you go. Every chapter has a ruler-based or hands-on practical activity, a list of common mistakes, a summary of key terms, nine review questions, and explained answers. Optional “Formula review” and “Going further” boxes give the formulas in compact form and explain why they work. You can skip them on a first reading. Chapter 12 brings everything together in a project, a measured and checked layout of a real room.
How to use it with limited time. One section takes about 10 to 15 minutes, and the activities take 20 to 40 minutes. If you can study for 20 minutes a few times a week, you can finish a chapter in about a week, and the whole book in about three months. Trying the review questions again a few days later helps your memory more than rereading does.
A promise about precision. Every number in this book has been checked. When we round, we tell you, and we always say which unit a number is in. We also label what kind of statement each claim is. An observation is something measured, and every measurement has some uncertainty. An inference is a conclusion that could be wrong. A model rests on stated assumptions, such as “the walls are straight.” An established result holds every time for ideal shapes, such as the Pythagorean relationship. Much of practical geometry is the work of checking whether a real object is close enough to the ideal shape for the established result to apply.
A note on language. In this book, “4 times as large” always means multiplying by 4. We never write “4 times more,” because readers take it in different ways. This matters a great deal in Chapter 10, where doubling the length of a shape multiplies its area by 4 and its volume by 8.
Where this leads. This book prepares you for U22 Measure and Lay Out Before Making, U30 Geography and GIS: Maps You Can Question, F10 Engineering Design and MORI CAD, F18 Sustainable Homes, Water, and Community Infrastructure, F20 Prospecting, Mineral Resources, and Field Mapping, and the other MORI courses that use measurement, maps, and drawings.
Course learning objectives
By the end of this book, you will be able to:
- Describe points, lines, segments, rays, and angles, measure angles with a protractor, and use the angle facts for straight lines, full turns, and crossing lines.
- Measure lengths with a ruler and a tape measure in both metric and US customary units, convert between them exactly, and convert area units correctly.
- Tell perimeter from area, choose which one a job needs, and calculate both for rectangles, triangles, quadrilaterals, circles, and composite shapes.
- Use the properties of triangles, quadrilaterals, and circles to find unknown angles, lengths, and areas.
- Check whether a corner is square with the 3-4-5 method and with equal diagonals, and use Pythagorean reasoning to find diagonals, heights, and distances.
- Decide whether two shapes are similar, find a scale factor, and use similar triangles to measure what you cannot reach.
- Read and make scale drawings and maps, and convert between drawing lengths and real lengths in both unit systems.
- Predict how length, area, and volume change when a shape is scaled, using the factors k, k², and k³.
- State the uncertainty of a measurement, carry it through a calculation, and check the spatial assumptions (straight, square, level, rectangular) that a calculation depends on.
- Produce a measured, checked, scale layout of a real room, with areas, lengths, clearances, and a materials estimate.
Chapter 1 · Points, Lines, Angles, and Ideal Shapes
U03 Geometry: Measure, Diagonals, and Scale · MORI University · Foundation level
Time needed: about 80 minutes in total, in six short sections, plus 30 minutes for the activity. Each section ends at a good place to stop. You need: a pencil, plain paper, a ruler, and a protractor. A clock with hands, or a picture of one, helps in Section 1.4.
Learning goals
By the end of this chapter, you will be able to:
- Explain the difference between an ideal shape and a real object, and say why geometry uses both.
- Name and draw points, lines, line segments, rays, and planes.
- Measure and draw an angle with a protractor, reading the correct scale.
- Classify angles as acute, right, obtuse, straight, or reflex.
- Use three angle facts: angles on a straight line add to 180°, angles around a point add to 360°, and vertical angles are equal.
- Check whether two real lines are parallel or perpendicular with a ruler.
Start here
Look at the edge of a table. It looks straight. Run your finger along it and it feels straight. But under a magnifying glass it has bumps, and no two measurements of its length agree to the last hair. Now draw a dot with a sharp pencil. It is small, but it has a width you could measure.
Geometry works with ideal shapes: lines that are perfectly straight and have no width, and points that have a position but no size at all. No one has ever drawn one. So why bother? Because ideal shapes obey rules that never fail, and real objects come close enough to them for the rules to be useful. The table edge is close enough to a straight line that its length is a single useful number. A room is close enough to a rectangle that its floor area can be worked out from two measurements.
This book moves back and forth between the ideal and the real. In this chapter you will meet the basic ideal shapes and learn to measure the most important thing about two lines that meet: the angle between them.
1.1 Ideal shapes and real objects
An ideal shape is a shape defined exactly by a rule, such as “every point the same distance from a center” for a circle. A real object can only approximate it.
Here is how this book uses the words from the Preface:
- Observation. “I measured the tabletop: 152.4 cm by 76.2 cm.” This is a measurement, and it has some uncertainty.
- Model. “Treat the tabletop as a rectangle.” This is an assumption. It is useful if the corners are close to square and the edges close to straight.
- Established result. “A rectangle’s area is length times width.” This is always true for the ideal shape.
- Inference. “So the tabletop’s area is about 152.4 × 76.2 ≈ 11,613 cm².” This conclusion is only as good as the measurement and the model.
The inference can fail in two ways. The measurement might be poor, or the model might be wrong (perhaps the table has rounded corners). Chapter 11 is about checking both. For now, the habit to build is simple: when you use a geometry rule on a real object, say which ideal shape you are treating it as.
Check yourself 1.1 A friend says, “My garden is a circle 6 m across, so its area is about 28 m².” Which part is the model, and which part is the observation? Answer: The observation is the 6 m measurement across. The model is treating the garden as a circle. The area is an inference that depends on both.
Good stopping point.
1.2 Points, lines, segments, rays, and planes
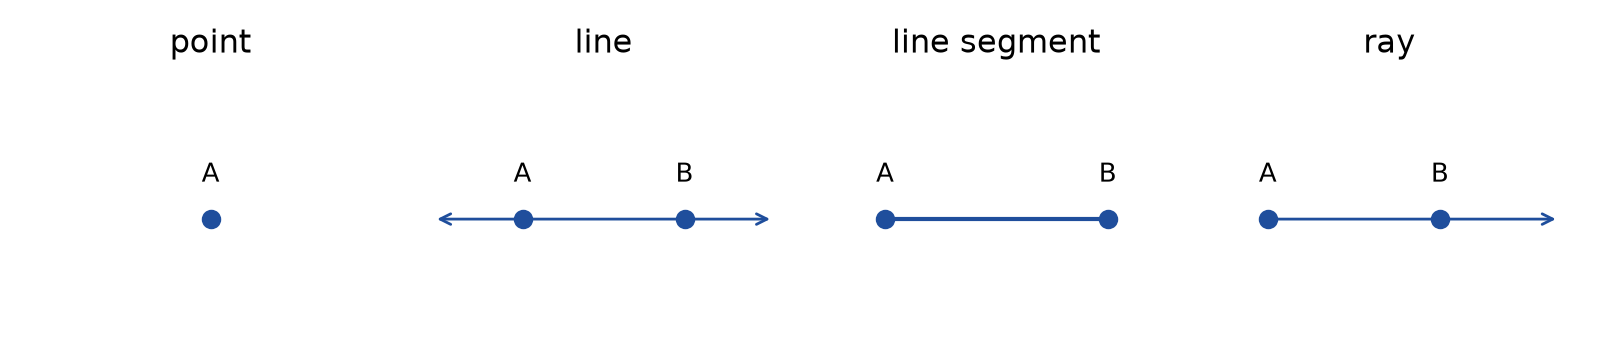
These are the building blocks of every drawing in this book. Figure 1.1 shows each one.
- A point marks an exact position and has no size. We draw it as a dot and name it with a capital letter, such as A.
- A line is perfectly straight, has no width, and goes on forever in both directions. A line through points A and B is written with arrows on both ends in a drawing.
- A line segment is the part of a line between two endpoints. Segment AB starts at A and stops at B, so it has a length you can measure. Every edge you measure in real life is modeled as a segment.
- A ray starts at one endpoint and goes on forever in one direction, like a beam from a flashlight. Ray AB starts at A and passes through B.
- A plane is a perfectly flat surface with no thickness that goes on forever in every direction. A floor, a sheet of paper, and a wall are each modeled as part of a plane.
Two facts you can rely on. Through any two different points there is exactly one line. And two different lines in a plane either cross at exactly one point or never cross at all. Lines that never cross are parallel. You will use both facts constantly. The first is why a chalk line snapped between two nails marks a single straight path.
Worked Example 1.1 · Naming the parts of a picture frame
A rectangular picture frame has corners A (top left), B (top right), C (bottom right), and D (bottom left).
Step 1 · Segments. Each side is a segment with two endpoints: AB, BC, CD, and DA. The two diagonals are segments too: AC and BD.
Step 2 · Which segments are parallel? In a rectangle the opposite sides are parallel: AB is parallel to DC, and AD is parallel to BC.
Step 3 · Which are the same length? Opposite sides are equal: AB = DC and AD = BC.
Check: Count the segments. There are 4 sides and 2 diagonals, so 6 segments in all. That is every pair of the 4 corners: 4 × 3 ÷ 2 = 6. ✓
In words: The frame has four sides in two parallel pairs, and two diagonals. In Chapter 7 you will see that measuring those two diagonals is the quickest way to check whether the frame is really square.
Check yourself 1.2 Is the edge of a sheet of paper a line, a segment, or a ray? Answer: A segment. It has two ends and a measurable length. A line would go on forever.
Good stopping point.
1.3 Angles and how to measure them
When two rays start from the same point, they form an angle. The shared starting point is the vertex of the angle, and the two rays are its arms. The size of an angle is the amount of turn from one arm to the other. It does not depend on how long the arms are drawn.
We measure turn in degrees (°). A full turn, all the way around, is 360°. This number is a convention, an agreement that goes back thousands of years, not a law of nature. It is convenient because 360 divides evenly by 2, 3, 4, 5, 6, 8, 9, 10, and 12. So:
- A half turn is 360° ÷ 2 = 180°.
- A quarter turn is 360° ÷ 4 = 90°.
- One hour on a clock face is 360° ÷ 12 = 30°.
A protractor is a half-circle (or full circle) marked in degrees. Most protractors have two scales running in opposite directions, an inner scale and an outer scale. That is the source of most protractor mistakes.
How to measure an angle with a protractor:
- Put the center mark of the protractor exactly on the vertex.
- Line up the zero line (the base line) along one arm.
- Follow the scale that reads 0 on that arm. If the arm points right, that is usually the inner scale. If it points left, it is usually the outer scale.
- Read where the other arm crosses that scale. If the arm is too short to reach the scale, extend it with a ruler first. Making the arm longer does not change the angle.
- Check by eye. Is the angle smaller than a square corner? Then the answer must be less than 90°.
Worked Example 1.2 · Reading the right scale
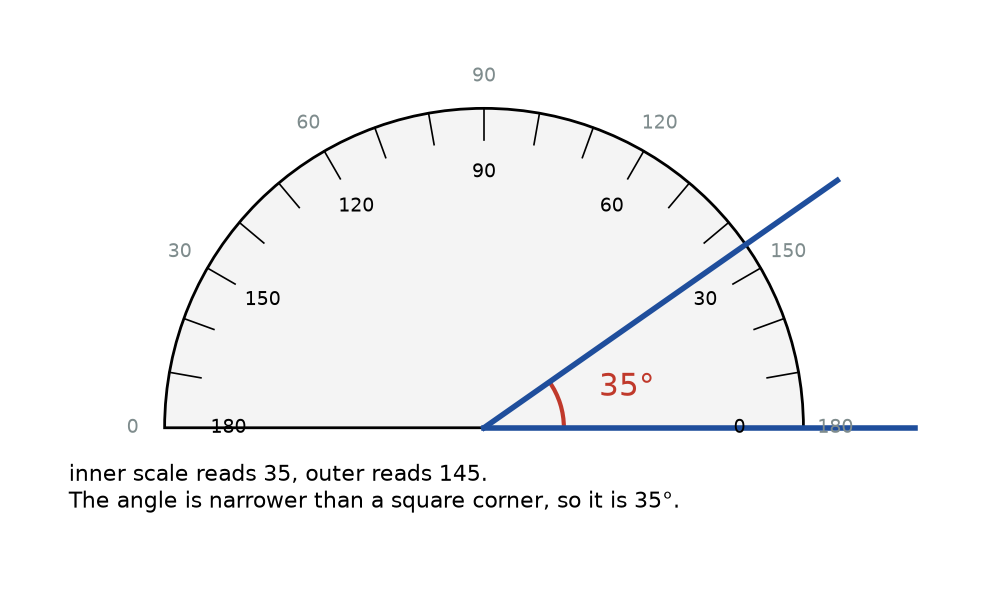
You place a protractor on an angle. The base line runs along the right-hand arm, and the other arm crosses the scales where the inner scale says 35 and the outer scale says 145. Figure 1.2 shows the reading.
Step 1 · Which scale starts at zero on the base arm? The base arm points right, and the inner scale reads 0 on the right. So use the inner scale.
Step 2 · Read it. The inner scale says 35°.
Step 3 · Check by eye. The angle is clearly narrower than the corner of a sheet of paper, so it is less than 90°. The reading 35° fits, and 145° does not. ✓
Check: The two readings always add to 180°: 35 + 145 = 180. ✓ That is because the two scales measure the same arm from opposite ends of the base line.
In words: The angle is 35°. Whenever you get two numbers from a protractor, choose the one that matches your estimate.
Check yourself 1.3 Your protractor gives the two readings 110 and 70 for an angle that is wider than a square corner. What is the angle? Answer: Wider than a square corner means more than 90°, so it is 110°. Check: 110 + 70 = 180. ✓
Good stopping point.
1.4 Kinds of angles
Angles are grouped by size. Use the square corner of a sheet of paper as your reference for 90°.
| Name | Size | Everyday example |
|---|---|---|
| acute angle | more than 0° and less than 90° | the tip of a slice of pizza |
| right angle | exactly 90° | the corner of a sheet of paper |
| obtuse angle | more than 90° and less than 180° | a laptop screen opened wide |
| straight angle | exactly 180° | a flat, open book’s spine line |
| reflex angle | more than 180° and less than 360° | the outside of a corner as you walk around it |
A right angle is marked in drawings with a small square in the corner instead of an arc. When you see that square, you are being told the angle is 90° exactly, in the ideal shape. A real corner marked “90°” on a plan is only claimed to be 90°. You will learn to check that claim in Chapter 7.
Worked Example 1.3 · Angles on a clock
Find the angle between the hour hand and the minute hand at (a) 3:00, (b) 4:00, and (c) 2:30.
Step 1 · The rate. The 12 hour marks are 30° apart. The minute hand turns 360° in 60 minutes, which is 6° per minute. The hour hand moves 30° per hour, which is 0.5° per minute.
Step 2 · (a) 3:00. The minute hand is on 12 and the hour hand is on 3. That is 3 hour spaces: 3 × 30° = 90°, a right angle.
Step 3 · (b) 4:00. That is 4 hour spaces: 4 × 30° = 120°, an obtuse angle.
Step 4 · (c) 2:30. Measure from 12, turning clockwise. The minute hand is on 6, at 30 × 6° = 180°. The hour hand is not on 2. It is halfway from 2 to 3, at 2 × 30° + 30 × 0.5° = 60° + 15° = 75°. The angle between them is 180° − 75° = 105°.
Check: At 2:30 the hour hand has gone half of one 30° space past the 2, which is 15°. The minute hand is 4 spaces past the 2 (2 to 6), which is 120°. So the angle is 120° − 15° = 105°. ✓
In words: At 2:30 the hands make an obtuse angle of 105°. The common answer of 120° forgets that the hour hand moves between the numbers.
Check yourself 1.4 Classify each angle: 89°, 90°, 91°, 180°, 270°. Answer: 89° is acute, 90° is right, 91° is obtuse, 180° is straight, and 270° is reflex.
Good stopping point.
1.5 Three angle facts
These three facts are established results. They follow from the definition of a full turn, and they let you find angles without measuring them.
Fact 1 · Angles on a straight line add to 180°. If several angles sit side by side along a straight line, together they make a half turn.
Fact 2 · Angles around a point add to 360°. If several angles fill all the way around a point, together they make a full turn.
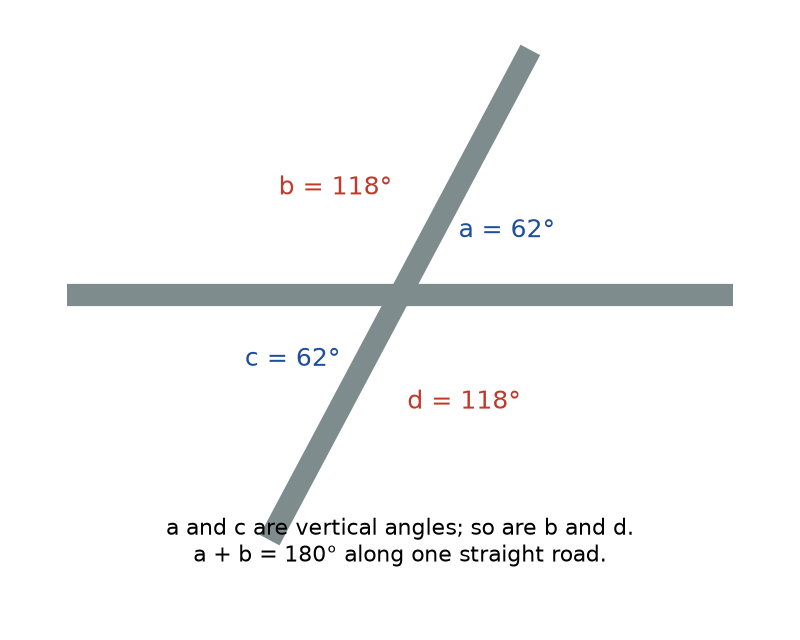
Fact 3 · Vertical angles are equal. When two straight lines cross, they make four angles. The angles opposite each other across the crossing point are called vertical angles, and they are always equal. (Here “vertical” means “sharing a vertex,” not “upright.”)
Why is Fact 3 true? Look at Figure 1.3. Angles a and b sit on a straight line, so a + b = 180°. Angles b and c also sit on a straight line, so b + c = 180°. Both a and c equal 180° − b, so a = c.
Worked Example 1.4 · Two roads crossing
Two straight roads cross. A map shows one of the angles at the crossing as 62°. Find the other three.
Step 1 · The angle next to it. It shares a straight road with the 62° angle, so it is 180° − 62° = 118°.
Step 2 · The vertical angles. The angle opposite 62° is also 62°. The angle opposite 118° is also 118°.
Check: Fact 2 says all four add to 360°: 62 + 118 + 62 + 118 = 360. ✓
In words: The crossing has two sharp corners of 62° and two wide corners of 118°. Drivers turning into a 62° corner must turn more sharply.
Worked Example 1.5 · A fan of shelves
Three angles fill a straight line. Two of them measure 47° and 85°. Find the third.
Step 1 · Use Fact 1. The three angles add to 180°. So the third is 180° − 47° − 85° = 48°.
Check: 47 + 85 + 48 = 180. ✓
In words: The third angle is 48°, an acute angle.
Check yourself 1.5 Four angles fill the space around a point. Three are 90°, 100°, and 75°. What is the fourth? Answer: 360° − 90° − 100° − 75° = 95°. Check: 90 + 100 + 75 + 95 = 360. ✓
Good stopping point.
1.6 Parallel and perpendicular lines
Two lines in a plane are parallel if they never meet. Two lines are perpendicular if they meet at a right angle. Floors and ceilings, the two rails of a railroad track, and the lines on ruled paper are modeled as parallel. A wall meeting a floor, and the two edges at the corner of a door, are modeled as perpendicular. The symbol ∥ means “is parallel to,” and ⊥ means “is perpendicular to.”
How to check parallel lines with a ruler. Parallel lines stay the same distance apart everywhere. Measure the gap at two places far apart, measuring each time at a right angle to the lines (use the square corner of a sheet of card to keep your ruler square). If the two gaps match, the lines are parallel, to the accuracy of your measurement.
How to check a right angle without a protractor. Fit the corner of a sheet of printer paper into the corner. Factory-cut paper corners are very close to 90°. If you see a gap along one edge, the corner is not square.
How to make a right angle with no tools at all. Fold any piece of paper once to make a straight crease. Then fold the crease back onto itself, so the two halves of the crease line up exactly. The second crease is perpendicular to the first. This works because folding the crease onto itself splits a straight angle (180°) into two equal parts, and 180° ÷ 2 = 90°.
Worked Example 1.6 · Is the shelf parallel to the floor?
You measure from the floor up to a shelf at both ends of the 90 cm shelf. The left end is 41.5 cm up, and the right end is 41.9 cm up.
Step 1 · Compare the gaps. The difference is 41.9 − 41.5 = 0.4 cm, which is 4 mm.
Step 2 · Is that a real difference? A ruler marked in millimeters can be read to about the nearest millimeter, so a 4 mm difference is larger than the reading error. The shelf is probably not exactly parallel to the floor.
Step 3 · Put it in context. Over a 90 cm shelf, a 4 mm rise is 0.4 ÷ 90 ≈ 0.0044, or about 0.44%. A round pencil might roll slowly toward the left end. But we also assumed the floor is level. If the floor slopes, the shelf could be level and still not be parallel to the floor.
Check: 41.5 + 0.4 = 41.9. ✓
In words: The shelf is about 4 mm higher on the right. Before you adjust it, check it with a level, because the floor may be the part that slopes. Chapter 11 returns to this kind of hidden assumption.
Check yourself 1.6 Two lines drawn on paper are 3.0 cm apart at one end and 3.0 cm apart at the other. Are they parallel? Answer: Yes, to the accuracy of the ruler. A difference smaller than about 1 mm would not show up, so “parallel within 1 mm” is the honest claim.
Good stopping point.
Practical activity · Draw, fold, and measure angles
Time: about 30 minutes. Materials: two sheets of plain paper, a pencil, a ruler, and a protractor.
- Fold a right angle. Fold one sheet to make a crease, then fold the crease onto itself as in Section 1.6. Open it and trace both creases in pencil. Measure the angle between them with your protractor. Record your reading. Most people get between 88° and 92°. The difference from 90° is your folding error plus your reading error.
- Fold 45°. Fold your right angle in half again, so one crease lies on the other. Measure the new angle. It should be close to 45°.
- Draw and estimate. On the second sheet, use your ruler to draw five angles of any size. Before measuring, write an estimate for each and classify it (acute, right, obtuse, or reflex). Then measure each one. How close were your estimates?
- Crossing lines. Draw two long straight lines that cross. Measure all four angles. Check that opposite angles match and that all four add to 360°. Write down how far from 360° your total is.
- Parallel check. Draw two lines that you think are parallel, by eye and without a ruler’s help. Then measure the gap between them at both ends, to the nearest millimeter. Were they parallel?
Reflect. Your measured totals in step 4 will rarely come to exactly 360°. Is that a failure of the angle fact, or of the measurement? (It is the measurement. The fact is an established result about ideal lines. Your lines have width, and your protractor can be read to about 1°.)
Common mistakes
- Reading the wrong protractor scale. Always estimate first. If your angle is narrow, the answer is below 90°.
- Putting the protractor’s edge, not its center mark, on the vertex. The center mark is usually a small hole or cross on the base line, and it is often not at the bottom edge of the plastic.
- Thinking a longer arm makes a bigger angle. An angle measures turn. Drawing the arms longer does not change it.
- Assuming the hour hand sits on the number. Between the hours it moves 0.5° each minute.
- Assuming “looks square” means square. A corner that is 88° looks square to most people. Check with a paper corner, and in Chapter 7, with the 3-4-5 method.
- Assuming the reference is perfect. A shelf can be parallel to a sloping floor and still not be level.
Going further (optional) · Formula review: angles on a clock
At H hours and M minutes, the hour hand is at 30H + 0.5M degrees from 12, and the minute hand is at 6M degrees. The angle between them is the difference, |30H + 0.5M − 6M| = |30H − 5.5M|. If that comes out over 180°, subtract it from 360° to get the smaller angle.
Test it at 2:30: |30 × 2 − 5.5 × 30| = |60 − 165| = 105°. This matches Worked Example 1.3. ✓ At 9:00: |270 − 0| = 270°, and 360° − 270° = 90°. ✓
The vertical bars | | mean absolute value, the size of a number without its sign. They appear here so that it doesn’t matter which hand is ahead.
Summary
- Geometry uses ideal shapes, defined exactly. Real objects approximate them. Say which ideal shape you are using as your model.
- A point has position but no size. A line is straight and endless. A line segment has two endpoints and a length. A ray has one endpoint. A plane is a flat endless surface.
- An angle is the turn between two rays from a common vertex, measured in degrees. A full turn is 360°.
- Use a protractor carefully: center on the vertex, zero on one arm, read the scale that starts at 0, and check by eye.
- Acute < 90° < obtuse < 180°. A right angle is 90° and a straight angle is 180°. A reflex angle is between 180° and 360°.
- Angles on a straight line add to 180°. Angles around a point add to 360°. Vertical angles are equal.
- Parallel lines stay the same distance apart. Perpendicular lines meet at 90°.
Key terms: ideal shape · point · line · line segment · ray · plane · angle · vertex · degree · protractor · acute angle · right angle · obtuse angle · straight angle · reflex angle · vertical angles · parallel · perpendicular
Review questions
Questions 1 to 6 practice single skills. Questions 7 to 9 combine them.
- Say whether each is best modeled as a point, a segment, a ray, or a plane: (a) a tabletop, (b) the beam of a laser pointer, (c) a corner of a room seen on a floor plan, (d) one edge of a door.
- A protractor shows the two readings 58 and 122 for an angle narrower than a square corner. What is the angle?
- Classify each angle: (a) 12°, (b) 90°, (c) 150°, (d) 200°.
- Two angles together make a straight line. One is 73°. Find the other.
- Two straight lines cross. One of the four angles is 135°. Find the other three.
- What angle do the clock hands make at 5:00?
- What angle do the clock hands make at 3:30? Check your answer two ways.
- Five angles fill the space around a point. Four of them are 80°, 80°, 70°, and 60°. Find the fifth and classify it.
- A picture rail is 2.10 m above the floor at one end of a wall and 2.10 m above the floor at the other end. A level placed on the rail shows it is not level. What does that tell you about the floor? Explain your reasoning.
Explained answers
1. (a) Plane (a flat surface, modeled as part of a plane). (b) Ray (it starts at the pointer and goes on in one direction). (c) Point (a position on the plan). (d) Segment (two ends and a length).
2. The angle is less than 90°, so it is 58°. Check: 58 + 122 = 180. ✓
3. (a) acute, (b) right, (c) obtuse, (d) reflex.
4. 180° − 73° = 107°. Check: 73 + 107 = 180. ✓
5. The angle beside it is 180° − 135° = 45°. The vertical angles are equal, so the four angles are 135°, 45°, 135°, and 45°. Check: 135 + 45 + 135 + 45 = 360. ✓
6. 5 hour spaces × 30° = 150°.
7. Method 1: The minute hand is at 6 × 30 = 180° from 12. The hour hand is halfway between 3 and 4, at 90° + 15° = 105°. The angle is 180° − 105° = 75°. Method 2: The formula gives |30 × 3 − 5.5 × 30| = |90 − 165| = 75°. ✓
8. 360° − 80° − 80° − 70° − 60° = 70°, which is acute. Check: 80 + 80 + 70 + 60 + 70 = 360. ✓
9. The rail is the same height above the floor at both ends, so it is parallel to the floor. Since the rail is not level, the floor is not level either. It must slope in the same direction as the rail. The measurement checked “parallel to the floor,” not “level.” Those are the same only if the floor is level.
Connections
- Chapter 4 uses the straight-line fact to show why a triangle’s angles add to 180°.
- Chapter 7 shows how to check a right angle by measuring lengths alone, which works on a corner too big for any protractor.
- Chapter 11 returns to the hidden assumption in Question 9: that your reference surface is what you think it is.
- Other MORI books: U01 Ratios, Proportions, and Percent covers the percent used in Worked Example 1.6. U22 Measure and Lay Out Before Making applies parallel and square checks on real jobs.
Sources consulted for scope and accuracy: OpenStax, Contemporary Mathematics, Chapter 10, Sections 10.1, “Points, Lines, and Planes,” and 10.2, “Angles,” https://openstax.org/details/books/contemporary-mathematics, CC BY 4.0; Common Core State Standards for Mathematics, Grade 7, Geometry (7.G.B.5, angle relationships), https://www.thecorestandards.org/Math/Content/7/G/ (checked October 23, 2026). All examples and exercises are original to MORI University. The tabletop and shelf measurements are illustrative.
Chapter 2 · Length and Area Units
U03 Geometry: Measure, Diagonals, and Scale · MORI University · Foundation level
Time needed: about 75 minutes in total, in six short sections, plus 30 minutes for the activity. Each section ends at a good place to stop. You need: a pencil, paper, a ruler marked in both centimeters and inches, and a calculator. A tape measure helps for the activity.
Learning goals
By the end of this chapter, you will be able to:
- Read a metric ruler to the nearest millimeter and an inch ruler to the nearest sixteenth of an inch.
- Convert between inches and centimeters exactly, and between feet-and-inches and decimal units.
- Explain what a square unit is and find an area by counting squares.
- Convert area units correctly, using the square of the length conversion.
- Choose a sensible unit and tool for a measurement, and always write the unit.
Start here
A friend tells you their new rug is “6 by 9.” Six by nine what? Feet would make a rug for a living room. Meters would cover most of a small apartment. Inches would make a bath mat for a doll’s house. A number without a unit is not a measurement.
Units matter twice as much in geometry, because lengths combine into areas. A rug 6 ft by 9 ft covers 54 square feet. That is a different kind of quantity from 54 feet, and converting it to other units needs a little care. This chapter makes sure that every length you measure and every area you calculate carries the right unit.
2.1 Reading a metric ruler
The metric system measures length in meters (m). A meter is divided into 100 centimeters (cm), and each centimeter into 10 millimeters (mm). So 1 m = 100 cm = 1,000 mm. A unit of length is just an agreed standard distance that you count in, and the metric units are linked by powers of 10, as you saw in U01 Ratios, Proportions, and Percent.
On a metric ruler, the numbered long marks are centimeters. The nine short marks between them are millimeters, with a slightly longer mark at the 5 mm point.
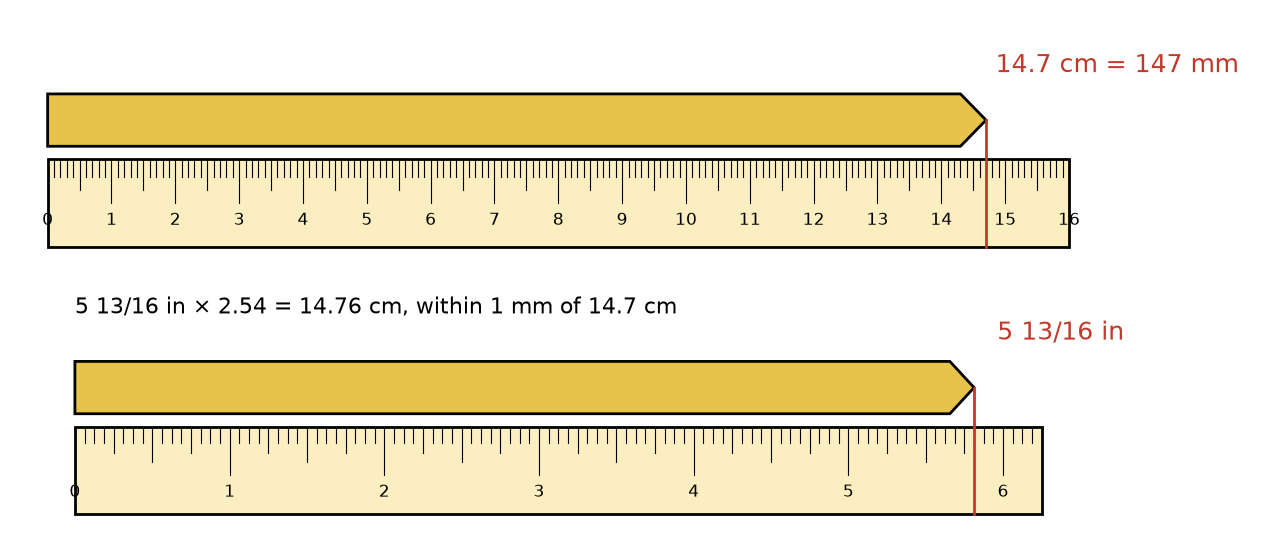
To read a length: put the zero mark (not the end of the ruler, which is often worn) at one end of the object. Read the last whole centimeter, then count the millimeters past it. A pencil whose tip falls 7 small marks past the 14 is 14.7 cm, or 147 mm. The two are the same length written in different units.
Check yourself 2.1 Write 3.2 cm in millimeters, and 850 mm in meters. Answer: 3.2 × 10 = 32 mm. 850 ÷ 1,000 = 0.85 m.
Good stopping point.
2.2 Reading an inch ruler
US customary rulers divide each inch (in) into halves, quarters, eighths, and sixteenths. The marks get shorter as the pieces get smaller: the half-inch mark is longest, then the quarters, then the eighths, then the sixteenths.
To read a length: read the last whole inch, then count sixteenths past it. Reduce the fraction if you can. For example, 12/16 = 3/4 and 10/16 = 5/8. A pencil whose tip falls 13 sixteenth-marks past the 5 is 5 13/16 in. That fraction can’t be reduced, because 13 is odd.
To turn a fraction of an inch into a decimal, divide: 13 ÷ 16 = 0.8125. So 5 13/16 in = 5.8125 in.
Figure 2.1 shows the same pencil measured both ways.
Worked Example 2.1 · Do the two readings agree?
The pencil measured 14.7 cm on one ruler and 5 13/16 in on the other. Do the readings agree?
Step 1 · Write the inch reading as a decimal. 5 13/16 in = 5 + 13 ÷ 16 = 5.8125 in.
Step 2 · Convert, using 1 in = 2.54 cm exactly. 5.8125 × 2.54 = 14.76375 cm, or about 14.76 cm.
Step 3 · Compare. 14.76 − 14.7 = 0.06 cm, which is 0.6 mm.
Step 4 · Is that difference real? The metric ruler is read to the nearest millimeter, so a reading of 14.7 could mean anything from about 14.65 to 14.75 cm. The inch ruler is read to the nearest 1/16 in, which is 0.15875 cm, or about 1.6 mm. A difference of 0.6 mm is smaller than either ruler’s reading step.
Check: Convert the other way: 14.7 ÷ 2.54 = 5.787 in, and 5.787 × 16 = 92.6 sixteenths, which is about 5 and 12.6 sixteenths. That is between 5 12/16 and 5 13/16 in. ✓
In words: The two readings agree to within the precision of the rulers. Neither one is “wrong.”
Check yourself 2.2 Write 2 3/8 in as a decimal, then in centimeters. Answer: 3 ÷ 8 = 0.375, so 2 3/8 in = 2.375 in. Then 2.375 × 2.54 = 6.0325 cm, about 6.03 cm.
Good stopping point.
2.3 Exact conversions and mixed units
Since 1959, the inch has been defined as exactly 2.54 centimeters. This is not a rounded value. It is the definition, recorded by the US National Institute of Standards and Technology (NIST). From it come other exact values:
- 1 foot (ft) = 12 in = 12 × 2.54 = 30.48 cm = 0.3048 m, exactly.
- 1 yard (yd) = 3 ft = 36 in = 91.44 cm = 0.9144 m, exactly.
- 1 mile = 5,280 ft = 1.609344 km, exactly.
An exact conversion is one that follows from a definition, so it introduces no rounding. Going from metric to US units means dividing by 2.54, and the result usually has to be rounded. The unit conversion card in the back matter lists the conversions this book uses.
US lengths are often written in mixed units, such as 10 ft 9 in, or 10′ 9″ (the marks ′ and ″ mean feet and inches). To calculate with a mixed length, first write it in one unit.
Worked Example 2.2 · A wall in feet and inches
A wall measures 10 ft 9 in. Write it in inches, in decimal feet, and in meters.
Step 1 · Inches. 10 × 12 + 9 = 120 + 9 = 129 in.
Step 2 · Decimal feet. 9 in is 9/12 of a foot, which is 0.75 ft. So the wall is 10.75 ft. (It is not 10.9 ft. Inches are twelfths of a foot, not tenths.)
Step 3 · Meters. 129 × 2.54 = 327.66 cm = 3.2766 m, or about 3.28 m.
Check: 10.75 × 0.3048 = 3.2766. ✓
In words: The wall is 129 in, 10.75 ft, or about 3.28 m long.
Worked Example 2.3 · A metric board in feet and inches
A board is sold as 2.4 m long. How long is that in feet and inches, to the nearest 1/16 in?
Step 1 · Inches. 2.4 m = 240 cm, and 240 ÷ 2.54 = 94.488… in, about 94.49 in.
Step 2 · Feet and inches. 94.49 ÷ 12 = 7 remainder 10.49. So it is 7 ft and 10.49 in.
Step 3 · Round to a ruler mark. 0.49 in × 16 = 7.8 sixteenths, which rounds to 8/16 = 1/2. So the board is about 7 ft 10 1/2 in.
Check: 7 × 12 + 10.5 = 94.5 in, and 94.5 × 2.54 = 240.03 cm. That is within 0.3 mm of 240 cm. ✓
In words: A 2.4 m board is just under 7 ft 10 1/2 in. It is about 1 1/2 in short of 8 ft, so it won’t do where a plan calls for an 8-foot board.
Check yourself 2.3 A doorway is 6 ft 8 in tall. How tall is it in inches and in centimeters? Answer: 6 × 12 + 8 = 80 in, and 80 × 2.54 = 203.2 cm.
Good stopping point.
2.4 Square units and area
Area is the amount of flat surface a shape covers. We measure it by counting square units: squares that are 1 unit long on each side.
- A square 1 cm on each side has an area of 1 square centimeter, written 1 cm².
- A square 1 ft on each side has an area of 1 square foot, written 1 ft² or 1 sq ft.
- A square 1 m on each side has an area of 1 square meter, written 1 m².
The small raised 2 is a reminder that two lengths were multiplied. A rectangle 3 cm by 2 cm holds 3 rows of 2 one-centimeter squares, so its area is 3 × 2 = 6 cm². That is why the area of a rectangle is length × width. Chapter 3 uses this idea constantly.
Large areas have their own units:
- An acre is 43,560 ft², by definition. A US football field without its end zones (300 ft by 160 ft) is 48,000 ft², which is about 1.1 acres.
- A hectare (ha) is 10,000 m², the area of a square 100 m on each side.
Area is not length. A length of 6 m and an area of 6 m² cannot be added, compared, or converted into each other. If an answer to an area question comes out in meters, something has gone wrong.
Check yourself 2.4 A rectangle on graph paper is 7 squares long and 4 squares wide, and each square is 1 cm by 1 cm. What is its area? Answer: 7 × 4 = 28 cm². You can check by counting: 4 rows of 7 squares.
Good stopping point.
2.5 Converting area units: square the conversion
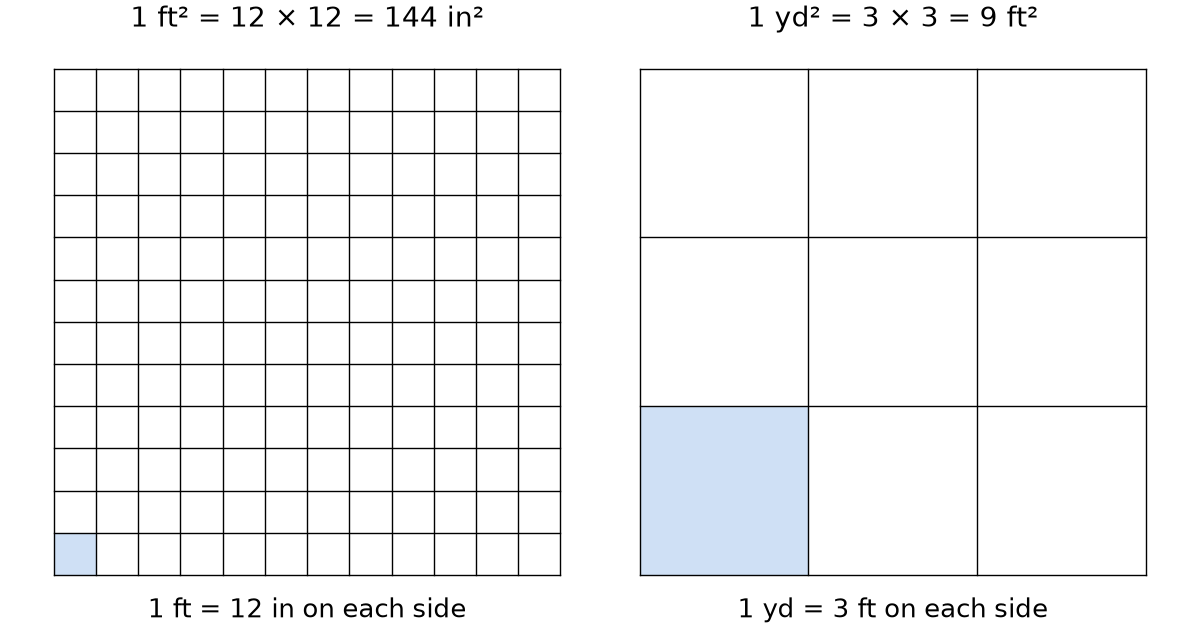
Here is the most common unit error in practical geometry. A square foot is 12 in long and 12 in wide. So it holds 12 rows of 12 square inches:
1 ft² = 12 × 12 = 144 in², not 12 in².
The same reasoning gives:
- 1 yd² = 3 × 3 = 9 ft²
- 1 m² = 100 × 100 = 10,000 cm²
- 1 cm² = 10 × 10 = 100 mm²
- 1 ft² = 0.3048 × 0.3048 = 0.09290304 m², exactly
- 1 m² = 1 ÷ 0.09290304 ≈ 10.764 ft²
The rule: to convert an area, multiply by the square of the length conversion factor. A conversion factor is the number you multiply by to change units, such as 12 for feet to inches. For area, you use it twice, once for each direction. Figure 2.2 shows why.
Worked Example 2.4 · A rug in three units
A rug is 2 m by 3 m. Find its area in square meters, square centimeters, and square feet.
Step 1 · Square meters. 2 × 3 = 6 m².
Step 2 · Square centimeters. Convert the lengths first: 200 cm × 300 cm = 60,000 cm². Or convert the area: 6 × 10,000 = 60,000 cm². Both agree. ✓
Step 3 · Square feet. 6 ÷ 0.09290304 = 64.58…, about 64.6 ft².
Check: Convert the lengths first: 2 m = 200 ÷ 30.48 = 6.562 ft and 3 m = 9.843 ft. Then 6.562 × 9.843 = 64.59 ft². ✓ (The last digit differs only because of rounding the lengths.)
In words: The rug covers 6 m², which is 60,000 cm² or about 64.6 ft². That is a bit larger than a 6 ft by 9 ft rug (54 ft²).
Worked Example 2.5 · Square yards from square feet
Some carpet is priced by the square yard. A room is 12 ft by 10 ft. What is its area in square feet, square yards, and square meters?
Step 1 · Square feet. 12 × 10 = 120 ft².
Step 2 · Square yards. 1 yd² = 9 ft², so 120 ÷ 9 = 13.33…, about 13.3 yd². A common mistake is to divide by 3, which gives 40. That would be the answer for a length, not an area.
Step 3 · Square meters. 120 × 0.09290304 = 11.148…, about 11.1 m².
Check: In yards, the room is 4 yd by 3 1/3 yd, and 4 × 10/3 = 40/3 = 13.33 yd². ✓
In words: The room is 120 ft², about 13.3 yd² or 11.1 m². If carpet costs a certain amount per square yard, you need 13.3 of them, not 40, plus an allowance for waste.
Check yourself 2.5 Convert 5 m² to square centimeters, and 288 in² to square feet. Answer: 5 × 10,000 = 50,000 cm². 288 ÷ 144 = 2 ft².
Good stopping point.
2.6 Choosing a tool and a unit
Pick the tool and unit to suit the job:
| Job | Tool | Sensible unit and precision |
|---|---|---|
| A pencil, a phone, a picture | ruler | nearest mm or 1/16 in |
| A wall, a room, a doorway | tape measure | nearest mm, or nearest 1/8 in |
| A yard or a garden | long tape, or pacing for a rough check | nearest cm, or nearest inch |
| A trail or a road | map or odometer | nearest 0.1 km or 0.1 mi |
Tape measure tips.
- The metal hook at the end slides a little on purpose. It moves by its own thickness, so the reading is correct whether you hook it over an edge (pulling) or push it against a wall.
- For an inside measurement, such as the width of a window opening, push the tape into one side, bend it into the corner, and read it there. Or read the case length printed on the tape’s housing and add it.
- Keep the tape straight and pulled tight. A tape that sags or bends around an obstacle reads long.
- Measure twice, and write down the number with its unit straight away.
Precision is the size of the smallest step you can read on your tool. A tape marked in sixteenths has a precision of 1/16 in, and a metric tape has a precision of 1 mm. Chapter 11 shows how to use precision to say how much a measurement can be trusted.
Check yourself 2.6 You measure a room with a tape and get “3 4.” What is missing? Answer: The units. It could be 3 m 4 cm, 3 ft 4 in, or 3.4 m. Write “3.04 m” or “3 ft 4 in” so no one has to guess.
Good stopping point.
Practical activity · Measure a sheet of paper both ways
Time: about 30 minutes. Materials: a ruler marked in cm and inches, a sheet of printer paper, a calculator, and a tape measure if you have one.
- Measure the long and short sides of the paper in millimeters. Write each with its unit.
- Measure the same sides in inches, to the nearest 1/16 in.
- Convert your inch readings to millimeters (multiply by 25.4). Do they agree with your metric readings to within about 1 mm? If you have US Letter paper, the package says 8 1/2 by 11 inches. Does your measurement agree?
- Find the area of the sheet in cm² and in in². Convert your cm² answer to in² by dividing by 2.54 × 2.54 = 6.4516. Compare it with your in² answer.
- With a tape, measure the width of a doorway in both units. Convert one to the other and check.
- Bonus: Measure your hand span (thumb tip to little-finger tip, stretched). It makes a handy rough ruler for quick estimates.
Reflect. Which measurement was easiest to read precisely? Which was hardest, and why?
Common mistakes
- Leaving off the unit. Write the unit on every measurement and every answer.
- Reading from the end of the ruler instead of the zero mark. The end is often worn or has a margin.
- Treating inches as tenths of a foot. 10 ft 9 in is 10.75 ft, not 10.9 ft.
- Converting area with the length factor. 1 ft² = 144 in², and 1 m² = 10,000 cm². Square the factor.
- Rounding too early. Keep the exact factor 2.54 until the end, then round once.
- Mixing units in one calculation. Convert 10 ft 9 in to 129 in (or 10.75 ft) before you multiply.
Going further (optional) · Formula review: area conversion
If 1 unit A = f units B for length, then 1 square unit A = f² square units B. For volume (Chapter 10), it is f³ cubic units B.
| Length factor f | Area factor f² | Volume factor f³ |
|---|---|---|
| 1 ft = 12 in | 1 ft² = 144 in² | 1 ft³ = 1,728 in³ |
| 1 yd = 3 ft | 1 yd² = 9 ft² | 1 yd³ = 27 ft³ |
| 1 m = 100 cm | 1 m² = 10,000 cm² | 1 m³ = 1,000,000 cm³ |
| 1 in = 2.54 cm | 1 in² = 6.4516 cm² | 1 in³ = 16.387064 cm³ |
All of these are exact. The acre is 43,560 ft², so 1 acre = 43,560 × 0.09290304 ≈ 4,046.9 m², about 0.405 ha.
Summary
- Every measurement needs a unit of length or of area. Metric: millimeters, centimeters, meters. US: inches, feet, yards.
- 1 in = 2.54 cm is an exact conversion. So are 1 ft = 30.48 cm and 1 yd = 91.44 cm.
- Write mixed units in a single unit before calculating. Inches are twelfths of a foot.
- Area is counted in square units: cm², square foot (ft²), square meter (m²). Large areas use the acre (43,560 ft²) and the hectare (10,000 m²).
- To convert area, square the conversion factor: 1 ft² = 144 in², 1 yd² = 9 ft², 1 m² = 10,000 cm².
- Precision is the smallest step you can read on a tool.
Key terms: unit of length · millimeter · centimeter · meter · inch · foot · exact conversion · mixed units · area · square units · square foot · square meter · acre · hectare · conversion factor · precision
Review questions
Questions 1 to 6 practice single skills. Questions 7 to 9 combine them.
- Write 4.6 cm in millimeters and 2,350 mm in meters.
- Write 3 5/8 in as a decimal and then in centimeters.
- Write 8 ft 3 in in inches, in decimal feet, and in meters.
- A shelf is 90 cm long. How long is it in inches, to the nearest 1/16 in?
- A tile is 12 in by 12 in. What is its area in square inches and in square feet?
- Convert 3 yd² to square feet and 25,000 cm² to square meters.
- A room is 4.2 m by 3.5 m. Find its area in m² and in ft². Check your ft² answer by converting the lengths first.
- A garden is 66 ft by 660 ft. What fraction of an acre is it?
- A student says a 2 m by 2 m square has an area of 400 cm², because “2 m is 200 cm and 200 + 200 = 400.” Find the correct area in cm² and explain both mistakes.
Explained answers
1. 4.6 × 10 = 46 mm. 2,350 ÷ 1,000 = 2.35 m.
2. 5 ÷ 8 = 0.625, so 3.625 in. 3.625 × 2.54 = 9.2075 cm, about 9.21 cm.
3. 8 × 12 + 3 = 99 in. 3 in is 0.25 ft, so 8.25 ft. 99 × 2.54 = 251.46 cm = 2.5146 m, about 2.51 m. Check: 8.25 × 0.3048 = 2.5146. ✓
4. 90 ÷ 2.54 = 35.433 in. The decimal part is 0.433 × 16 = 6.9 sixteenths, which rounds to 7/16. So about 35 7/16 in. Check: 35.4375 × 2.54 = 90.01 cm. ✓
5. 12 × 12 = 144 in², which is exactly 1 ft².
6. 3 × 9 = 27 ft². 25,000 ÷ 10,000 = 2.5 m².
7. 4.2 × 3.5 = 14.7 m². In square feet, 14.7 ÷ 0.09290304 = 158.23, about 158.2 ft². Check with lengths: 4.2 m = 420 ÷ 30.48 = 13.780 ft, and 3.5 m = 11.483 ft. Then 13.780 × 11.483 = 158.24 ft². ✓ The last digit differs only because the lengths were rounded.
8. 66 × 660 = 43,560 ft², which is exactly 1 acre. (This is close to the old definition: an acre was a strip one furlong, 660 ft, long and one chain, 66 ft, wide.)
9. 200 cm × 200 cm = 40,000 cm². The first mistake is adding the sides instead of multiplying them. Adding gives part of the perimeter, not the area. The second mistake is the unit: 400 cm would be a length. Check with the area factor: 2 × 2 = 4 m², and 4 × 10,000 = 40,000 cm². ✓
Connections
- Chapter 3 uses square units to find the areas of rooms and walls, and contrasts them with perimeter.
- Chapter 10 extends the squared factor to the cubed factor for volume.
- Chapter 11 turns precision into a stated uncertainty.
- Other MORI books: U01 Ratios, Proportions, and Percent introduced unit rates and conversion factors. U22 Measure and Lay Out Before Making practices tape measure technique on real projects.
Sources consulted for scope and accuracy: NIST Handbook 44, Appendix C, “General Tables of Units of Measurement” (1 in = 2.54 cm exactly; 1 acre = 43,560 ft²), https://www.nist.gov/pml/owm/nist-handbook-44-current-edition; NIST Special Publication 811, https://www.nist.gov/pml/special-publication-811 (both checked October 23, 2026); OpenStax, Prealgebra 2e, https://openstax.org/details/books/prealgebra-2e, CC BY 4.0. All examples and exercises are original to MORI University. The pencil, rug, and room measurements are illustrative.
Chapter 3 · Perimeter versus Area
U03 Geometry: Measure, Diagonals, and Scale · MORI University · Foundation level
Time needed: about 80 minutes in total, in six short sections, plus 30 minutes for the activity. Each section ends at a good place to stop. You need: a pencil, graph paper, a ruler, a calculator, and 24 small identical squares (cut from card) or a piece of string about 30 cm long.
Learning goals
By the end of this chapter, you will be able to:
- Find the perimeter and area of rectangles and squares, with the correct units.
- Show that shapes with the same perimeter can have different areas, and the other way around.
- Decide whether a practical job needs a perimeter, an area, or both.
- Find the wall area of a room from its perimeter and height, allowing for doors and windows.
- Estimate the area of an irregular shape by counting grid squares.
Start here
You have 24 meters of fencing for a vegetable bed. You could make a long thin bed 1 m wide and 11 m long. Or you could make a square, 6 m on each side. Both use exactly 24 m of fence. Which one gives you more ground to grow in?
Many people guess “the same,” because the fence is the same. It isn’t. The long thin bed holds 11 m² and the square holds 36 m², more than three times as much ground. Perimeter and area measure different things, and confusing them is one of the most expensive mistakes in home projects. You buy fencing, trim, and baseboard by length around the edge. You buy paint, flooring, and seed by the area they cover.
3.1 Perimeter: the distance around
The perimeter of a flat shape is the total length of its boundary. Imagine walking all the way around the edge: the distance you walk is the perimeter. It is a length, so it is measured in m, ft, cm, or in.
A rectangle is a four-sided shape with four right angles. Its opposite sides are equal. The two side lengths are often called the length and the width, and together they are the rectangle’s dimensions. A square is a rectangle with all four sides equal.
For a rectangle with length l and width w:
Perimeter = l + w + l + w = 2 × (l + w)
For a square with side s, the perimeter is 4 × s.
Worked Example 3.1 · A bedroom floor
A bedroom floor is a rectangle 12 ft by 10 ft. Find its perimeter in feet and in meters.
Step 1 · Add the four sides. 12 + 10 + 12 + 10 = 44 ft.
Step 2 · Use the formula as a check. 2 × (12 + 10) = 2 × 22 = 44 ft. ✓
Step 3 · Meters. 44 × 0.3048 = 13.4112 m, about 13.4 m.
Check: Convert the sides first: 12 ft = 3.6576 m and 10 ft = 3.048 m. Then 2 × (3.6576 + 3.048) = 13.4112 m. ✓
In words: Walking once around the edge of the floor covers 44 ft, about 13.4 m.
Check yourself 3.1 A square tablecloth is 1.5 m on each side. What is its perimeter? Answer: 4 × 1.5 = 6 m.
Good stopping point.
3.2 Area of rectangles and squares
You saw in Chapter 2 that a rectangle 3 cm by 2 cm holds 3 × 2 = 6 one-centimeter squares. In general:
Area of a rectangle = l × w
Area of a square = s × s = s²
The answer is in square units, because two lengths were multiplied: ft × ft = ft², and m × m = m².
The bedroom in Worked Example 3.1 has area 12 × 10 = 120 ft². In metric, 3.6576 × 3.048 = 11.148… m², about 11.1 m². This matches Worked Example 2.5. ✓
Area also works backward. If you know the area and one side, divide to find the other. A rectangular patio of 18 m² that is 4 m long must be 18 ÷ 4 = 4.5 m wide.
Check yourself 3.2 A rectangular rug has area 24 ft² and is 6 ft long. How wide is it, and what is its perimeter? Answer: Width 24 ÷ 6 = 4 ft. Perimeter 2 × (6 + 4) = 20 ft.
Good stopping point.
3.3 Same perimeter, different area
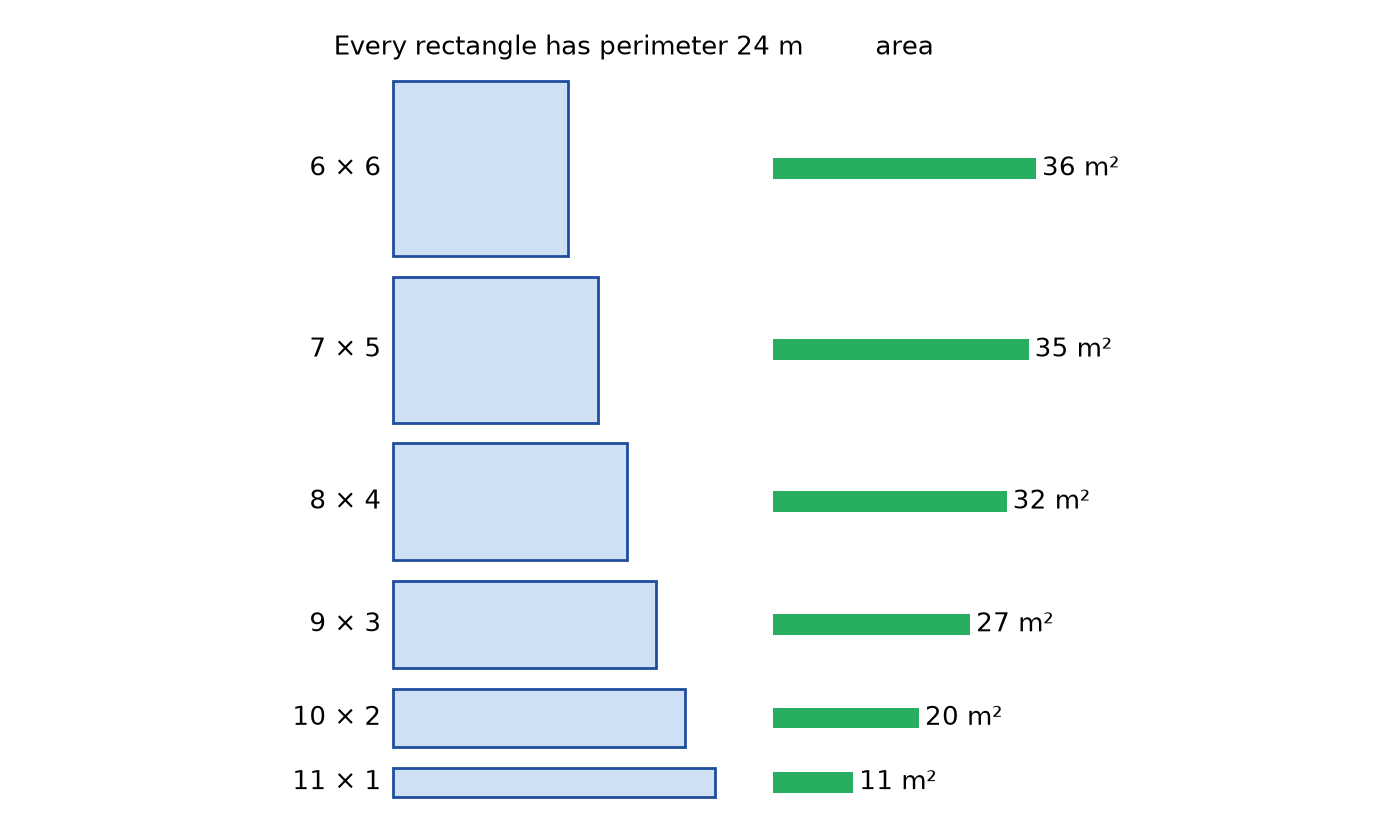
Back to the 24 m of fencing. A rectangle with perimeter 24 m has l + w = 12 m. Here are the whole-number choices:
| Length (m) | Width (m) | Perimeter (m) | Area (m²) |
|---|---|---|---|
| 11 | 1 | 24 | 11 |
| 10 | 2 | 24 | 20 |
| 9 | 3 | 24 | 27 |
| 8 | 4 | 24 | 32 |
| 7 | 5 | 24 | 35 |
| 6 | 6 | 24 | 36 |
Every rectangle uses the same fence, but the area ranges from 11 m² to 36 m². The closer the rectangle is to a square, the more area it encloses. Figure 3.1 shows the six beds drawn to the same scale.
Worked Example 3.2 · A bed against a wall
You want a vegetable bed against a long garden wall, so the wall forms one side and you only fence three sides. You still have 24 m of fencing. Compare a bed 6 m along the wall (sticking out 9 m) with one 12 m along the wall (sticking out 6 m).
Step 1 · Check each uses 24 m of fence. For the first: 6 + 9 + 9 = 24 m. ✓ For the second: 12 + 6 + 6 = 24 m. ✓
Step 2 · Areas. First: 6 × 9 = 54 m². Second: 12 × 6 = 72 m².
Check: Try one more: 8 m along the wall, sticking out 8 m, uses 8 + 8 + 8 = 24 m and encloses 64 m². That is between the other two, so 72 m² is the best of these three. ✓
In words: With a wall as one side, a bed 12 m long and 6 m deep gives the most ground of the three, 72 m². A square isn’t always best. It depends on which sides you have to pay for.
Check yourself 3.3 A rectangle has perimeter 20 cm. What is the largest area it can have, and what shape gives it? Answer: A square, 5 cm by 5 cm, with area 25 cm². (For example, 6 by 4 gives only 24 cm².)
Good stopping point.
3.4 Same area, different perimeter
Now turn it around. Arrange 36 one-foot-square patio stones into a solid rectangle. The area is always 36 ft², but the edging around the outside changes:
| Length (ft) | Width (ft) | Area (ft²) | Perimeter (ft) |
|---|---|---|---|
| 36 | 1 | 36 | 74 |
| 18 | 2 | 36 | 40 |
| 12 | 3 | 36 | 30 |
| 9 | 4 | 36 | 26 |
| 6 | 6 | 36 | 24 |
A long thin path needs more than three times as much edging as a square patio of the same area (74 ft against 24 ft). Once again the square is the extreme case. For a fixed area, a square has the smallest perimeter of any rectangle.
Check yourself 3.4 Two rectangles each have area 16 m². One is 8 m by 2 m and the other is 4 m by 4 m. Find both perimeters. Answer: 2 × (8 + 2) = 20 m and 4 × 4 = 16 m.
Good stopping point.
3.5 Which one does the job need?
Before calculating, ask: am I covering a surface or going around an edge?
| The job | It needs | Unit |
|---|---|---|
| fence, edging, baseboard, crown molding, weatherstrip | perimeter (length) | ft, m |
| carpet, flooring, tiles, sod, seed, fertilizer | floor area | ft², m² |
| paint, wallpaper | wall area | ft², m² |
| a rug that leaves a border | dimensions (both lengths) | ft, m |
Worked Example 3.3 · Baseboard for the bedroom
The 12 ft by 10 ft bedroom has one doorway 3 ft wide in a 10 ft wall. Baseboard is sold in 8 ft lengths. How many lengths do you need?
Step 1 · Perimeter. 44 ft, from Worked Example 3.1.
Step 2 · Subtract the doorway. No baseboard goes across the doorway: 44 − 3 = 41 ft.
Step 3 · First estimate. 41 ÷ 8 = 5.125, so at least 6 lengths.
Step 4 · Plan the cuts. Each wall needs its own pieces, so check that 6 lengths really work:
| Length | Cut into | Used for |
|---|---|---|
| 1 | 8 ft | first 12 ft wall |
| 2 | 8 ft | second 12 ft wall |
| 3 | 8 ft | full 10 ft wall |
| 4 | 4 ft + 4 ft | rest of both 12 ft walls |
| 5 | 2 ft + 5 ft | rest of the 10 ft wall, and one side of the doorway |
| 6 | 2 ft | other side of the doorway |
Check: The pieces add to 8 + 8 + 8 + 8 + 7 + 2 = 41 ft. ✓ The last length has 6 ft left over.
In words: Buy 6 lengths of baseboard. Dividing alone gave the right count here, but planning the cuts confirms it, because a short piece left on one wall can’t be used on another if it’s too short.
Good stopping point.
3.6 Wall area: perimeter times height
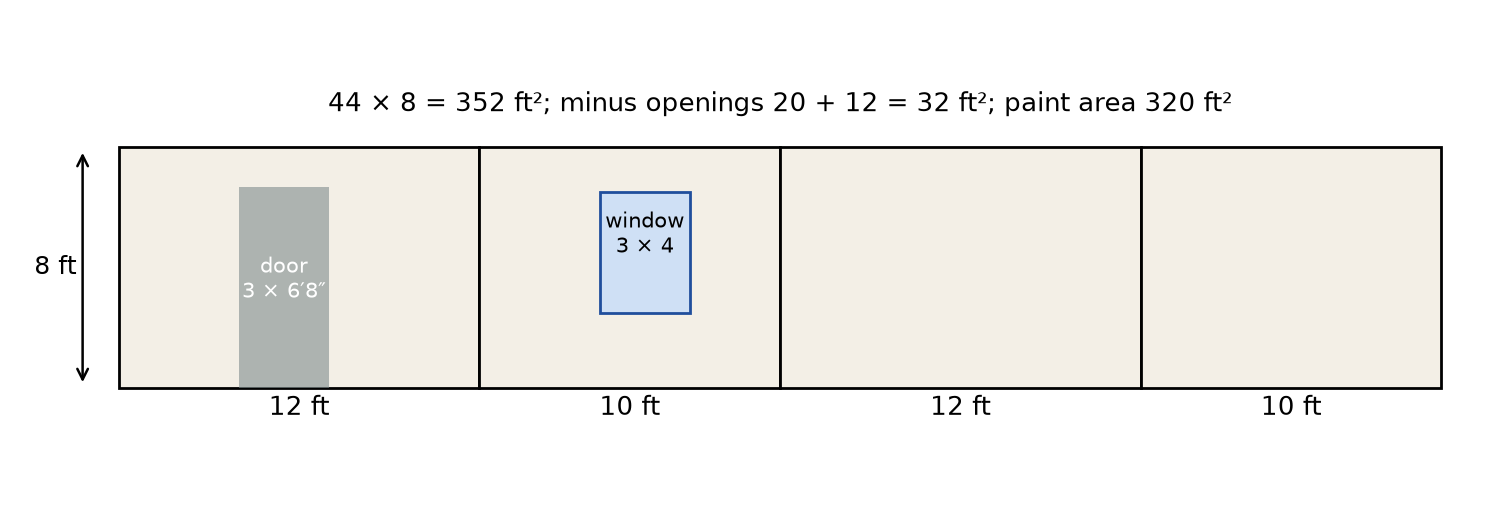
Here is a neat link between perimeter and area. Imagine peeling the four walls off a room and laying them flat in a row. They form one long rectangle. Its length is the room’s perimeter, and its height is the wall height. Figure 3.2 shows this.
Wall area = perimeter × wall height
Then subtract the openings (doors and windows) that you won’t paint.
Worked Example 3.4 · Paint for the bedroom
The bedroom (12 ft by 10 ft) has walls 8 ft high. It has one door 3 ft wide and 6 ft 8 in tall, and one window 3 ft wide and 4 ft tall. You’ll apply two coats. The paint label says one gallon covers about 350 ft² per coat. (That is an illustrative figure. Check your can.) How many gallons do you need?
Step 1 · Wall area. 44 × 8 = 352 ft².
Step 2 · Openings. Door: 6 ft 8 in = 6 2/3 ft, so 3 × 6 2/3 = 20 ft². Window: 3 × 4 = 12 ft². Total: 20 + 12 = 32 ft².
Step 3 · Paint area. 352 − 32 = 320 ft².
Step 4 · Two coats. 2 × 320 = 640 ft² of coverage.
Step 5 · Gallons. 640 ÷ 350 = 1.83. You can’t buy 1.83 gallons, so buy 2 gallons.
Check: 2 gallons cover 2 × 350 = 700 ft², which is more than the 640 ft² needed. One and a half gallons (a gallon and two quarts) would cover only 525 ft², which is not enough. ✓
Metric: 352 ft² × 0.09290304 ≈ 32.7 m² of wall, and 320 ft² ≈ 29.7 m² to paint.
In words: The walls have about 320 ft² to paint. Two coats need about 1.83 gallons of paint at the stated coverage, so buy 2 gallons.
The coverage rate (here, 350 ft² per gallon) is a rate in area per unit of paint. Like every rate in U01 Ratios, Proportions, and Percent, it lets you go from one quantity to the other by multiplying or dividing.
Check yourself 3.5 A room’s walls have a perimeter of 15 m and a height of 2.4 m. Openings total 4 m². What is the area to paint? Answer: 15 × 2.4 = 36 m², and 36 − 4 = 32 m².
Good stopping point.
3.7 Estimating irregular areas by counting squares
Not every shape is a rectangle. To estimate the area of a pond, a leaf, or a puddle on a plan, trace it onto graph paper and count:
- Count the squares that are completely inside the shape.
- Count the squares that are partly inside.
- Estimate: area ≈ full squares + half the partial squares.
The idea is that, on average, a square cut by the boundary is about half inside. This is a model, and it works better with smaller squares.
Worked Example 3.5 · A leaf on centimeter paper
You trace a leaf onto 1 cm graph paper. You count 18 full squares and 12 partial squares.
Step 1 · Apply the rule. 18 + 12 ÷ 2 = 18 + 6 = 24 cm².
Step 2 · Find the limits. The leaf is at least 18 cm² (the full squares alone) and at most 18 + 12 = 30 cm² (if every partial square counted fully).
Check: 24 cm² lies between 18 and 30 cm². ✓
In words: The leaf’s area is about 24 cm², and certainly between 18 and 30 cm². Tracing it on 5 mm paper would narrow that range.
Good stopping point.
Practical activity · One fence, many fields
Time: about 30 minutes. Materials: graph paper, a ruler, a pencil, and 24 card squares or a 24 cm loop of string.
- On 1 cm graph paper, draw every rectangle with whole-number sides and a perimeter of 24 cm. Label each with its area. Do your results match the table in Section 3.3?
- Close your string loop (24 cm around) and shape it on the graph paper into a rectangle, then a square, then a rough circle. Estimate each area by counting squares. Which shape holds the most? (You’ll check the circle in Chapter 5.)
- Arrange 24 card squares into every possible solid rectangle. For each, record the perimeter. Which has the shortest perimeter?
- Measure one wall of a room in your home, and the door or window in it, with a tape. Find the wall’s paintable area in both ft² and m².
Reflect. Write one sentence explaining to a friend why “same fence, same field” is false.
Common mistakes
- Mixing up perimeter and area. Perimeter is a length (ft, m). Area is in square units (ft², m²).
- Adding the sides for area or multiplying for perimeter. Area of a rectangle is l × w. Perimeter is 2 × (l + w).
- Forgetting openings. No baseboard goes across a doorway, and no paint goes on a window.
- Forgetting coats. Two coats need twice the coverage.
- Rounding paint or material down. You can’t buy 1.83 gallons. Round up to what you can buy, and check that it covers the need.
- Assuming the same perimeter means the same area, or the other way around.
Going further (optional) · Formula review, and why the square wins
Formulas. Rectangle: P = 2(l + w), A = l × w. Square: P = 4s, A = s². Walls of a rectangular room: wall area = P × h, minus openings.
Why the square encloses the most for a fixed perimeter. Suppose the perimeter is P, so l + w = P/2. Write the sides as l = P/4 + d and w = P/4 − d, where d is how far each side is from a square’s side. Then
A = (P/4 + d)(P/4 − d) = (P/4)² − d².
The area is largest when d = 0, which is the square. Test it with P = 24: (24/4)² − d² = 36 − d². For the 7 by 5 bed, d = 1, and 36 − 1 = 35 m². ✓ For the 11 by 1 bed, d = 5, and 36 − 25 = 11 m². ✓ The multiplication step uses the distributive property from U02 Algebra: Expressions, Equations, and Models.
Summary
- Perimeter is the distance around a shape, measured in length units.
- A rectangle has four right angles. A square is a rectangle with equal sides. Its two dimensions are its length and width.
- Rectangle: perimeter = 2 × (l + w), area = l × w.
- The same perimeter can enclose different areas, and the same area can have different perimeters. For rectangles, the square gives the most area for a given perimeter.
- Edges (fencing, baseboard) need perimeter. Surfaces (paint, flooring) need area.
- Wall area = perimeter × height, minus openings. A coverage rate turns area into an amount of material.
- Irregular areas: count full squares plus half the partial squares to make a grid estimate.
Key terms: perimeter · rectangle · square · dimensions · wall area · coverage rate · grid estimate
Review questions
Questions 1 to 6 practice single skills. Questions 7 to 9 combine them.
- Find the perimeter and area of a rectangle 9 m by 4 m.
- A square has a perimeter of 30 in. Find its side and its area.
- A rectangular patio has area 21 m² and width 3.5 m. Find its length.
- Say whether each job needs perimeter or area: (a) weatherstrip around a door, (b) sod for a lawn, (c) a wallpaper border at the top of a wall, (d) floor tiles.
- On 1 cm grid paper, a puddle covers 30 full squares and 16 partial squares. Estimate its area, and give the smallest and largest it could be.
- A rectangle has perimeter 36 ft. List three possible pairs of whole-number dimensions and their areas.
- A room is 14 ft by 11 ft with walls 8 ft high. It has two windows, each 3 ft by 5 ft, and one door 3 ft by 6 ft 8 in. Find the paintable wall area, and the number of gallons for two coats at 350 ft² per gallon.
- A rectangular garden 10 m by 6 m is surrounded by a path 1 m wide. Find the area of the path alone. (Hint: find the area of the big rectangle, including the path, and subtract.)
- A friend says, “My new room has twice the perimeter of my old room, so it has twice the floor area.” The old room was 10 ft by 10 ft and the new one is 20 ft by 20 ft. Is the friend right? Explain with numbers.
Explained answers
1. Perimeter 2 × (9 + 4) = 26 m. Area 9 × 4 = 36 m².
2. Side 30 ÷ 4 = 7.5 in. Area 7.5 × 7.5 = 56.25 in².
3. 21 ÷ 3.5 = 6 m. Check: 6 × 3.5 = 21. ✓
4. (a) perimeter, (b) area, (c) perimeter (a length along the top of the walls), (d) area.
5. 30 + 16 ÷ 2 = 38 cm². At least 30 cm² and at most 30 + 16 = 46 cm².
6. l + w = 18. For example: 17 by 1 (area 17 ft²), 12 by 6 (72 ft²), and 9 by 9 (81 ft²). Any whole-number pair adding to 18 is correct, and 9 by 9 gives the largest area.
7. Perimeter 2 × (14 + 11) = 50 ft. Wall area 50 × 8 = 400 ft². Openings: windows 2 × 3 × 5 = 30 ft², and the door 3 × 6 2/3 = 20 ft², so 50 ft² in all. Paintable area 400 − 50 = 350 ft². Two coats: 700 ft², and 700 ÷ 350 = 2 gallons exactly. Since there’s no spare, you might buy an extra quart for touch-ups.
8. With the path, the outer rectangle is (10 + 2) by (6 + 2) = 12 m by 8 m, because the path adds 1 m on each side. Outer area 12 × 8 = 96 m². Garden 10 × 6 = 60 m². Path 96 − 60 = 36 m². Check by pieces: two long strips 12 × 1 = 12 m² each, and two short strips 6 × 1 = 6 m² each, give 12 + 12 + 6 + 6 = 36 m². ✓
9. No. Old room: perimeter 40 ft, area 100 ft². New room: perimeter 80 ft, which is twice as long, but area 400 ft², which is 4 times as large. Doubling both dimensions multiplies the area by 2 × 2 = 4. Chapter 10 explains this in general.
Connections
- Chapter 6 finds areas and perimeters of L-shaped rooms and other composite shapes, and shows that the perimeter of a combined shape is not the sum of the parts’ perimeters.
- Chapter 10 explains Question 9: doubling lengths quadruples areas.
- Chapter 12’s project uses perimeter for baseboard and wall area for paint.
- Other MORI books: U01 Ratios, Proportions, and Percent covers rates such as coverage per gallon and waste allowances. U22 Measure and Lay Out Before Making estimates materials on real jobs.
Sources consulted for scope and accuracy: OpenStax, Prealgebra 2e, Section 9.4, “Use Properties of Rectangles, Triangles, and Trapezoids,” https://openstax.org/details/books/prealgebra-2e, CC BY 4.0; OpenStax, Contemporary Mathematics, Sections 10.4 and 10.6, https://openstax.org/details/books/contemporary-mathematics, CC BY 4.0 (checked October 23, 2026). All examples and exercises are original to MORI University. Room sizes and the paint coverage rate of 350 ft² per gallon are illustrative. Check the label on your paint.
Chapter 4 · Triangles and Quadrilaterals
U03 Geometry: Measure, Diagonals, and Scale · MORI University · Foundation level
Time needed: about 80 minutes in total, in six short sections, plus 30 minutes for the activity. Each section ends at a good place to stop. You need: a pencil, paper, scissors, a ruler, a protractor, and a calculator. Three or four drinking straws (or strips of card) and some string help in Section 4.6.
Learning goals
By the end of this chapter, you will be able to:
- Classify triangles by their sides and by their angles.
- Use the fact that a triangle’s angles add to 180°, and a quadrilateral’s to 360°, to find a missing angle.
- Decide whether three lengths can make a triangle.
- Find the area of a triangle, parallelogram, and trapezoid using a base and its perpendicular height.
- Name the common quadrilaterals and describe their properties.
- Explain why triangles are rigid and four-sided frames are not.
Start here
Look at a bridge, a crane, a bicycle frame, or the roof trusses in a garage. You’ll see triangles everywhere. Now look at a wooden gate. It probably has a diagonal brace across its rectangle of rails. Without it, the gate would sag into a slanted shape within a few years.
Triangles and four-sided shapes are the workhorses of practical geometry. Rooms, lots, tabletops, and windows are four-sided. Triangles appear when you split those shapes up, when you brace them, and, from Chapter 7 on, when you check whether they’re square.
4.1 Naming triangles
A triangle is a flat shape with three straight sides and three corners (vertices). Triangles are named by their sides and by their angles.
By sides:
- An equilateral triangle has all three sides equal.
- An isosceles triangle has at least two sides equal.
- A scalene triangle has no two sides equal.
By angles:
- An acute triangle has all three angles acute.
- A right triangle has one right angle. The side opposite the right angle is the longest side, called the hypotenuse. The other two sides are the legs.
- An obtuse triangle has one obtuse angle.
One triangle can have a name of each kind: a “right isosceles triangle” has a right angle and two equal legs, like a square cut corner to corner.
Check yourself 4.1 A triangle has sides 5 cm, 5 cm, and 8 cm. Name it by its sides. Answer: Isosceles, because two sides are equal.
Good stopping point.
4.2 The angles of a triangle add to 180°
Draw any triangle, cut it out, and tear off its three corners. Fit the three torn corners together so their points meet. They always form a straight line, as in Figure 4.1. Since a straight angle is 180° (Chapter 1), the angles of any triangle add to 180°.
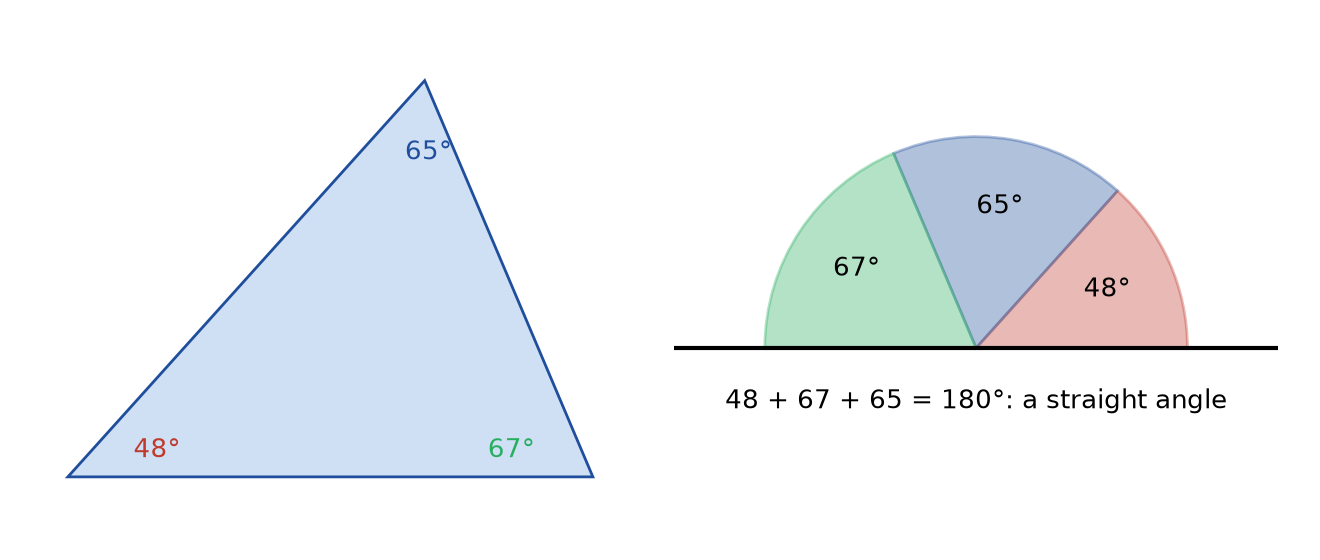
Tearing corners is an experiment, and an experiment only shows the fact for the triangles you tried. The Going further box at the end of this chapter shows why it must be true for every triangle.
Worked Example 4.1 · The missing angle
A triangle has angles of 48° and 67°. Find the third.
Step 1 · Subtract from 180°. 180 − 48 − 67 = 65°.
Check: 48 + 67 + 65 = 180. ✓
In words: The third angle is 65°. All three angles are acute, so it is an acute triangle.
Two quick consequences.
- In a right triangle, the two other angles add to 180 − 90 = 90°. So they are both acute.
- In an equilateral triangle, all three angles are equal, so each one is 180 ÷ 3 = 60°.
Check yourself 4.2 A right triangle has one angle of 35°. What are the other two? Answer: 90° (the right angle) and 90 − 35 = 55°. Check: 90 + 35 + 55 = 180. ✓
Good stopping point.
4.3 Which lengths make a triangle?
Take three sticks. Can you always make a triangle from them? No. If two of them are very short, they can’t reach each other across the long one.
The triangle inequality: in any triangle, each side is shorter than the other two added together. The quick test is to check the longest side: the two shorter sides must add to more than the longest.
Worked Example 4.2 · Testing three sets of sticks
Can each set of lengths make a triangle? (a) 3, 4, 8 cm. (b) 5, 6, 10 cm. (c) 4, 6, 10 cm.
Step 1 · (a) 3 + 4 = 7, which is less than 8. No triangle. The short sides can’t meet.
Step 2 · (b) 5 + 6 = 11, which is more than 10. Yes.
Step 3 · (c) 4 + 6 = 10, which equals 10. No triangle. The two short sticks would lie flat along the long one, making a straight line with no height.
Check: In (b), test the other pairs too: 5 + 10 = 15 > 6 and 6 + 10 = 16 > 5. ✓ Checking the longest side is enough, because the other two tests always pass.
In words: Only set (b) makes a triangle.
A practical use: the shortest path between two points is the straight segment. Going via a third point is longer unless that point lies on the segment. This is why diagonal shortcuts across a lawn wear paths.
Check yourself 4.3 Can 7 m, 7 m, and 13 m make a triangle? Answer: Yes. 7 + 7 = 14, which is more than 13.
Good stopping point.
4.4 Area of a triangle: half the rectangle
Any triangle fits inside a rectangle with the same base and height, and it fills exactly half of it. Figure 4.2 shows why: a line from the top corner straight down to the base splits the rectangle into two smaller rectangles, and the triangle takes half of each.
Area of a triangle = ½ × base × height
The base can be any side. The height is the distance from the base to the opposite corner, measured at right angles to the base. It is not the slanted side, unless the triangle has a right angle at the base. When the triangle leans over, the height may fall outside it, and you measure to the extended base line.
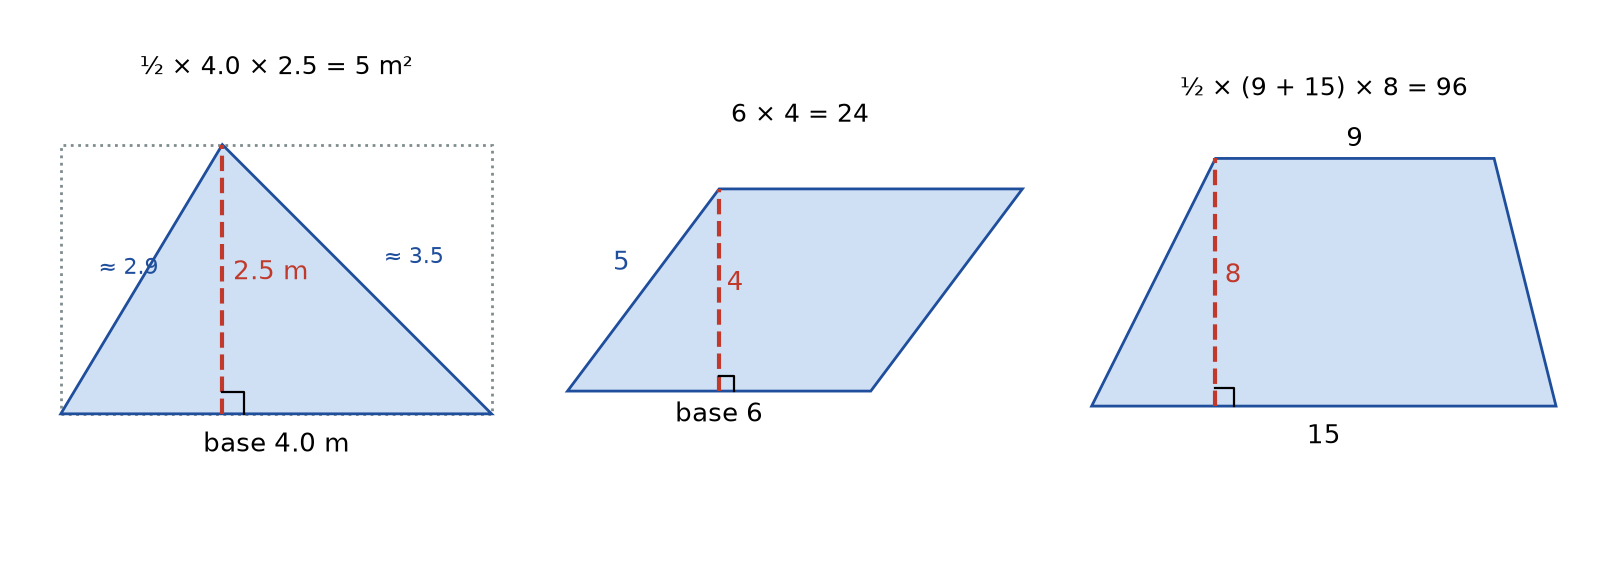
Worked Example 4.3 · A triangular garden bed
A garden bed is a triangle with a base of 4.0 m along a fence. The far corner is 2.5 m from the fence, measured at right angles to it. The two slanted sides measure about 2.9 m and 3.5 m. Find the area.
Step 1 · Choose base and height. Base 4.0 m. The height is the 2.5 m measured at right angles. The slanted sides are not needed for the area.
Step 2 · Calculate. ½ × 4.0 × 2.5 = 5 m².
Check: The surrounding rectangle is 4.0 × 2.5 = 10 m², and the triangle is half of it: 10 ÷ 2 = 5 m². ✓
Metric to US: 5 ÷ 0.09290304 ≈ 53.8 ft².
In words: The bed covers 5 m², about 54 ft². Using a slanted side instead of the height would have given too large an answer.
Check yourself 4.4 A triangle has base 10 in and height 7 in. What is its area? Answer: ½ × 10 × 7 = 35 in².
Good stopping point.
4.5 Quadrilaterals
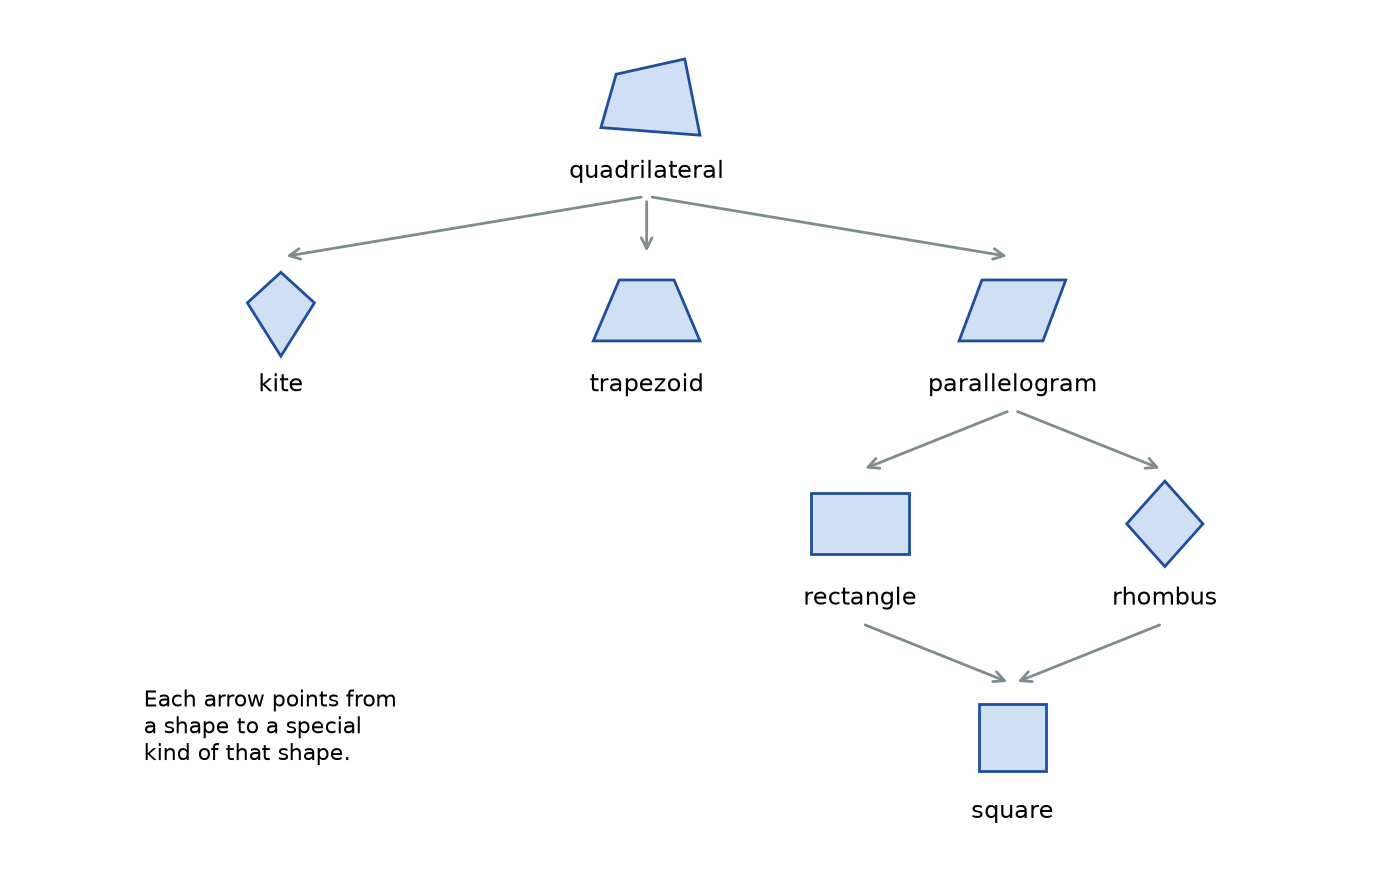
A quadrilateral is a flat shape with four straight sides. The family members you’ll meet most often are these:
| Shape | What makes it that shape |
|---|---|
| parallelogram | two pairs of parallel sides; opposite sides equal; opposite angles equal |
| rectangle | a parallelogram with four right angles |
| rhombus | a parallelogram with four equal sides |
| square | a rectangle and a rhombus: four equal sides and four right angles |
| trapezoid | exactly one pair of parallel sides (some books say at least one pair) |
| kite | two pairs of equal sides next to each other, like a toy kite |
Figure 4.3 shows the family. Every square is a rectangle, and every rectangle is a parallelogram. But not every parallelogram is a rectangle. This matters in practice: a frame whose opposite sides you have measured as equal is a parallelogram, but you don’t yet know it’s a rectangle. Chapter 7 shows the extra check.
Angles of a quadrilateral add to 360°. Draw a diagonal. It splits the quadrilateral into two triangles, each with angles adding to 180°. Together that is 2 × 180° = 360°.
Worked Example 4.4 · A corner that isn’t square
A four-sided plot has three corners measured at 90°, 90°, and 110°. Find the fourth.
Step 1 · Subtract from 360°. 360 − 90 − 90 − 110 = 70°.
Check: 90 + 90 + 110 + 70 = 360. ✓
In words: The fourth corner is 70°, a sharp corner. The plot is a trapezoid, not a rectangle. Its two right-angled corners share a side, so the sides at either end of that side are both perpendicular to it, and therefore parallel to each other.
Area of a parallelogram = base × height. Slice the slanted triangle off one end and slide it to the other end. The parallelogram becomes a rectangle with the same base and height. Again, the height is measured at right angles to the base, not along the slanted side.
Area of a trapezoid = ½ × (sum of the two parallel sides) × height. Two copies of a trapezoid, one turned upside down, fit together into a parallelogram whose base is the sum of the parallel sides. The trapezoid is half of that.
Worked Example 4.5 · A trapezoid-shaped yard
A yard has two parallel sides, 9 m (at the street) and 15 m (at the back). They are 8 m apart, measured at right angles. Find the area two ways.
Step 1 · Formula. ½ × (9 + 15) × 8 = ½ × 24 × 8 = 96 m².
Step 2 · Split it. A 9 m by 8 m rectangle in the middle has area 72 m². The two triangles at the sides have bases that add to 15 − 9 = 6 m, and the same height of 8 m. Together their area is ½ × 6 × 8 = 24 m². Total: 72 + 24 = 96 m².
Check: Both methods give 96 m². ✓ In US units, 96 ÷ 0.09290304 ≈ 1,033 ft².
In words: The yard is 96 m², about 1,033 ft².
Check yourself 4.5 A parallelogram has a base of 6 ft, a slanted side of 5 ft, and a height of 4 ft. What is its area? Answer: 6 × 4 = 24 ft². The 5 ft slanted side isn’t used.
Good stopping point.
4.6 Why triangles are rigid
Make a triangle from three straws threaded on a string, and tie it tight. Try to change its shape. You can’t, without bending a straw. Now make a square from four straws. It folds flat easily, becoming a rhombus and then a thin sliver.
The reason: once three side lengths are fixed, there is only one triangle they can make (you can flip it or turn it, but its shape and angles are fixed). Four side lengths do not fix a quadrilateral. The angles can change.
This is why a diagonal brace fixes a gate, why shelving units have cross-braces on their backs, and why roof trusses are made of triangles. It is also the reason behind the 3-4-5 check in Chapter 7. If a triangle’s sides are fixed at 3, 4, and 5 units, its angles are fixed too, and one of them is a right angle.
A gate brace should run the right way. On a gate hung on the left, a wooden brace should run from the bottom of the hinge side up to the top of the latch side. That way the weight of the latch end pushes down along the brace toward the lower hinge. A brace in compression stops the sag. (A wire brace works the other way, in tension, from the top hinge down to the bottom of the latch side.)
Check yourself 4.6 Why does a rectangular bookcase without a back wobble from side to side, while one with a nailed-on back does not? Answer: The open frame is a quadrilateral, which can change its angles. The back panel acts like a diagonal brace, dividing the frame into rigid triangles.
Good stopping point.
Practical activity · Tear, measure, and brace
Time: about 30 minutes. Materials: paper, scissors, a ruler, a protractor, straws or card strips, and string.
- Tear the corners. Draw three different triangles (one acute, one right, one obtuse) with a ruler. Measure each angle with a protractor and add them up. Then cut each one out, tear off the corners, and line them up. Do they make a straight line? How close to 180° did your protractor totals come?
- Measure an area two ways. On one triangle, measure all three sides and the height to each side. Calculate ½ × base × height using each of the three sides as the base. You should get three nearly equal answers. Why aren’t they exactly equal?
- Triangle inequality. Cut straws to 3, 4, and 8 cm, and to 5, 6, and 10 cm. Which set makes a triangle?
- Rigidity. Make a triangle and a square from straws and string. Push on a corner of each. Then add a diagonal straw to the square. What happens?
Reflect. In step 2, the three answers differ slightly because each height and base has a small measurement error. The ideal triangle has one area. Chapter 11 shows how to describe that small spread honestly.
Common mistakes
- Using the slanted side as the height. The height is always measured at right angles to the base.
- Forgetting the ½ in the triangle formula. A triangle is half of its surrounding rectangle.
- Assuming equal opposite sides make a rectangle. That only proves a parallelogram.
- Adding to 360° for a triangle or 180° for a quadrilateral. Triangles: 180°. Quadrilaterals: 360°.
- Using the formula for a trapezoid with the slanted sides. The two lengths you add are the parallel sides.
- Thinking any three lengths make a triangle. Check that the two shorter sides add to more than the longest.
Going further (optional) · Formula review, and a proof of 180°
Formulas. Triangle: A = ½bh. Parallelogram: A = bh. Trapezoid: A = ½(a + b)h, with a and b the parallel sides. Angle sums: triangle 180°, quadrilateral 360°, and any polygon with n sides (n − 2) × 180°.
Why a triangle’s angles always add to 180°. Through the top corner of a triangle, draw a line parallel to the base. At the top corner, three angles now sit along that straight line, so they add to 180°. The middle one is the triangle’s top angle. When a line crosses two parallel lines, it makes equal alternate angles on opposite sides, in a Z shape. So the left angle at the top equals the triangle’s bottom-left angle, and the right one equals its bottom-right angle. The three angles of the triangle are exactly the three angles along the straight line, so they add to 180°. This argument works for every triangle, which is why the result is established, not just observed.
Test the polygon rule. A pentagon (n = 5): (5 − 2) × 180 = 540°. A hexagon (n = 6): 4 × 180 = 720°, so each angle of a regular hexagon, like a honeycomb cell, is 720 ÷ 6 = 120°.
Summary
- A triangle has three sides. Name it by sides (equilateral, isosceles, scalene) and by angles (acute, right triangle, obtuse). The hypotenuse is the side opposite the right angle.
- A triangle’s angles add to 180°. A quadrilateral’s add to 360°.
- Triangle inequality: the two shorter sides must add to more than the longest.
- Triangle area = ½ × base × height, with the height at right angles to the base.
- Parallelogram area = base × height. Trapezoid area = ½ × (sum of parallel sides) × height.
- Squares are rectangles, and rectangles are parallelograms. A rhombus has four equal sides. A kite has two pairs of equal adjacent sides.
- Triangles are rigid. Four-sided frames are not, unless they are braced.
Key terms: triangle · equilateral triangle · isosceles triangle · scalene triangle · right triangle · hypotenuse · triangle inequality · base · height · quadrilateral · parallelogram · rhombus · trapezoid · kite · rigid
Review questions
Questions 1 to 6 practice single skills. Questions 7 to 9 combine them.
- A triangle has angles of 52° and 71°. Find the third angle and name the triangle by its angles.
- Can each set of lengths make a triangle? (a) 2, 3, 6 ft. (b) 6, 8, 10 ft. (c) 1, 1, 1 ft.
- Find the area of a triangle with base 12 cm and height 9 cm.
- A parallelogram has a base of 7.5 m and a height of 4 m. Its slanted sides are 5 m long. Find its area and its perimeter.
- Three angles of a quadrilateral are 85°, 95°, and 120°. Find the fourth.
- Name the quadrilateral: four equal sides, and the angles are 70°, 110°, 70°, and 110°.
- A gable end of a shed is a triangle on top of a rectangle. The rectangle is 8 ft wide and 7 ft tall. The triangle has base 8 ft and height 3 ft. Find the area of the whole gable end in ft² and m².
- An isosceles triangle has a top angle of 40°. Its two base angles are equal. Find them.
- A trapezoid has parallel sides of 6 m and 10 m and height 5 m. Find its area with the formula, then check by splitting it into a rectangle and triangles.
Explained answers
1. 180 − 52 − 71 = 57°. All three angles are acute, so it is an acute triangle. Check: 52 + 71 + 57 = 180. ✓
2. (a) 2 + 3 = 5, which is less than 6: no. (b) 6 + 8 = 14, which is more than 10: yes. (It is a right triangle, as you’ll see in Chapter 7.) (c) 1 + 1 = 2, which is more than 1: yes. It is equilateral.
3. ½ × 12 × 9 = 54 cm².
4. Area 7.5 × 4 = 30 m². Perimeter 2 × (7.5 + 5) = 25 m. The area uses the height. The perimeter uses the slanted side.
5. 360 − 85 − 95 − 120 = 60°. Check: 85 + 95 + 120 + 60 = 360. ✓
6. A rhombus. It has four equal sides but no right angles, so it is not a square.
7. Rectangle 8 × 7 = 56 ft². Triangle ½ × 8 × 3 = 12 ft². Total 68 ft². In metric, 68 × 0.09290304 ≈ 6.32 m².
8. The base angles share 180 − 40 = 140°, so each is 140 ÷ 2 = 70°. Check: 40 + 70 + 70 = 180. ✓
9. ½ × (6 + 10) × 5 = 40 m². Split: a 6 by 5 rectangle (30 m²) plus triangles whose bases add to 10 − 6 = 4 m, with total area ½ × 4 × 5 = 10 m². Total 30 + 10 = 40 m². ✓
Connections
- Chapter 6 combines triangles, rectangles, and trapezoids into composite shapes.
- Chapter 7 turns rigid triangles into a tool: the 3-4-5 check and the Pythagorean relationship for right triangles.
- Chapter 8 asks when two triangles have the same shape but different sizes.
- Other MORI books: U22 Measure and Lay Out Before Making uses bracing and triangulation on real projects. F10 Engineering Design and MORI CAD returns to rigid frames and trusses.
Sources consulted for scope and accuracy: OpenStax, Contemporary Mathematics, Sections 10.3, “Triangles,” and 10.4, “Polygons, Perimeter, and Circumference,” https://openstax.org/details/books/contemporary-mathematics, CC BY 4.0; OpenStax, Prealgebra 2e, Sections 9.3 and 9.4, https://openstax.org/details/books/prealgebra-2e, CC BY 4.0; Common Core State Standards for Mathematics, 7.G.A.2 and 8.G.A.5, https://www.thecorestandards.org/Math/Content/7/G/ and https://www.thecorestandards.org/Math/Content/8/G/ (checked October 23, 2026). All examples and exercises are original to MORI University. The garden, plot, and yard measurements are illustrative.
Chapter 5 · Circles
U03 Geometry: Measure, Diagonals, and Scale · MORI University · Foundation level
Time needed: about 80 minutes in total, in six short sections, plus 30 minutes for the activity. Each section ends at a good place to stop. You need: a pencil, paper, a ruler, a piece of string or a strip of paper, a calculator with a π key (or use 3.1416), and three or four round objects such as cans, jar lids, and plates.
Learning goals
By the end of this chapter, you will be able to:
- Name the parts of a circle: center, radius, diameter, circumference, chord, arc, and sector.
- Measure the ratio of circumference to diameter and explain what π is.
- Find a circle’s circumference from its radius or diameter, and the other way around.
- Find the area of a circle, a semicircle, and a quarter circle.
- Use circles in practical problems: wheels, round tables, door swings, and turning space.
Start here
Wrap a string once around a soup can, then lay the string along the can’s top, across the middle. You’ll find the string goes across a little more than three times. Try a jar lid, a dinner plate, or a bicycle wheel. It’s always the same: a little more than three times. That number, the same for every circle anyone has ever measured, is called π (pi).
Circles appear in wheels, pipes, round tables, and garden beds. They also appear where you don’t see them: every swinging door sweeps out part of a circle, and a person turning a wheelchair around needs a circle of clear floor. This chapter gives you the two formulas that handle all of these, and the reasons they work.
5.1 Parts of a circle
A circle is the set of all points in a plane at the same distance from a fixed point, its center. Figure 5.1 shows its parts.
- The radius (plural radii) is the distance from the center to the circle. It is written r.
- The diameter is the distance across the circle through the center. It is twice the radius: d = 2r.
- The circumference is the distance around the circle, its perimeter.
- A chord is a segment joining two points on the circle. The diameter is the longest chord.
- An arc is a part of the circle between two points.
- A sector is a slice of the circle between two radii, like a slice of pizza.
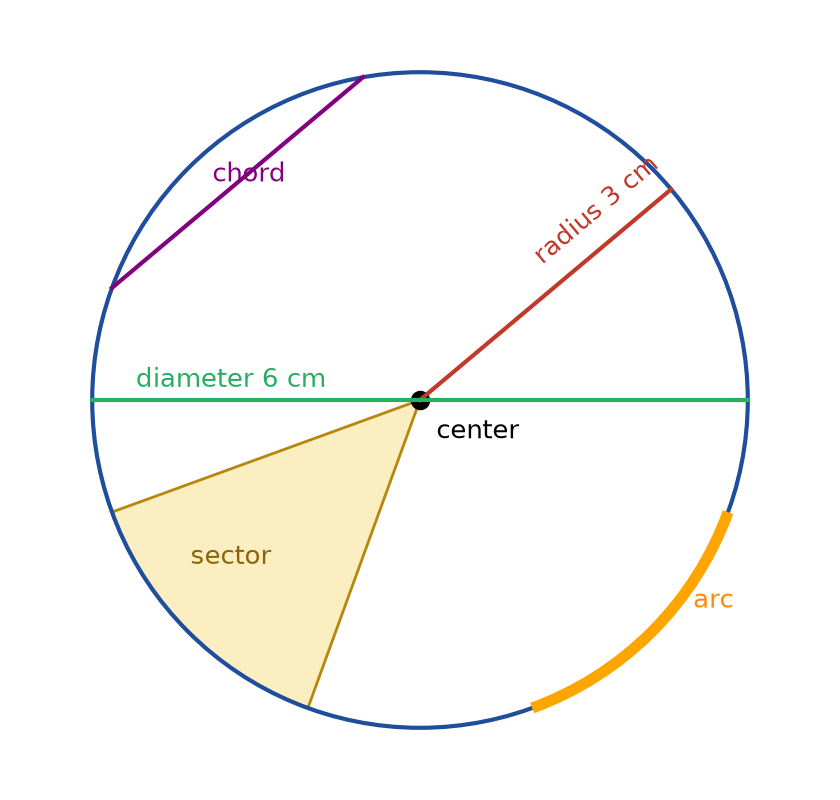
Drawing a circle without a compass. Tie a loop of string around a pencil. Hold the other end of the string down with a thumbtack (or a finger) and keep the string tight as you draw. The string’s length is the radius. Gardeners lay out round beds the same way, with a stake and a cord.
Check yourself 5.1 A round mirror has a radius of 25 cm. What is its diameter? Answer: 2 × 25 = 50 cm.
Good stopping point.
5.2 What π is, and how to measure it
For every circle, the circumference divided by the diameter is the same number. That number is called pi and written π. It is about 3.14159. Its digits go on forever without repeating, so any written value of it is rounded. For most practical work, 3.14 is enough, and a calculator’s π key is better.
That the ratio is always the same is an established result about ideal circles. You can check it with real ones.
Worked Example 5.1 · Measuring π with a can
You wrap a string around a can and mark where it overlaps. Laid along a ruler, the string is 25.0 cm long. The can’s diameter, measured across the top, is 8.0 cm.
Step 1 · Divide. 25.0 ÷ 8.0 = 3.125.
Step 2 · Compare with π. 3.125 is about 0.017 less than 3.14159. That is about half of one percent.
Step 3 · Is the difference real? Suppose the string could be off by 0.2 cm either way, and the diameter by 0.1 cm. The smallest possible ratio is 24.8 ÷ 8.1 = 3.06 and the largest is 25.2 ÷ 7.9 = 3.19. The true value, 3.14159, lies inside that range.
Check: An ideal 8.0 cm circle has circumference π × 8.0 = 25.13 cm. Your string read 25.0, only 1.3 mm short. ✓
In words: Your measurement gives π ≈ 3.13, which agrees with the true value within the accuracy of string and ruler. Chapter 11 develops this kind of range in detail.
Check yourself 5.2 A plate’s circumference measures 85 cm and its diameter 27 cm. What value of π does that give? Answer: 85 ÷ 27 = 3.148, about 3.15. Close to π.
Good stopping point.
5.3 Circumference
Since circumference ÷ diameter = π, it follows that:
Circumference = π × diameter = 2 × π × radius
Worked Example 5.2 · How far does a wheel go?
A bicycle has wheels 26 in across, including the tire. How far does the bike go in one turn of the wheel? In 100 turns?
Step 1 · One turn. The wheel rolls out its circumference: π × 26 = 81.68 in, about 81.7 in.
Step 2 · 100 turns. 100 × 81.68 = 8,168 in. In feet, 8,168 ÷ 12 = 680.7 ft, about 681 ft.
Step 3 · Metric. 26 in = 26 × 2.54 = 66.04 cm, and π × 66.04 = 207.47 cm, about 2.07 m per turn.
Check: Use 3 × 26 = 78 in as a rough estimate. The answer, 81.7 in, is a bit more, as it should be, since π is a bit more than 3. ✓
In words: Each turn of the wheel moves the bike about 81.7 in, or 2.07 m. A hundred turns cover about 681 ft.
Working backward. If you know the circumference, divide by π to get the diameter. This is how you measure the diameter of a tree trunk, a post, or a pipe without cutting it: wrap a tape around it and divide by π.
Worked Example 5.3 · The diameter of a tree
A tape wrapped around a tree trunk reads 157 cm. About how wide is the trunk?
Step 1 · Divide by π. 157 ÷ π = 49.97 cm, about 50 cm.
Check: π × 50 = 157.08 cm. ✓
In words: Treating the trunk as a circle (a model, because real trunks are not perfectly round), it is about 50 cm across, a little under 20 in.
Check yourself 5.3 A round tabletop has a radius of 2 ft. What length of edging does it need? Answer: 2 × π × 2 = 12.57 ft, about 12.6 ft.
Good stopping point.
5.4 Area of a circle
Area of a circle = π × radius × radius = π × r²
Note that the radius is squared, not the diameter. The Going further box and Figure 5.2 show why: cut a circle into many thin slices and rearrange them, and they make a shape very close to a rectangle whose sides are half the circumference (πr) and the radius (r). Its area is πr × r = πr².
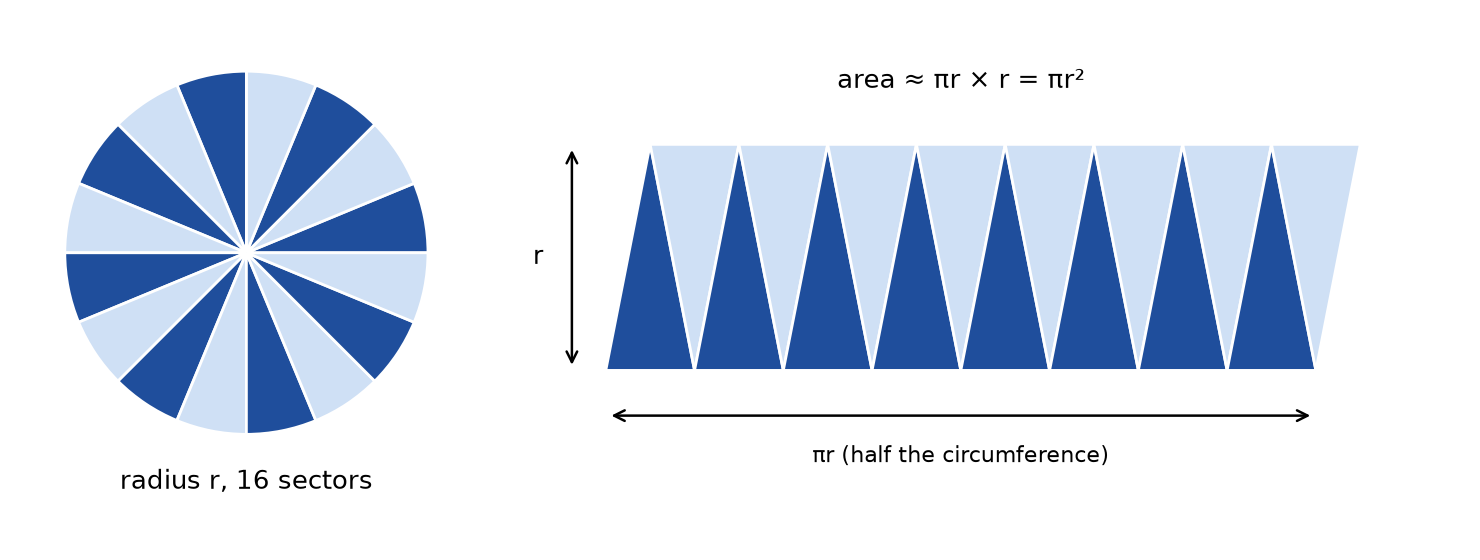
Worked Example 5.4 · A round table
A round table is 48 in across. What is its area in square inches and square feet?
Step 1 · Radius. 48 ÷ 2 = 24 in.
Step 2 · Area. π × 24 × 24 = π × 576 = 1,809.56 in², about 1,810 in².
Step 3 · Square feet. 1,809.56 ÷ 144 = 12.57 ft².
Check: Work in feet from the start: the radius is 2 ft, and π × 2 × 2 = 12.57 ft². ✓
In words: The tabletop covers about 12.6 ft². A square table 4 ft on each side would cover 16 ft², so the round table is about 79% of that square (12.57 ÷ 16 = 0.785). That fraction, π ÷ 4, is the same for every circle in its surrounding square.
Worked Example 5.5 · Which pizza is more food?
A restaurant sells a 16-inch pizza and a 12-inch pizza. (Pizza sizes are diameters.) Is one 16-inch pizza more or less food than two 12-inch pizzas? Figure 5.3 compares them.
Step 1 · One 16-inch. Radius 8 in. Area π × 64 = 201.1 in².
Step 2 · Two 12-inch. Radius 6 in. Each: π × 36 = 113.1 in². Two: 226.2 in².
Step 3 · Compare. 226.2 − 201.1 = 25.1 in². The two small pizzas are more food, by about 25 in².
Check: Compare without π: 2 × 36 = 72 against 64. The two small pizzas win, by a factor of 72 ÷ 64 = 1.125. ✓
In words: Two 12-inch pizzas have about 12.5% more area than one 16-inch. Whether they are a better deal depends on the prices. The comparison would use the unit-price method from U01 Ratios, Proportions, and Percent, in dollars per square inch.
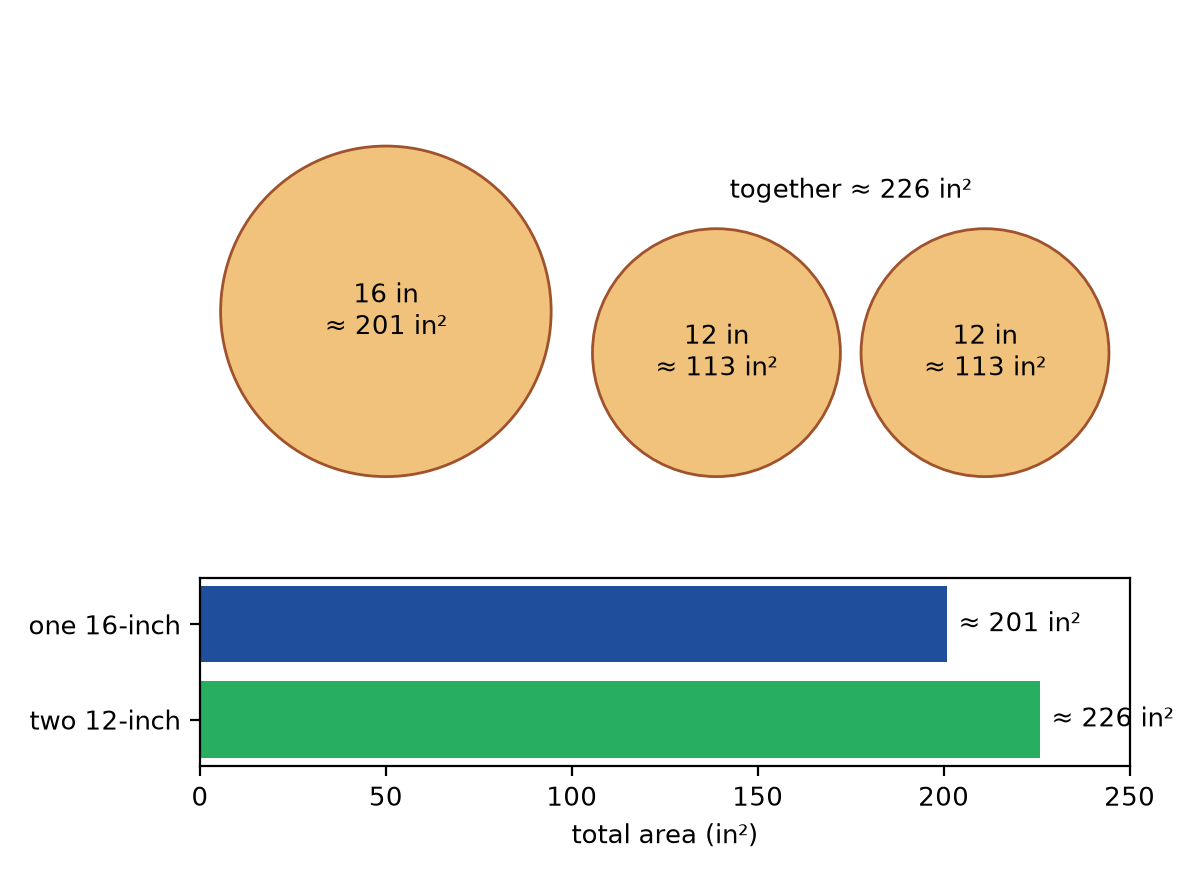
Check yourself 5.4 A circular rug has a diameter of 2 m. What is its area? Answer: Radius 1 m, so π × 1 × 1 = 3.14 m².
Good stopping point.
5.5 Parts of circles: semicircles, quarter circles, and sectors
A semicircle is half a circle, cut along a diameter. A quarter circle is a sector with a right angle at the center. For any sector, the area and arc length are the same fraction of the whole circle as its angle is of 360°.
- Semicircle: angle 180°, so ½ of the area and ½ of the circumference.
- Quarter circle: angle 90°, so ¼ of each.
- A 60° sector: 60 ÷ 360 = 1/6 of each.
Be careful with the perimeter of a semicircle or quarter circle. It includes the straight edges as well as the curved arc.
Worked Example 5.6 · A door’s swing
A door 32 in wide swings open through 90°. Its edge sweeps out a quarter circle on the floor, centered on the hinge. Find the floor area the door sweeps, and the distance its outer edge travels.
Step 1 · Area. The radius is the door’s width, 32 in. A quarter of π × 32² = ¼ × π × 1,024 = 804.2 in².
Step 2 · In square feet. 804.2 ÷ 144 = 5.59 ft².
Step 3 · Arc length. A quarter of 2 × π × 32 = ¼ × 201.06 = 50.3 in.
Check: The quarter circle fits in a 32 in by 32 in square, which has area 1,024 in². The quarter circle is π ÷ 4 ≈ 78.5% of that: 0.785 × 1,024 = 804. ✓
In words: The door needs about 5.6 ft² of clear floor to swing. In the room layout of Chapter 12, you’ll draw this quarter circle on the plan and keep furniture out of it.
Worked Example 5.7 · Turning space for a wheelchair
The 2010 ADA Standards for Accessible Design, published by the US Access Board, describe one form of wheelchair turning space as a circle 60 inches (1525 mm) in diameter, minimum (section 304.3.1; checked October 23, 2026). How much floor area is that, in both unit systems?
Step 1 · US units. Radius 30 in. Area π × 30² = π × 900 = 2,827.4 in². In square feet, 2,827.4 ÷ 144 = 19.6 ft².
Step 2 · Metric. Radius 1525 ÷ 2 = 762.5 mm = 0.7625 m. Area π × 0.7625² = 1.83 m².
Check: 19.63 ft² × 0.09290304 = 1.824 m², and π × 0.7625² = 1.827 m². These agree to about 0.003 m². The small difference is because the standard rounds 60 in (exactly 1524 mm) to 1525 mm. ✓
In words: A 60-inch turning circle takes about 19.6 ft² (1.83 m²) of clear floor. It’s a useful reference for a comfortable turning space in any room, even where the ADA Standards don’t legally apply, such as most private homes.
Check yourself 5.5 A semicircular rug has a diameter of 1.2 m. What is its area? Answer: Radius 0.6 m. Half of π × 0.6² = ½ × π × 0.36 = 0.565 m², about 0.57 m².
Good stopping point.
5.6 Working with π: exact and rounded answers
There are two good ways to give an answer involving π.
- In terms of π. The area of a circle of radius 3 cm is 9π cm². This is exact. It’s useful when you’ll keep calculating, or when you want to compare circles without rounding.
- As a rounded decimal. 9π ≈ 28.27 cm². This is what you need to buy materials or read a ruler.
How much does the choice of π matter? For the 48-in table: with π = 3.14, the area is 1,808.6 in². With the calculator’s π, it is 1,809.6 in². The difference is about 1 in², which is far smaller than the uncertainty in measuring a real table. With π = 3, though, you’d get 1,728 in², which is about 4.5% low. That is too rough for buying materials, but fine for a quick check that your answer is the right size.
Check yourself 5.6 Give the circumference of a circle of radius 5 m, in terms of π and rounded to one decimal place. Answer: 10π m, about 31.4 m.
Good stopping point.
Practical activity · Measure π yourself
Time: about 30 minutes. Materials: three or four round objects, string or a paper strip, a ruler, and a calculator.
- For each object, wrap string once around it, mark the overlap, and measure the string. That is the circumference.
- Measure the diameter across the widest part. Sight across the top so you go through the center.
- Make a table with columns: object, circumference, diameter, circumference ÷ diameter.
- Find the average of your ratios. How close is it to 3.14?
- Give each ratio a rough range, as in Worked Example 5.1. Does π fall inside each range?
- Area by squares. Trace one round lid onto 1 cm graph paper and estimate its area by counting squares (Chapter 3). Compare with π × r².
Reflect. Which objects gave ratios furthest from π? Were they small (where 1 mm matters more) or not quite round?
Common mistakes
- Using the diameter in the area formula. Area is π × r², with the radius. Halve the diameter first.
- Squaring before halving, or forgetting to square. For d = 48, compute r = 24, then 24² = 576, then × π.
- Mixing up area and circumference. Circumference is a length (πd). Area is in square units (πr²).
- Forgetting the straight edges when finding the perimeter of a semicircle or quarter circle.
- Converting area units with the length factor. 1,809.56 in² is 12.57 ft² (÷ 144), not 150.8 ft² (÷ 12).
- Treating real round things as perfect circles without checking. Measure the diameter in two directions. If the two readings differ, the object is not quite round.
Going further (optional) · Formula review, and why A = πr²
Formulas. d = 2r. Circumference C = πd = 2πr. Area A = πr². A sector with angle θ (in degrees) has area (θ/360) × πr² and arc length (θ/360) × 2πr.
Why the area is πr². Cut a circle into an even number of equal sectors, and lay them side by side, points alternately up and down, as in Figure 5.2. The curved edges along the top add up to half the circumference, πr, and the same along the bottom. The height of the shape is the radius, r. With more and thinner slices, the curved edges get flatter, and the shape gets closer and closer to a rectangle πr long and r high. So the circle’s area is πr × r = πr².
Why the circumference is πd in the first place. Every circle is an enlargement of every other circle. In Chapter 8 you’ll see that enlarging a shape by any scale factor multiplies all its lengths by that factor. So circumference and diameter grow together, and their ratio never changes. π is simply the name for that fixed ratio.
Summary
- A circle is all the points at one distance, the radius, from its center. The diameter is twice the radius.
- Circumference is the distance around: C = πd = 2πr.
- π (pi) is circumference ÷ diameter for every circle, about 3.14159.
- Area is A = πr², with the radius squared.
- A chord joins two points on a circle, an arc is part of the circle, and a sector is a slice between two radii.
- A semicircle is half a circle, and a quarter circle is a 90° sector. Their areas are ½ and ¼ of the full circle.
- Practical uses include wheels, round tables, door swings (quarter circles), and turning space.
Key terms: circle · center · radius · diameter · circumference · pi · chord · arc · sector · semicircle · quarter circle
Review questions
Questions 1 to 6 practice single skills. Questions 7 to 9 combine them.
- A circle has diameter 14 cm. Find its radius, circumference, and area.
- A round garden bed has a radius of 1.5 m. How much edging goes around it?
- A tape around a post reads 31.4 in. About how wide is the post?
- Find the area of a circle of radius 10 ft, in terms of π and as a decimal.
- A sector has angle 120° in a circle of radius 6 cm. What fraction of the circle is it? Find its area.
- Which is larger: a square 10 cm on each side, or a circle 10 cm across? By how much?
- A semicircular window sits on top of a door. The semicircle has a diameter of 36 in. Find the area of glass in the semicircle, and the length of trim along its curved edge.
- A circular patio 12 ft across is to be paved. Pavers cover 1 ft² each, and you’ll add 10% for cuts and breakage. How many pavers should you buy?
- A friend says, “A 20-inch pizza is twice as big as a 10-inch pizza.” Check this claim, and explain what “twice as big” gets wrong.
Explained answers
1. Radius 14 ÷ 2 = 7 cm. Circumference π × 14 = 43.98 cm, about 44.0 cm. Area π × 7² = 49π = 153.94 cm², about 153.9 cm².
2. 2 × π × 1.5 = 3π = 9.42 m.
3. 31.4 ÷ π = 9.995 in, about 10 in.
4. π × 10² = 100π ft², about 314.16 ft².
5. 120 ÷ 360 = 1/3 of the circle. Area: 1/3 × π × 6² = 12π = 37.70 cm².
6. The square is 10 × 10 = 100 cm². The circle has radius 5 cm, so its area is π × 25 = 78.54 cm². The square is larger by about 21.5 cm².
7. Radius 18 in. Glass: ½ × π × 18² = 162π = 508.9 in², about 3.53 ft² (508.9 ÷ 144). Curved trim: ½ × π × 36 = 18π = 56.5 in.
8. Radius 6 ft. Area π × 36 = 113.1 ft². With 10%: 113.1 × 1.10 = 124.4. Round up to 125 pavers.
9. Areas: π × 10² = 314.2 in² for the 20-inch, and π × 5² = 78.5 in² for the 10-inch. The 20-inch is 4 times as large in area (314.2 ÷ 78.5 = 4), not twice. Its diameter is twice as long, but area depends on the radius squared, so doubling the width multiplies the area by 2 × 2 = 4. “Twice as big” mixes up a length comparison with an area comparison. Chapter 10 makes this a rule.
Connections
- Chapter 6 adds semicircles and quarter circles to rectangles to make composite shapes, such as an arched window or a running track.
- Chapter 10 explains Question 9: doubling a length multiplies the area by 4, for circles and every other shape.
- Chapter 12’s room layout draws door swings and a 60-inch turning circle to scale.
- Other MORI books: U01 Ratios, Proportions, and Percent provides unit prices for the pizza comparison. U22 Measure and Lay Out Before Making lays out curves with a stake and cord.
Sources consulted for scope and accuracy: US Access Board, 2010 ADA Standards for Accessible Design, section 304.3.1, “Circular Space” (60 inches, 1525 mm, diameter minimum), https://www.access-board.gov/ada/ (checked October 23, 2026); OpenStax, Prealgebra 2e, Section 9.5, “Solve Geometry Applications: Circles and Irregular Figures,” https://openstax.org/details/books/prealgebra-2e, CC BY 4.0; Common Core State Standards for Mathematics, 7.G.B.4, https://www.thecorestandards.org/Math/Content/7/G/. All examples and exercises are original to MORI University. The can, wheel, tree, table, and pizza measurements are illustrative.
Chapter 6 · Composite Shapes
U03 Geometry: Measure, Diagonals, and Scale · MORI University · Foundation level
Time needed: about 75 minutes in total, in five short sections, plus 30 minutes for the activity. Each section ends at a good place to stop. You need: a pencil, graph paper, a ruler, a calculator, and a tape measure for the activity.
Learning goals
By the end of this chapter, you will be able to:
- Break a composite shape into rectangles, triangles, and parts of circles.
- Find an area by adding parts, and check it by subtracting from a bounding rectangle.
- Find the perimeter of a composite shape without double-counting shared edges.
- Find the area of a border, path, or frame as outer minus inner.
- Work out how a real design, the US flag, divides its area.
Start here
Real rooms are rarely perfect rectangles. A living room has an alcove, a kitchen has an L-shaped counter, a window has an arched top, and a garden has a path around the lawn. None of these has its own formula. You don’t need one. Every one of them can be cut into shapes you already know from Chapters 3 to 5, or seen as a big simple shape with a piece taken away.
The skill in this chapter is not a new formula. It is the habit of splitting a shape up, and then checking the answer with a second, different split.
6.1 Adding parts, subtracting parts
A composite shape is a shape made of simpler shapes joined together. To decompose a shape is to cut it into simpler pieces that don’t overlap. Then:
- Add method: total area = the sum of the pieces.
- Subtract method: total area = the area of a larger simple shape minus the pieces that are missing. The larger shape is often the bounding rectangle, the smallest rectangle that encloses the whole shape.
Using both methods is the best check there is. If they agree, you can trust the answer.
Worked Example 6.1 · An L-shaped room
An L-shaped living room measures 16 ft along its longest wall and 14 ft along the wall at right angles to it. A 6 ft by 5 ft corner is cut out by a closet. Figure 6.1 shows the plan. Find the floor area.
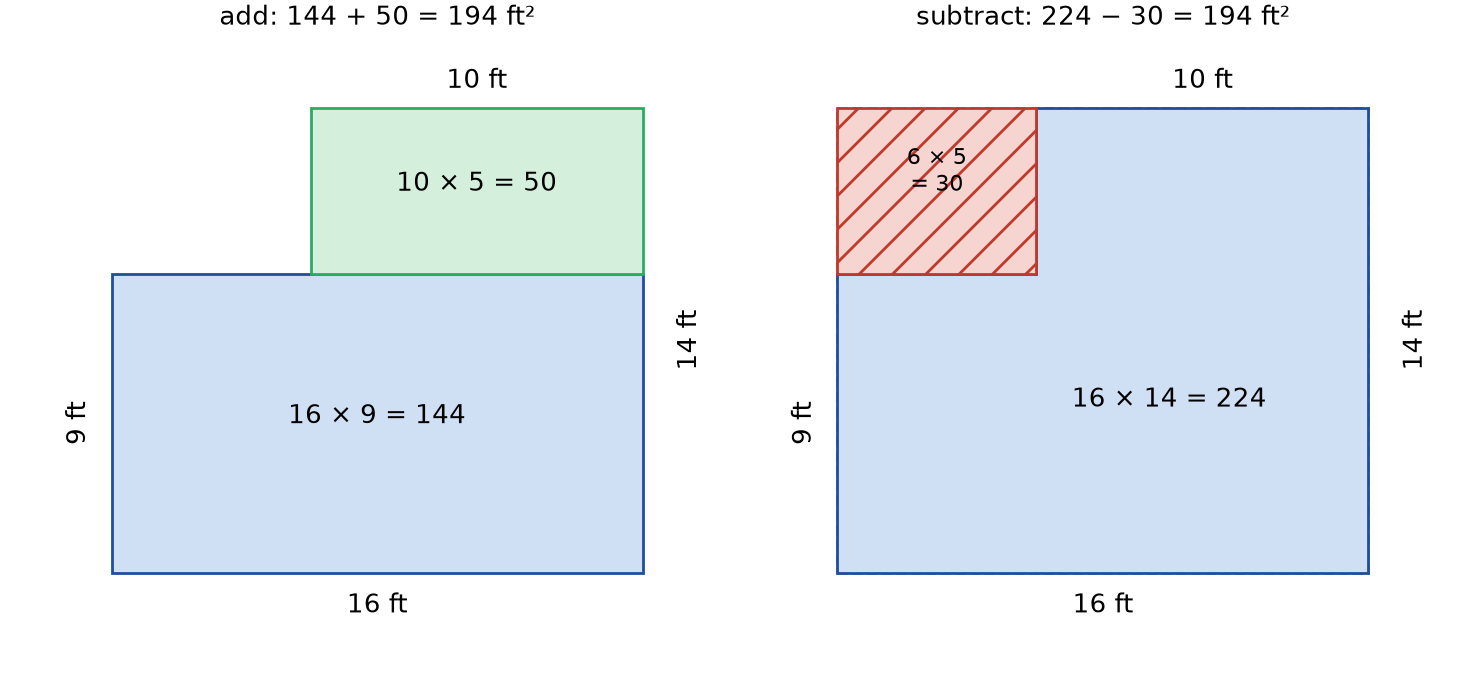
Step 1 · Find the missing lengths. The top edge is 16 − 6 = 10 ft. The left edge is 14 − 5 = 9 ft.
Step 2 · Add method. Cut across at the level of the notch. The bottom piece is 16 × 9 = 144 ft². The top piece is 10 × 5 = 50 ft². Total: 144 + 50 = 194 ft².
Step 3 · Subtract method. The bounding rectangle is 16 × 14 = 224 ft². The notch is 6 × 5 = 30 ft². Total: 224 − 30 = 194 ft².
Check: Both methods give 194 ft². ✓ In metric, 194 × 0.09290304 = 18.02 m².
In words: The room has 194 ft², about 18.0 m², of floor.
A third way would be to cut the L vertically instead: 6 × 9 = 54 plus 10 × 14 = 140, which is again 194. There is often more than one good cut. Choose the one that uses lengths you actually measured.
Check yourself 6.1 A rectangular deck is 20 ft by 12 ft, with a 4 ft by 4 ft square cut out of one corner for a tree. Find its area. Answer: 20 × 12 − 4 × 4 = 240 − 16 = 224 ft².
Good stopping point.
6.2 Perimeter of a composite shape
Area adds up nicely. Perimeter does not. When two pieces are joined, the shared edge between them is inside the shape, so it isn’t part of the perimeter anymore.
Worked Example 6.2 · Baseboard for the L-shaped room
How much baseboard goes around the L-shaped room in Figure 6.1? (Ignore doorways for now.)
Step 1 · Walk around the edge. Start at the bottom-left corner and go counterclockwise: 16 (bottom), 14 (right), 10 (top), 5 (down the notch), 6 (across the notch), 9 (down the left). Total: 16 + 14 + 10 + 5 + 6 + 9 = 60 ft.
Step 2 · The wrong way. The two rectangles’ perimeters are 2 × (16 + 9) = 50 ft and 2 × (10 + 5) = 30 ft. Their sum, 80 ft, counts the shared 10 ft edge twice, once for each piece. The correct value is 80 − 2 × 10 = 60 ft.
Check: The bounding rectangle has perimeter 2 × (16 + 14) = 60 ft. For an L made by cutting a notch out of one corner, the two edges of the notch exactly replace the two pieces of the rectangle’s edge that were removed. ✓
In words: The room needs 60 ft of baseboard, before taking off doorways. Removing a corner notch changes the area but not the perimeter, which is another example of Chapter 3’s lesson that area and perimeter are separate measurements.
Check yourself 6.2 Two 3 m by 3 m squares are placed side by side to make a 6 m by 3 m rectangle. What is the sum of the two squares’ perimeters, and what is the perimeter of the rectangle? Answer: Sum: 12 + 12 = 24 m. Rectangle: 2 × (6 + 3) = 18 m. The shared 3 m edge was counted twice (24 − 2 × 3 = 18).
Good stopping point.
6.3 Shapes with curves
Curved parts are usually semicircles or quarter circles, from Chapter 5.
Worked Example 6.3 · An arched window
A window is a rectangle 36 in wide and 48 in tall, topped by a semicircle with the same 36 in width as its diameter. This shape is sometimes called a Norman window. Find the area of glass and the length of the frame around the outside.
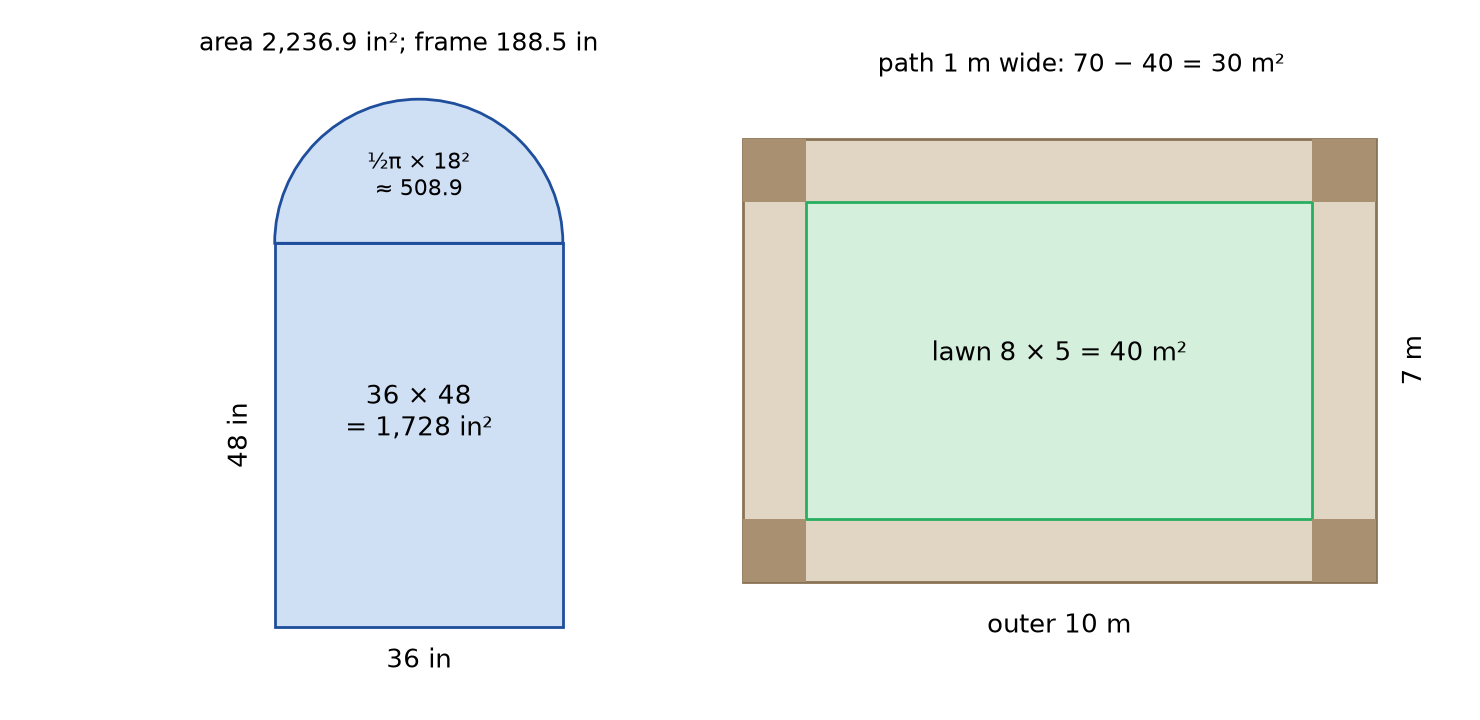
Step 1 · Rectangle. 36 × 48 = 1,728 in².
Step 2 · Semicircle. Radius 18 in. Half of π × 18² = 508.9 in².
Step 3 · Total area. 1,728 + 508.9 = 2,236.9 in². In square feet, 2,236.9 ÷ 144 = 15.53 ft².
Step 4 · Frame. The frame runs up one side (48), around the arch (half of π × 36 = 56.5), and down the other side (48), and across the bottom (36). Total: 48 + 56.5 + 48 + 36 = 188.5 in, about 15.7 ft. The 36 in line where the arch meets the rectangle is a shared edge, so it is not counted.
Check: The window must be larger than its 36 × 48 rectangle (1,728 in²) but smaller than the 36 × 66 bounding rectangle (2,376 in²). 2,236.9 is between them. ✓
In words: The window has about 15.5 ft² of glass and about 188.5 in of outer frame.
Check yourself 6.3 A rug is a 2 m by 1 m rectangle with a semicircle on each short end (diameter 1 m). Find its area. Answer: Rectangle 2 m². The two semicircles make one whole circle of radius 0.5 m: π × 0.25 = 0.785 m². Total 2.785 m², about 2.79 m².
Good stopping point.
6.4 Borders, paths, and frames
A border strip, such as a path around a lawn, a frame around a picture, or a margin around a page, is best handled with the subtract method:
border area = outer shape − inner shape
Worked Example 6.4 · A path around a lawn
A rectangular lawn is 8 m by 5 m. A gravel path 1 m wide runs all the way around it. Find the area of the path (Figure 6.2, right).
Step 1 · Outer rectangle. The path adds 1 m on each side, so the outer rectangle is 8 + 2 = 10 m by 5 + 2 = 7 m. Its area is 10 × 7 = 70 m².
Step 2 · Subtract the lawn. 70 − 8 × 5 = 70 − 40 = 30 m².
Check: Cut the path into strips. Two long strips, 10 m by 1 m, give 20 m². Two short strips between them, 5 m by 1 m, give 10 m². Total 30 m². ✓
In words: The path covers 30 m², about 323 ft² (30 ÷ 0.09290304 = 322.9).
The corner trap. A common shortcut is “perimeter of the lawn × width of path”: 2 × (8 + 5) × 1 = 26 m². This misses the four 1 m by 1 m corner squares, shaded in Figure 6.2. 26 + 4 = 30. ✓ The outer-minus-inner method can’t forget the corners.
Check yourself 6.4 A photo 8 in by 10 in has a mat 2 in wide all around it. Find the area of the mat. Answer: Outer 12 × 14 = 168 in². Photo 80 in². Mat 88 in².
Good stopping point.
6.5 A real design: how the US flag divides its area
The proportions of the US flag are set by Executive Order 10834 (1959), which is reproduced by the National Archives (checked October 23, 2026). It gives the flag’s dimensions as fractions of its width, called the hoist:
- hoist (width) 1.0, fly (length) 1.9;
- the blue union is 7/13 of the hoist wide and 0.76 long;
- each of the 13 stripes is 1/13 of the hoist wide.
The stripes alternate red and white, with red at the top and bottom. So there are 7 red stripes and 6 white. The union covers the top 7 stripes (4 red and 3 white) along part of their length. How much of the flag’s area is each color? Figure 6.3 shows the answer.
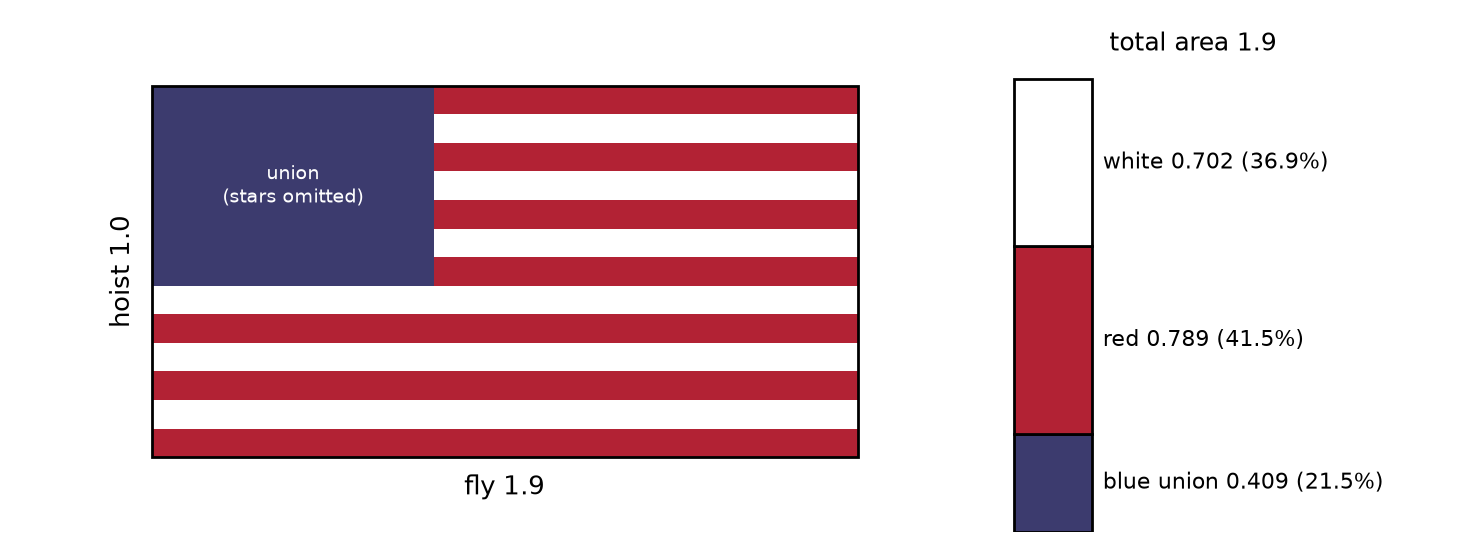
Worked Example 6.5 · Colors of the flag
Use a flag with hoist 1 and fly 1.9 (any real size is a scaled copy, as Chapter 8 shows). Ignore the white stars for now.
Step 1 · Whole flag. 1 × 1.9 = 1.9 square units.
Step 2 · Union. 7/13 × 0.76 = 5.32 ÷ 13 = 0.4092.
Step 3 · Red. All 7 red stripes at full length: 7 × (1/13) × 1.9 = 13.3 ÷ 13. Subtract the 4 red stripes hidden behind the union: 4 × (1/13) × 0.76 = 3.04 ÷ 13. Red = (13.3 − 3.04) ÷ 13 = 10.26 ÷ 13 = 0.7892.
Step 4 · White. All 6 white stripes at full length: 6 × 1.9 ÷ 13 = 11.4 ÷ 13. Subtract the 3 hidden behind the union: 3 × 0.76 ÷ 13 = 2.28 ÷ 13. White = 9.12 ÷ 13 = 0.7015.
Step 5 · Percentages. Divide each by 1.9: blue 21.5%, red 41.5%, white 36.9%.
Check: 0.4092 + 0.7892 + 0.7015 = 1.8999, which equals 1.9 apart from rounding. The percentages add to 21.5 + 41.5 + 36.9 = 99.9%, again 100% apart from rounding. ✓
In words: Leaving out the stars, about 41.5% of the flag is red, 36.9% white, and 21.5% blue. The 50 white stars, each 0.0616 of the hoist across, take a little area from the blue and give it to the white.
For a real flag. A flag 3 ft by 5.7 ft (one of the official sizes in the order’s table) has area 17.1 ft². Its union is 21.5% of that: 0.2154 × 17.1 = 3.68 ft². Check: 3 × 7/13 = 1.615 ft wide, and 3 × 0.76 = 2.28 ft long, so 1.615 × 2.28 = 3.68 ft². ✓
Check yourself 6.5 Why are there more red stripes than white, yet the red area is only a little bigger than the white? Answer: There are 7 red and 6 white stripes, but 4 red stripes and only 3 white run behind the union. So red loses more length to the union.
Good stopping point.
Practical activity · Measure an awkward room
Time: about 30 minutes. Materials: a tape measure, graph paper, a pencil, and a calculator.
- Choose a room (or a yard, or a counter) that is not a simple rectangle.
- Sketch its outline, not to scale yet. Measure every straight edge and write the lengths on the sketch.
- Check your sketch: for an outline made of right angles, the lengths on opposite sides should balance. In Figure 6.1, the bottom (16) equals the top pieces (6 + 10), and the right side (14) equals the left pieces (9 + 5).
- Find the area by the add method, then by the subtract method.
- Find the perimeter by walking around your sketch.
- If there is a curved part, treat it as a semicircle or quarter circle, and say so.
Reflect. Did your two area methods agree exactly? If not, which measurements would explain the difference? Step 3 often catches a misread tape before you calculate anything.
Common mistakes
- Adding the pieces’ perimeters. Shared edges are inside the shape. Walk around the outside instead.
- Overlapping pieces. If two pieces overlap, the overlap gets counted twice. Make cuts that don’t overlap.
- Forgetting a missing length. Find unlabeled edges from the ones you know (16 − 6 = 10) before you calculate.
- Adding the path width only once. A 1 m path around a lawn makes the outer rectangle 2 m longer, not 1 m.
- Missing the corners of a border strip when using perimeter × width.
Going further (optional) · Formula review, and counting the corners
Formulas. Area of composite shape = sum of non-overlapping parts = bounding shape − missing parts. Perimeter = the sum of the outside edges only. Border of width w around an a by b rectangle: (a + 2w)(b + 2w) − ab.
Why the corner squares appear. Multiply out the border formula: (a + 2w)(b + 2w) − ab = 2aw + 2bw + 4w². The first two parts, 2(a + b)w, are perimeter × width. The last part, 4w², is the four corner squares. For the lawn: 2 × (8 + 5) × 1 + 4 × 1² = 26 + 4 = 30 m². ✓ This w² term is a first taste of Chapter 10: lengths add, but areas pick up squares.
Summary
- A composite shape is made of simpler shapes. Decompose it into pieces that don’t overlap.
- Find the area by adding the pieces, and check it by subtracting from a bounding rectangle.
- Perimeter is the outside edges only. A shared edge between pieces doesn’t count.
- A border strip has area outer − inner. Don’t forget its corners.
- Curved parts are usually semicircles or quarter circles.
- The US flag’s official proportions divide its area into about 41.5% red, 36.9% white, and 21.5% blue (ignoring the stars).
Key terms: composite shape · decompose · bounding rectangle · shared edge · border strip
Review questions
Questions 1 to 6 practice single skills. Questions 7 to 9 combine them.
- A T-shaped patio is made of a 12 ft by 4 ft rectangle with a 4 ft by 6 ft rectangle attached below the middle of its long side. Find its area.
- Find the perimeter of the T-shaped patio in Question 1.
- A 10 m by 6 m rectangle has a 2 m by 3 m rectangle cut out of one corner. Find the area by the subtract method, and check by the add method.
- A poster 50 cm by 70 cm is in a frame with a border 5 cm wide. Find the area of the border.
- A quarter-circle flower bed of radius 3 m sits in the corner of a yard. Find its area and the length of edging needed around all its sides.
- A running track’s infield is a rectangle 84 m long and 64 m wide with a semicircle (diameter 64 m) on each end. Find the infield’s area.
- A room is 14 ft by 12 ft. A hearth 5 ft by 2 ft sticks into the room and will not be carpeted. Carpet costs $4.50 per ft². Find the carpet area and the cost, adding 10% for waste.
- A gable wall is an 8 m by 2.5 m rectangle with a triangle of base 8 m and height 2 m on top. It has a 1 m by 2 m door. Find the area to paint.
- A US flag 5 ft by 9.5 ft (an official size) is made to the proportions in Section 6.5. Find the area of its union and of its red stripes.
Explained answers
1. 12 × 4 = 48 ft², plus 4 × 6 = 24 ft². Total 72 ft².
2. Walk around: top 12, right side 4, back along the bottom 4 (from 12 to the stem’s edge at 8 ft), down the stem 6, across the stem 4, up the stem 6, back along the bottom 4, up the left side 4. Total 12 + 4 + 4 + 6 + 4 + 6 + 4 + 4 = 44 ft. Check: the pieces’ perimeters are 32 + 20 = 52, minus 2 × the shared 4 ft edge: 52 − 8 = 44. ✓
3. Subtract: 60 − 6 = 54 m². Add: cut into 10 × 3 = 30 and 8 × 3 = 24, total 54 m². ✓ (The cut runs along the notch: the remaining strip next to the notch is 10 − 2 = 8 m long and 3 m wide.)
4. Outer 60 × 80 = 4,800 cm². Poster 3,500 cm². Border 1,300 cm². Check: 2 × (50 + 70) × 5 + 4 × 5² = 1,200 + 100 = 1,300. ✓
5. Area ¼ × π × 9 = 7.07 m². Edging: arc ¼ × 2π × 3 = 4.71 m, plus two straight edges of 3 m. Total 10.71 m.
6. Rectangle 84 × 64 = 5,376 m². Two semicircles make a circle of radius 32 m: π × 1,024 = 3,216.99 m². Total 8,593.0 m², about 8,593 m².
7. 168 − 10 = 158 ft². With waste, 158 × 1.10 = 173.8 ft². Cost 173.8 × $4.50 = $782.10.
8. Rectangle 20 m², triangle ½ × 8 × 2 = 8 m², door 2 m². Paint area 20 + 8 − 2 = 26 m².
9. Union: (5 × 7/13) × (5 × 0.76) = 2.692 × 3.8 = 10.23 ft². Red: 41.54% of 5 × 9.5 = 47.5 ft², which is 0.41538 × 47.5 = 19.73 ft². Check the union another way: 21.54% of 47.5 = 10.23 ft². ✓
Connections
- Chapter 3 introduced wall areas with doors and windows subtracted. This chapter extends the subtract method to any shape.
- Chapter 8 shows why one set of proportions fits every official flag size, and which sizes in the order’s table don’t fit.
- Chapter 12 uses the add and subtract methods for the floor, walls, and baseboard of the project room.
- Other MORI books: U01 Ratios, Proportions, and Percent covers the percentages and the waste allowance. U22 Measure and Lay Out Before Making applies composite areas to materials lists.
Sources consulted for scope and accuracy: Executive Order 10834, “Flag of the United States” (1959), as codified by the National Archives, https://www.archives.gov/federal-register/codification/executive-order/10834.html (checked October 23, 2026); OpenStax, Prealgebra 2e, Section 9.5, “Solve Geometry Applications: Circles and Irregular Figures,” https://openstax.org/details/books/prealgebra-2e, CC BY 4.0; Common Core State Standards for Mathematics, 7.G.B.6, https://www.thecorestandards.org/Math/Content/7/G/. All examples and exercises are original to MORI University. The rooms, window, lawn, and patio are illustrative.
Chapter 7 · Right Angles, Diagonals, and Pythagorean Reasoning
U03 Geometry: Measure, Diagonals, and Scale · MORI University · Foundation level
Time needed: about 90 minutes in total, in six short sections, plus 30 minutes for the activity. Each section ends at a good place to stop. You need: a pencil, graph paper, a ruler, a calculator with a √ key, and a tape measure. For the activity: masking tape or chalk, and a helper if you can find one.
Learning goals
By the end of this chapter, you will be able to:
- State the Pythagorean relationship for right triangles and show it with squares on graph paper.
- Find a missing side of a right triangle using squares and square roots.
- Use the 3-4-5 check, and the converse of the Pythagorean theorem, to test whether a corner is square.
- Check whether a frame or room is rectangular by comparing its diagonals.
- Solve practical problems with diagonals: screens, ladders, ramps, and boxes.
Start here
Builders, gardeners, and anyone laying tile need square corners: exactly 90°. A carpenter’s square is too small to check the corner of a room or a garden bed. A protractor is worse. But a tape measure and some arithmetic can check a corner of any size to a fraction of a degree.
The method rests on a fact about right triangles known for thousands of years, and written down in many ancient cultures. In this book it is the Pythagorean theorem, after the Greek school that is credited with a proof. It ties together the three sides of every right triangle. This chapter gives you the fact, a way to see why it is true, and its two most useful jobs: finding diagonals and checking corners.
7.1 Squares on the sides of a right triangle
In a right triangle, the two sides that form the right angle are the legs. The longest side, opposite the right angle, is the hypotenuse (Chapter 4).
Draw a right triangle with legs 3 and 4 units on graph paper. Measure its hypotenuse. It is 5 units. Now draw a square on each side, as in Figure 7.1, and count the unit squares inside each one: 9, 16, and 25. And 9 + 16 = 25.
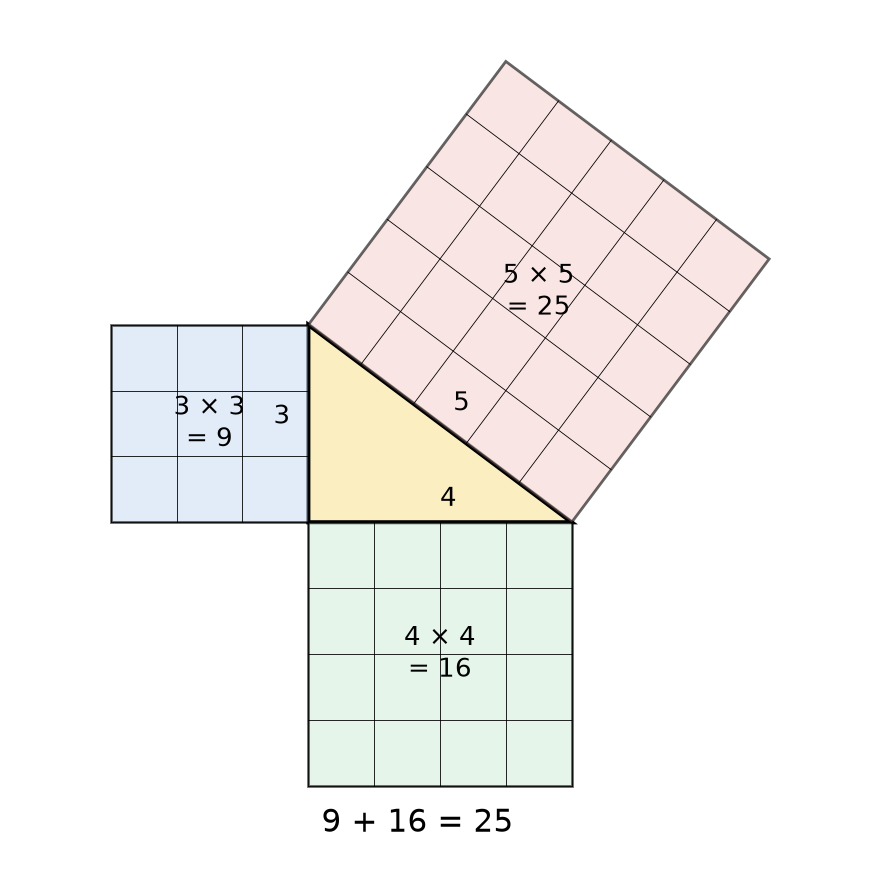
The Pythagorean theorem: in every right triangle, the square on the hypotenuse equals the sum of the squares on the two legs. With legs a and b and hypotenuse c:
a² + b² = c²
Here “square” means both the drawn square and the arithmetic square, a number times itself. That is no accident. The area of a square with side 3 is 3 × 3 = 3².
This is an established result that has been proved for every ideal right triangle. The Going further box shows one proof with four copies of the triangle. It does not hold for triangles without a right angle. That fact is what makes it a corner test.
Check yourself 7.1 A right triangle has legs 6 and 8. What is a² + b²? What is the hypotenuse? Answer: 36 + 64 = 100, and the number that squares to 100 is 10.
Good stopping point.
7.2 Finding a missing side
To undo squaring, take a square root (√). The square root of a number is the positive number that, multiplied by itself, gives that number: √100 = 10 because 10 × 10 = 100.
- Finding the hypotenuse: c = √(a² + b²). Add the squares, then take the root.
- Finding a leg: a = √(c² − b²). Subtract the squares, then take the root.
Most square roots are not whole numbers, so you’ll round them. Before using a calculator, estimate: √244 lies between √225 = 15 and √256 = 16, and nearer 16.
Worked Example 7.1 · The diagonal of a room
A bedroom is 12 ft by 10 ft. How long is a straight line across the floor from one corner to the opposite corner?
Step 1 · Square the sides. 12² = 144 and 10² = 100.
Step 2 · Add. 144 + 100 = 244.
Step 3 · Square root. √244 = 15.62 ft. In feet and inches, 0.62 ft × 12 = 7.4 in, so about 15 ft 7½ in.
Check: 15.62² = 243.98, which is 244 apart from rounding. And the diagonal (15.62) is longer than either side, but shorter than the two sides added together (22), as the triangle inequality (Chapter 4) requires. ✓
In words: The room’s diagonal is about 15.62 ft, or 4.76 m (15.62 × 0.3048 = 4.761). You’ll use this number in Section 7.4 to check that the room is square.
Worked Example 7.2 · How wide is a “55-inch” TV?
TV and monitor sizes are the diagonal of the screen. A 55-inch screen with the common 16:9 shape is 16 parts wide and 9 parts tall. Find its width and height.
Step 1 · Diagonal in parts. √(16² + 9²) = √(256 + 81) = √337 = 18.358 parts.
Step 2 · Size of one part. 55 ÷ 18.358 = 2.996 in.
Step 3 · Width and height. Width 16 × 2.996 = 47.94 in. Height 9 × 2.996 = 26.96 in.
Check: 47.94² + 26.96² = 2,298.2 + 726.8 = 3,025.0, and 55² = 3,025. ✓ The width-to-height ratio is 47.94 ÷ 26.96 = 1.778 = 16 ÷ 9. ✓
In words: A 55-inch 16:9 screen is about 47.9 in wide and 27.0 in tall (121.8 cm by 68.5 cm), not counting the frame. This uses the ratio skills from U01 Ratios, Proportions, and Percent.
Worked Example 7.3 · How high does a ladder reach?
A 12 ft ladder leans against a wall with its foot 3 ft out from the wall. How high up the wall does its top reach?
Step 1 · Identify the sides. The ladder is the hypotenuse, c = 12. The distance out from the wall is one leg, b = 3. The height is the other leg.
Step 2 · Subtract the squares. 12² − 3² = 144 − 9 = 135.
Step 3 · Square root. √135 = 11.62 ft, about 11 ft 7½ in.
Check: 11.62² + 3² = 135.0 + 9 = 144.0 = 12². ✓
In words: The top of the ladder reaches about 11.6 ft up the wall. The US workplace safety rule for ladders, 29 CFR 1926.1053(b)(5)(i), says a non-self-supporting ladder should be placed so the horizontal distance from the top support to the foot is “approximately one-quarter of the working length” of the ladder (checked October 23, 2026). For a 12 ft ladder that is 12 ÷ 4 = 3 ft, so this placement follows the rule. The ladder makes an angle of about 75.5° with the ground.
Check yourself 7.2 A right triangle has hypotenuse 13 cm and one leg 5 cm. Find the other leg. Answer: √(169 − 25) = √144 = 12 cm.
Good stopping point.
7.3 The 3-4-5 check: is this corner square?
The Pythagorean theorem also works in reverse. The converse: if a triangle’s sides satisfy a² + b² = c², then the angle between a and b is a right angle. Since a triangle is rigid (Chapter 4), fixing its three sides fixes its angles, so the only triangle with sides 3, 4, 5 is a right triangle.
Sets of whole numbers that fit a² + b² = c² are called Pythagorean triples. The most useful are 3-4-5, 5-12-13, and 8-15-17, along with their multiples, such as 6-8-10, 9-12-15, and 60-80-100.
The 3-4-5 check. To test whether a corner is square:
- Measure 3 units along one edge from the corner and mark it.
- Measure 4 units along the other edge and mark it.
- Measure straight between the two marks. If it is exactly 5 units, the corner is square.
Use the largest multiple that fits: 3-4-5 ft for a room, 60-80-100 cm for a garden bed, 6-8-10 ft or 9-12-15 ft for a deck or foundation. Larger triangles catch smaller errors. Figure 7.2 shows the check.
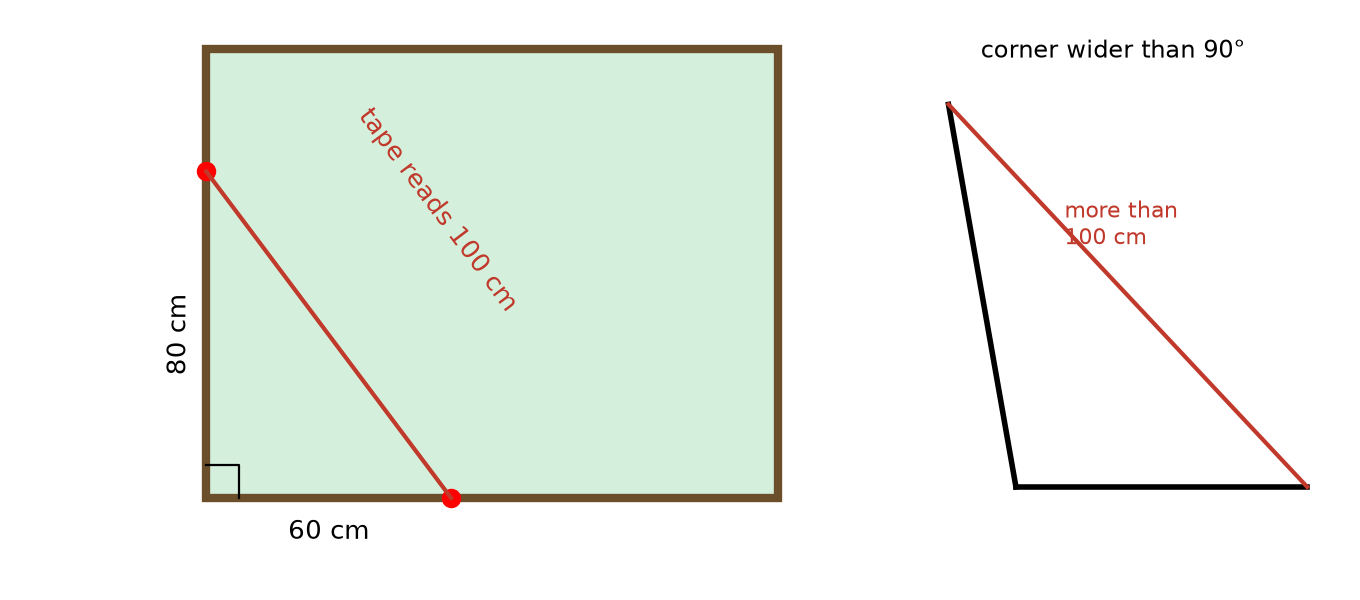
Worked Example 7.4 · Reading a 3-4-5 check
You mark 3 ft (36 in) and 4 ft (48 in) along the walls from a corner. The distance between the marks is 5 ft ¼ in, that is, 60¼ in. Is the corner square? If not, is it too open or too closed?
Step 1 · Compare. A square corner gives exactly 60 in. You read ¼ in more.
Step 2 · Interpret. Opening a corner wider pushes the marks apart. So a reading longer than 60 in means the angle is more than 90°. A shorter reading means less than 90°.
Step 3 · How far off? Using the law of cosines from the Going further box, the angle is about 90.5°.
Check: If the corner were square, 36² + 48² = 1,296 + 2,304 = 3,600 = 60². Your reading squared is 60.25² = 3,630.06, which is larger than 3,600, so the angle is larger than a right angle. ✓
In words: The corner is about half a degree wider than square. Whether that matters depends on the job. For tile, it would leave a tapering gap. Across a 12 ft wall, a half-degree error moves the far end of the wall about 12 × 12 × 0.0087 ≈ 1¼ in off from where a square corner would put it.
Check yourself 7.3 Is a triangle with sides 7, 24, and 25 a right triangle? Answer: 49 + 576 = 625 = 25². Yes.
Good stopping point.
7.4 The diagonal test for rectangles
Chapter 4 warned that equal opposite sides only prove a parallelogram. A parallelogram that leans has one diagonal longer than the other. A rectangle has two equal diagonals.
The diagonal test: if a four-sided frame has opposite sides equal, and its two diagonals are equal, then it is a rectangle. Builders call a frame or a room that fails this test out of square. Figure 7.3 shows both cases.
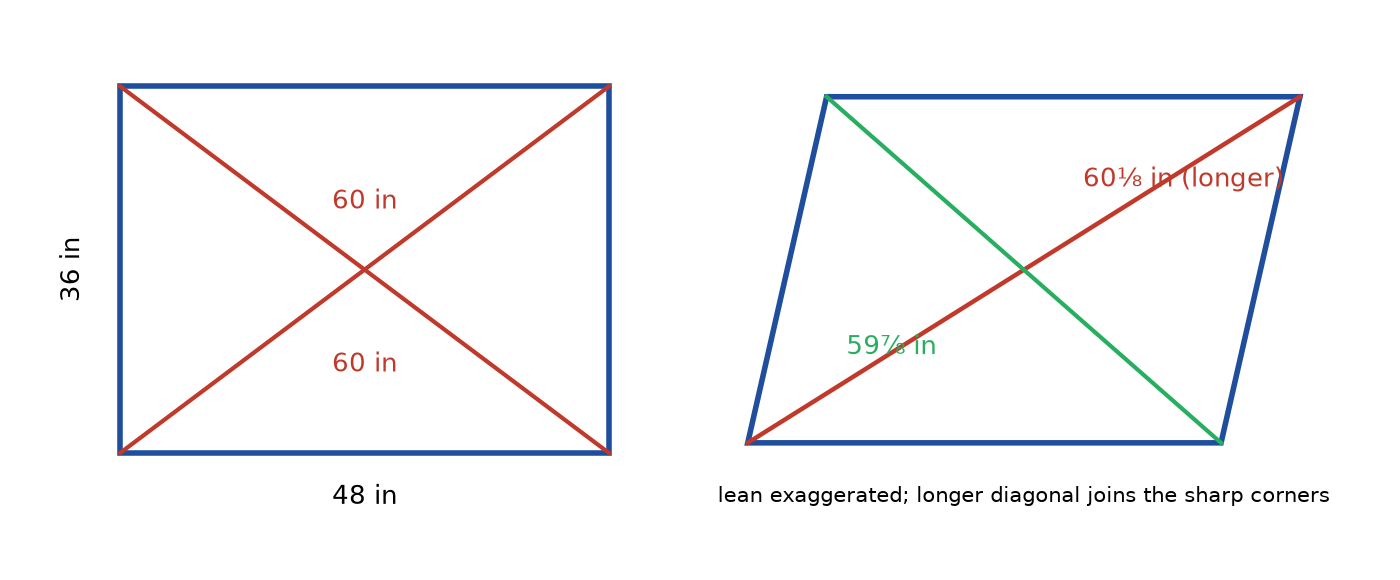
Worked Example 7.5 · Squaring a picture frame
You glue up a frame 48 in by 36 in. Its diagonals measure 60⅛ in and 59⅞ in. What should they be, and what do you do?
Step 1 · The ideal diagonal. √(48² + 36²) = √(2,304 + 1,296) = √3,600 = 60 in. (This is the 3-4-5 triangle scaled by 12.)
Step 2 · Compare. One diagonal is ⅛ in long and the other ⅛ in short, so the frame leans.
Step 3 · Fix it. Push gently on the two corners at the ends of the long diagonal, squeezing them together, until both diagonals read 60 in.
Check: The average of the two diagonals is (60.125 + 59.875) ÷ 2 = 60 in, the ideal value. Small leans change the two diagonals by about the same amount in opposite directions. ✓
In words: Both diagonals should be 60 in. Squeeze the long diagonal until they match. The same test works for a room, a deck frame, or a door opening: measure corner to corner both ways.
Check yourself 7.4 A room’s opposite walls are equal, and its diagonals are 15 ft 7 in and 15 ft 8 in. Is the room rectangular? Answer: No, it is out of square by a small amount. A difference of 1 in over a diagonal of about 15½ ft is small but measurable.
Good stopping point.
7.5 Distances on a grid, slopes, and ramps
Distance on a grid. To find the straight-line distance between two points on graph paper or a map grid, count the horizontal and vertical steps between them. They are the legs of a right triangle. From (1, 2) to (7, 10), the steps are 7 − 1 = 6 across and 10 − 2 = 8 up. The distance is √(36 + 64) = √100 = 10 units.
Slope. The steepness of a ramp or roof is described by its slope: rise ÷ run, where the run is the horizontal distance. A slope of 1:12 rises 1 unit for every 12 units across.
Worked Example 7.6 · How long must a ramp be?
The 2010 ADA Standards for Accessible Design (US Access Board) set a ramp’s running slope at “not steeper than 1:12” (section 405.2) and its rise for any single run at 30 in maximum (section 405.6; both checked October 23, 2026). A doorway is 24 in above the ground. What is the shortest run for a 1:12 ramp, and how long is its sloped surface?
Step 1 · Run. At 1:12, run = 12 × rise = 12 × 24 = 288 in = 24 ft (7.32 m).
Step 2 · Rise limit. 24 in is under 30 in, so one run is allowed.
Step 3 · Sloped surface. √(288² + 24²) = √(82,944 + 576) = √83,520 = 289.0 in.
Check: 289.0 ÷ 288 = 1.0035. The sloped length is only about 0.35% more than the run. For gentle slopes, the surface and the run are nearly equal. ✓
In words: A 24 in rise needs at least 24 ft of horizontal run at 1:12, and the ramp surface is about 289 in long, just 1 in more. The ramp would also need level landings at the top and bottom, so it takes up more ground than this.
Check yourself 7.5 How far apart are the grid points (0, 0) and (5, 12)? Answer: √(25 + 144) = √169 = 13 units.
Good stopping point.
7.6 Diagonals in three dimensions
The longest straight line inside a box runs from a bottom corner to the opposite top corner. To find it, use the Pythagorean theorem twice: first across the floor of the box, then up.
Worked Example 7.7 · Will the pole fit?
A moving box is 24 in long, 18 in wide, and 16 in high. What is the longest straight rod that fits inside?
Step 1 · Floor diagonal. √(24² + 18²) = √(576 + 324) = √900 = 30 in.
Step 2 · Up to the far top corner. √(30² + 16²) = √(900 + 256) = √1,156 = 34 in.
Check: In one step: √(24² + 18² + 16²) = √(576 + 324 + 256) = √1,156 = 34. ✓
In words: A rod up to 34 in long (86.4 cm) fits corner to corner. For the 12 ft by 10 ft room with 8 ft walls, the longest line from a floor corner to the opposite ceiling corner is √(144 + 100 + 64) = √308 = 17.55 ft.
Check yourself 7.6 A box is 3 m by 4 m by 12 m. Find its corner-to-corner diagonal. Answer: Floor diagonal √(9 + 16) = 5 m. Then √(25 + 144) = √169 = 13 m.
Good stopping point.
Practical activity · Check a corner and a room
Time: about 30 minutes. Materials: a tape measure, masking tape or chalk, a pencil, and a calculator.
- Choose a corner of a room. Put a piece of tape on the floor 3 ft (or 60 cm) out along one wall, and another 4 ft (or 80 cm) along the other wall.
- Measure between the tapes. Record it to the nearest ⅛ in or 1 mm. Is it longer or shorter than 5 ft (100 cm)? Is the corner more or less than 90°?
- Measure the room’s length and width. Calculate the diagonal it should have.
- Measure both diagonals of the room, from corner to corner. A helper holding the tape’s end makes this easier. Note any furniture you had to go around.
- Compare the two diagonals with each other and with your calculated value.
- Measure the diagonal of a TV, monitor, or phone screen and check its advertised size, as in Worked Example 7.2.
Reflect. How big would an error have to be before you could see it with your eyes? With a tape? Chapter 11 helps you decide whether a difference is a real error or just measurement uncertainty.
Common mistakes
- Using the theorem on a triangle with no right angle. a² + b² = c² holds only for right triangles.
- Adding when you should subtract. If you know the hypotenuse, subtract: leg = √(c² − b²).
- Treating the longest side as a leg. c is always the side opposite the right angle.
- Adding the sides instead of their squares. 3 + 4 = 7, but the hypotenuse is 5.
- Forgetting the square root. 144 + 100 = 244 is the square of the diagonal. The diagonal itself is √244 ≈ 15.62.
- Mixing units. Convert 5 ft ¼ in to 60¼ in before comparing with 36 and 48.
Going further (optional) · Formula review, and a proof
Formulas. a² + b² = c². Hypotenuse c = √(a² + b²). Leg a = √(c² − b²). Distance between grid points (x₁, y₁) and (x₂, y₂): √((x₂ − x₁)² + (y₂ − y₁)²). Box diagonal: √(l² + w² + h²).
A proof with four triangles. Take four copies of a right triangle with legs a and b and hypotenuse c. Arrange them inside a large square of side a + b, one in each corner, so their hypotenuses form a tilted square of side c in the middle. The large square’s area is (a + b)², which multiplies out to a² + 2ab + b². The four triangles take ½ab each, 2ab in total. The tilted square is what remains: c² = a² + 2ab + b² − 2ab = a² + b².
Angles from three sides. For any triangle with sides a, b, c, the law of cosines says c² = a² + b² − 2ab cos C, where C is the angle opposite c. When C = 90°, cos C = 0, and this becomes the Pythagorean theorem. In Worked Example 7.4, cos C = (1,296 + 2,304 − 3,630.06) ÷ (2 × 36 × 48) = −0.0087, which a calculator turns into C ≈ 90.5°.
Summary
- In a right triangle, the two legs form the right angle, and the hypotenuse is opposite it.
- The Pythagorean theorem: a² + b² = c². Find a missing side with a square root.
- The converse: if a² + b² = c², the triangle has a right angle.
- Pythagorean triples such as 3-4-5, 5-12-13, and their multiples give the 3-4-5 check for square corners.
- A rectangle’s two diagonals are equal. A frame with unequal diagonals is out of square.
- Slope is rise ÷ run. A 1:12 ramp needs 12 units of run per unit of rise.
- The same theorem gives distances on a grid and diagonals of boxes.
Key terms: Pythagorean theorem · legs · square root · converse · Pythagorean triples · 3-4-5 check · diagonals · out of square · slope
Review questions
Questions 1 to 6 practice single skills. Questions 7 to 9 combine them.
- Find the hypotenuse of a right triangle with legs 9 cm and 12 cm.
- Find the missing leg: hypotenuse 17 in, one leg 8 in.
- Without a calculator, between which two whole numbers is √50?
- Is a triangle with sides 10, 11, and 15 a right triangle?
- A 3-4-5 check on a deck corner gives 4 ft 11¾ in between the marks. Is the corner more or less than 90°?
- Find the distance between the grid points (2, 1) and (5, 5).
- A rectangular garden bed is 2.4 m by 1.8 m. What should each diagonal measure? You measure 3.02 m and 2.98 m. What does that tell you?
- A 16 ft ladder is set up following the one-quarter rule. How far is its foot from the wall, and how high does it reach?
- A tablet screen is 10 in diagonally with a 4:3 shape. Find its width, height, and area.
Explained answers
1. √(81 + 144) = √225 = 15 cm. (A 3-4-5 triangle scaled by 3.)
2. √(289 − 64) = √225 = 15 in. (The 8-15-17 triple.)
3. 7² = 49 and 8² = 64, so √50 is between 7 and 8, very close to 7 (√50 ≈ 7.07).
4. 100 + 121 = 221, and 15² = 225. They are not equal, so no. Since 221 is less than 225, the angle opposite the 15 side is a little more than 90°.
5. 4 ft 11¾ in is less than 5 ft, so the marks are too close together: the corner is less than 90°.
6. Across 3, up 4: √(9 + 16) = 5 units.
7. √(2.4² + 1.8²) = √(5.76 + 3.24) = √9 = 3.00 m. (A 3-4-5 triangle scaled by 0.6.) The diagonals differ by 4 cm, so the bed is out of square. Push the corners at the ends of the 3.02 m diagonal toward each other until both read 3.00 m.
8. Foot 16 ÷ 4 = 4 ft from the wall. Height √(256 − 16) = √240 = 15.49 ft, about 15 ft 6 in.
9. Diagonal in parts: √(16 + 9) = 5 parts, so one part is 10 ÷ 5 = 2 in. Width 8 in, height 6 in, area 48 in².
Connections
- Chapter 4 showed that triangles are rigid, which is why the converse works as a corner test.
- Chapter 11 asks how big a diagonal difference must be before it is a real error, not measurement noise.
- Chapter 12 uses the diagonal test on the project room, and the slope of a ramp for a threshold.
- Other MORI books: U22 Measure and Lay Out Before Making uses the 3-4-5 check for decks, sheds, and foundations. F10 Engineering Design and MORI CAD turns the grid-distance formula into coordinates for design.
Sources consulted for scope and accuracy: US Access Board, 2010 ADA Standards for Accessible Design, sections 405.2 (running slope not steeper than 1:12) and 405.6 (rise 30 inches maximum), https://www.access-board.gov/ada/; OSHA, 29 CFR 1926.1053(b)(5)(i), https://www.ecfr.gov/current/title-29/subtitle-B/chapter-XVII/part-1926/subpart-X/section-1926.1053 (both checked October 23, 2026); OpenStax, Prealgebra 2e, Section 9.3, “Use Properties of Angles, Triangles, and the Pythagorean Theorem,” https://openstax.org/details/books/prealgebra-2e, CC BY 4.0; Common Core State Standards for Mathematics, 8.G.B.6 to 8.G.B.8, https://www.thecorestandards.org/Math/Content/8/G/. All examples and exercises are original to MORI University. The room, frame, garden bed, and box sizes are illustrative.
Chapter 8 · Similarity
U03 Geometry: Measure, Diagonals, and Scale · MORI University · Foundation level
Time needed: about 75 minutes in total, in five short sections, plus 30 minutes for the activity. Each section ends at a good place to stop. You need: a pencil, graph paper, a ruler, a protractor, a calculator, and, for the activity, a stick or broom handle, a tape measure, and a sunny day.
Learning goals
By the end of this chapter, you will be able to:
- Decide whether two shapes are similar by checking angles and side ratios.
- Find and use a scale factor between similar shapes.
- Test real rectangles, such as photos, screens, and flags, for similarity.
- Use the AA test to recognize similar triangles.
- Measure a height you can’t reach, using shadows or a ruler at arm’s length.
Start here
You order an 8 by 10 inch print of a photo you took with your phone. When it arrives, part of the picture has been cut off. Nobody made a mistake. The phone’s photo and the print are rectangles of different shapes, so one can’t be an exact enlargement of the other.
This chapter is about when one shape is an exact enlargement or reduction of another. It gives you a precise test, a number called the scale factor, and a surprising use: measuring the height of a tree or a building without climbing it.
8.1 Same shape, different size
Two shapes are similar if one is an exact enlargement or reduction of the other. More precisely:
- Their corresponding angles are equal. (Corresponding means “in matching positions.”)
- Their corresponding lengths are all in the same ratio.
That ratio, new length ÷ original length, is the scale factor, written k.
- If k is more than 1, the new shape is an enlargement.
- If k is less than 1, it is a reduction.
- If k = 1, the shapes are the same size as well as the same shape. Shapes that are the same shape and size are congruent.
Both conditions matter. A 2 by 2 square and a 2 by 4 rectangle have equal angles (all 90°) but are not similar, because their sides are not in one ratio. A square and a rhombus with sides 2 have equal sides but are not similar, because their angles differ.
Worked Example 8.1 · Checking two triangles
Triangle P has sides 3, 4, and 5 cm. Triangle Q has sides 7.5, 10, and 12.5 cm. Are they similar?
Step 1 · Match the sides in order, shortest to longest. 7.5 ÷ 3 = 2.5. 10 ÷ 4 = 2.5. 12.5 ÷ 5 = 2.5.
Step 2 · Conclude. All three ratios are 2.5, so the triangles are similar, with scale factor k = 2.5 from P to Q.
Check: For triangles, equal side ratios guarantee equal angles, because a triangle is rigid (Chapter 4). Both are right triangles: 7.5² + 10² = 56.25 + 100 = 156.25 = 12.5². ✓
In words: Q is P enlarged 2.5 times. Every length in Q is 2.5 times the matching length in P.
Check yourself 8.1 A rectangle 4 cm by 6 cm is enlarged with scale factor 3. What are the new dimensions? Answer: 12 cm by 18 cm.
Good stopping point.
8.2 Similar rectangles: photos and screens
All rectangles have the same angles, so two rectangles are similar exactly when their aspect ratios match. The aspect ratio is long side ÷ short side (or the pair written as long:short, like 16:9).
Worked Example 8.2 · Why the print got cropped
Is a 4 by 6 in photo similar to an 8 by 10 in print? Is a 5 by 7 in photo similar to a 10 by 14 in print?
Step 1 · Aspect ratios. 6 ÷ 4 = 1.5. 10 ÷ 8 = 1.25. 7 ÷ 5 = 1.4. 14 ÷ 10 = 1.4.
Step 2 · Compare. 1.5 and 1.25 differ: 4 × 6 and 8 × 10 are not similar. 1.4 and 1.4 match: 5 × 7 and 10 × 14 are similar, with k = 2.
Step 3 · What gets cut. Enlarge the 4 by 6 photo so its short side fills 8 in: k = 8 ÷ 4 = 2, so it becomes 8 by 12 in. To fit in 10 in, 2 in of the long side must be cropped away, about 1 in from each end.
Check: 10 ÷ 12 = 0.833, so the print keeps about 83% of the photo’s long side. ✓
In words: A 4 by 6 photo can’t fill an 8 by 10 print without cropping about one-sixth of its length. A 5 by 7 photo scales perfectly to 10 by 14. Figure 8.1 shows both pairs.
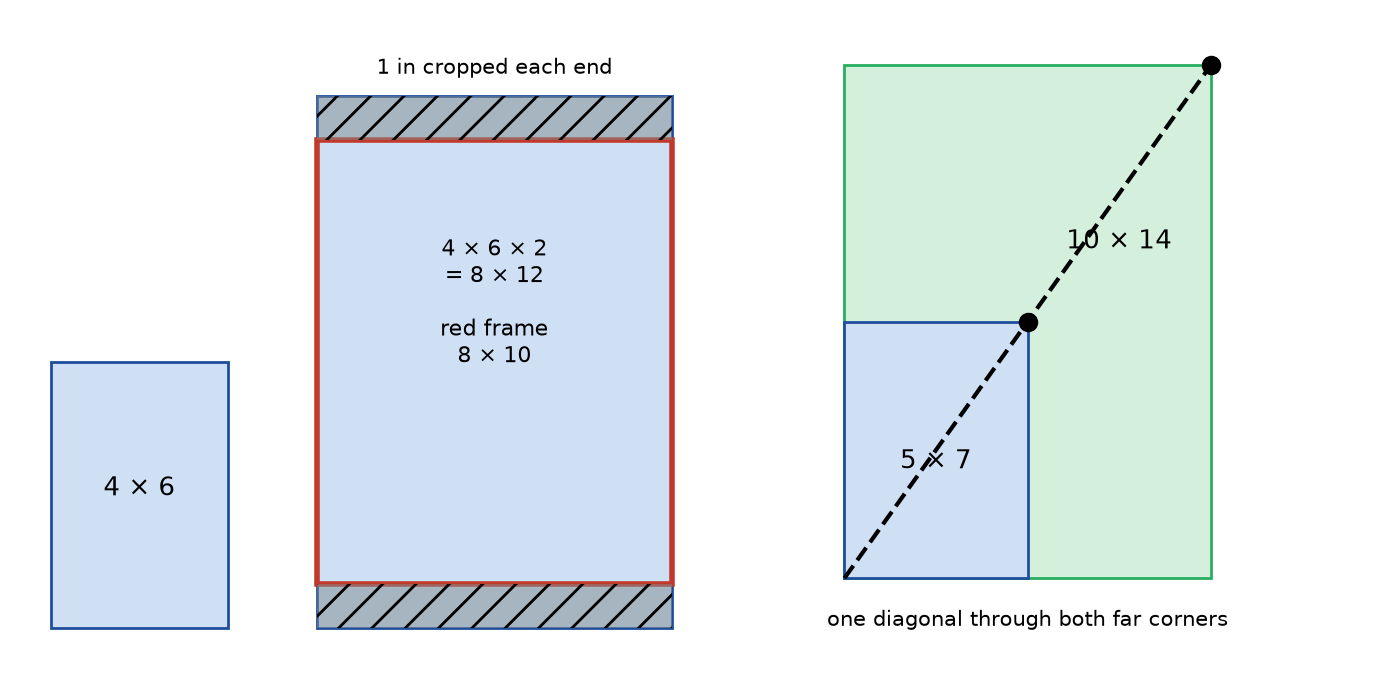
A diagonal test for similar rectangles. Place two rectangles with one corner in common, as in Figure 8.1, right. If a straight line from the shared corner passes through both opposite corners, the rectangles are similar. Picture framers and graphic designers use this trick with a straightedge.
Check yourself 8.2 Is a 16:9 screen 32 in wide similar to one 48 in wide and 27 in tall? Answer: 48 ÷ 27 = 1.778 = 16 ÷ 9. Yes. The first screen is 32 × 9 ÷ 16 = 18 in tall, and the scale factor is 1.5.
Good stopping point.
8.3 A real test: the official flag sizes
Executive Order 10834 (1959), reproduced by the National Archives (checked October 23, 2026), sets the US flag’s proportions as hoist (width) 1.0 to fly (length) 1.9. It also lists eleven official sizes, in feet. Are they all similar to the standard design?
| Size | Hoist (ft) | Fly (ft) | Fly ÷ hoist | Similar to 1:1.9? |
|---|---|---|---|---|
| 1 | 20 | 38 | 1.900 | yes, exactly |
| 2 | 10 | 19 | 1.900 | yes, exactly |
| 3 | 8.95 | 17.00 | 1.899 | very nearly |
| 4 | 7 | 11 | 1.571 | no |
| 5 | 5 | 9.50 | 1.900 | yes, exactly |
| 6 | 4.33 | 5.50 | 1.270 | no |
| 7 | 3.50 | 6.65 | 1.900 | yes, exactly |
| 8 | 3 | 4 | 1.333 | no |
| 9 | 3 | 5.70 | 1.900 | yes, exactly |
| 10 | 2.37 | 4.50 | 1.899 | very nearly |
| 11 | 1.32 | 2.50 | 1.894 | very nearly |
Fly ÷ hoist calculated by MORI University from the sizes in the order, rounded to three decimal places.
Worked Example 8.3 · Reading the table
Step 1 · Exact matches. Sizes 1, 2, 5, 7, and 9 have fly ÷ hoist exactly 1.9. For example, 6.65 ÷ 3.50 = 1.9.
Step 2 · Near matches. Size 3: 17.00 ÷ 8.95 = 1.8994. A flag with an exact 1.9 ratio and hoist 8.95 ft would have fly 8.95 × 1.9 = 17.005 ft, only 0.005 ft (about 1/16 in) more than the 17.00 listed. Sizes 10 and 11 are off by similarly tiny amounts (4.503 against 4.50 ft, and 2.508 against 2.50 ft). The listed dimensions appear to be rounded, so these sizes are similar to the standard design for any practical purpose.
Step 3 · Clear mismatches. Sizes 4, 6, and 8 have ratios far from 1.9. They are noticeably stubbier rectangles and are not similar to the standard design. The order lists them, but the table alone doesn’t say why. A reader shouldn’t guess.
Check: Size 2 to size 9: 10 ÷ 3 = 3.333 and 19 ÷ 5.70 = 3.333. Both lengths scale by the same factor, so these two are similar, with k = 10/3. ✓ Figure 8.2 plots all eleven ratios.
In words: Eight of the eleven official sizes are similar to the 1:1.9 design (five exactly, three after rounding). Three are not. Checking a ratio turns a vague “they look about the same” into a clear answer.
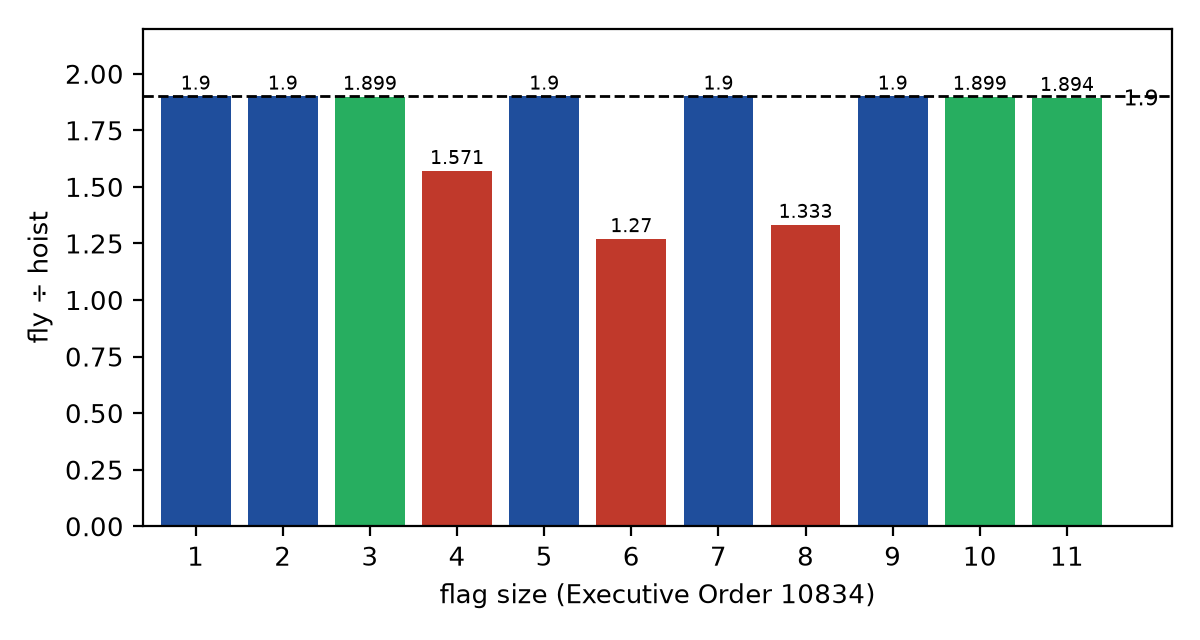
Check yourself 8.3 A flag is 4 ft by 7.6 ft. Is it similar to the standard design? Answer: 7.6 ÷ 4 = 1.9. Yes.
Good stopping point.
8.4 Similar triangles and the AA test
For triangles there is a shortcut. Since the three angles of a triangle add to 180°, two equal angles force the third to be equal too. And for triangles, equal angles guarantee equal side ratios. So:
AA similarity: if two angles of one triangle equal two angles of another, the triangles are similar.
Worked Example 8.4 · A missing side
Triangle A has sides 6, 8, and 9 m. Triangle B has the same angles, and its side matching the 8 m side is 12 m. Find B’s other two sides.
Step 1 · Scale factor. k = 12 ÷ 8 = 1.5.
Step 2 · Multiply. 6 × 1.5 = 9 m. 9 × 1.5 = 13.5 m.
Check: 9 ÷ 6 = 1.5, 12 ÷ 8 = 1.5, 13.5 ÷ 9 = 1.5. ✓ The perimeter also scales by k: (6 + 8 + 9) × 1.5 = 34.5 = 9 + 12 + 13.5. ✓
In words: B’s sides are 9, 12, and 13.5 m. The hard part is matching the sides correctly: the side opposite the largest angle in one triangle matches the side opposite the largest angle in the other.
Check yourself 8.4 Two triangles each have angles of 40° and 75°. Are they similar? Answer: Yes, by AA. (Both third angles are 180 − 40 − 75 = 65°.)
Good stopping point.
8.5 Measuring heights you can’t reach
Worked Example 8.5 · The shadow of a tree
On a sunny afternoon, a 1.0 m stick held upright casts a shadow 1.6 m long. At the same time, a tree’s shadow is 12 m long. How tall is the tree? Figure 8.3 shows the two triangles.
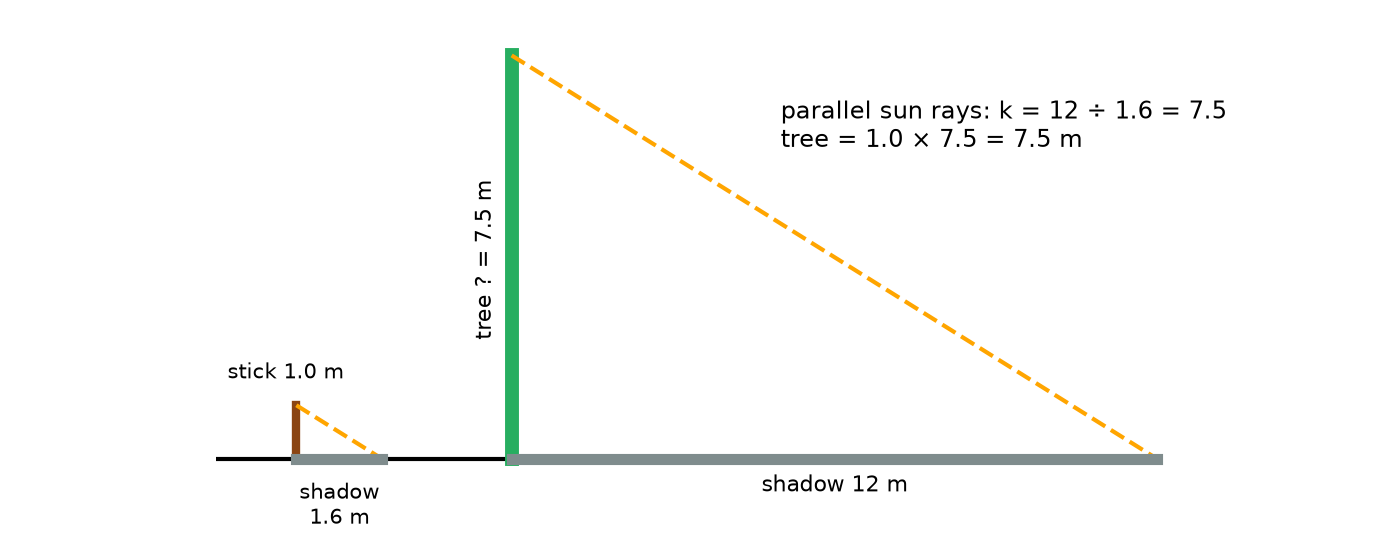
Step 1 · Why the triangles are similar. Each object, its shadow, and a sun ray make a triangle. Both have a right angle at the ground, if both stand upright on level ground. The sun is so far away that its rays arrive essentially parallel, so they meet the ground at the same angle. Two equal angles: AA.
Step 2 · Scale factor. 12 ÷ 1.6 = 7.5.
Step 3 · Height. 1.0 × 7.5 = 7.5 m, about 24.6 ft (7.5 ÷ 0.3048 = 24.61).
Check: Height ÷ shadow should be the same for both: 1.0 ÷ 1.6 = 0.625 and 7.5 ÷ 12 = 0.625. ✓
In words: The tree is about 7.5 m tall. The answer depends on three assumptions: both upright, level ground, and shadows measured at the same time. If the ground slopes, or the shadow’s tip is fuzzy among leaves, the answer could be off by a meter or more. Chapter 11 returns to checking assumptions like these.
Worked Example 8.6 · A ruler at arm’s length
On a cloudy day, you can use your arm. Hold a ruler upright at arm’s length, 60 cm from your eye. Standing 90 m from a building, you see the building’s height span 8 cm on the ruler. How tall is the building?
Step 1 · The similar triangles. Lines from your eye to the top and bottom of the building pass the top and bottom of the 8 cm span. The small triangle (eye to ruler) and the large triangle (eye to building) are similar.
Step 2 · Scale factor. Distances: 90 m ÷ 0.60 m = 150.
Step 3 · Height. 8 cm × 150 = 1,200 cm = 12 m.
Check: 0.08 ÷ 0.60 = 0.133 and 12 ÷ 90 = 0.133. ✓
In words: The building is about 12 m tall, roughly four stories. The method assumes you hold the ruler upright and parallel to the building, and that the distance is measured to the building’s base, at your eye’s height. An error of 2 mm in reading the ruler changes the answer by 0.2 × 150 = 30 cm.
Check yourself 8.5 A 6 ft person casts a 4 ft shadow. A flagpole nearby casts a 20 ft shadow. How tall is the pole? Answer: k = 20 ÷ 4 = 5, so 6 × 5 = 30 ft.
Good stopping point.
Practical activity · Measure a tall thing
Time: about 30 minutes, on a sunny day. Materials: a stick or broom handle, a tape measure, a ruler, and a calculator.
- Stand the stick upright on level ground (check it by eye from two directions). Measure the stick and its shadow.
- At once, measure the shadow of a tree, pole, or building. Mark the shadow’s tip with a stone, then measure from the base.
- Calculate the height using similar triangles.
- Repeat 20 minutes later. The shadows will both be different. Does your height answer change?
- Try the arm’s-length method on the same object, measuring your distance from it by pacing or with the tape.
- Compare the two answers. Which do you trust more, and why?
Reflect. Write down every assumption you made. Which one was hardest to meet in practice?
Common mistakes
- Checking only the angles of rectangles. All rectangles have 90° angles. Compare the side ratios.
- Matching the wrong sides. Order the sides by size, or match sides opposite equal angles.
- Adding instead of multiplying. Enlarging 4 by 6 so the short side is 8 does not give 8 by 10 (adding 4 to each side). It multiplies both sides by 2, giving 8 by 12.
- Measuring shadows at different times. The sun’s angle changes, so both shadows must be measured together.
- Using the scale factor for area. A scale factor of 2 doubles lengths but does not double area. Chapter 10 explains.
Going further (optional) · Formula review, and why parallel lines matter
Formulas. Scale factor k = new length ÷ matching original length. For similar shapes: every new length = k × original length, and every angle is unchanged. Two triangles are similar by AA (two equal angles), SSS (all three side ratios equal), or SAS (two side ratios equal with the angle between them equal).
A proportion form. In Worked Example 8.5, height ÷ shadow is the same for both triangles: 1.0 ÷ 1.6 = h ÷ 12. Multiply both sides by 12: h = 12 × 1.0 ÷ 1.6 = 7.5. This is the cross-multiplication method from U01 Ratios, Proportions, and Percent. The scale-factor method and the proportion method always give the same answer.
Why parallel rays give equal angles. When a line (the ground) crosses two parallel lines (two sun rays), it makes equal corresponding angles with them. That’s the same fact about parallel lines used in Chapter 4’s proof that a triangle’s angles add to 180°.
Summary
- Similar shapes have equal corresponding angles and all lengths in the same ratio, the scale factor k.
- k > 1 is an enlargement, k < 1 a reduction, and congruent shapes have k = 1.
- Rectangles are similar when their aspect ratios match.
- Of the eleven official US flag sizes in Executive Order 10834, eight are similar (five exactly, three after rounding) to the 1:1.9 design and three are not.
- AA similarity: two equal angles make two triangles similar.
- Shadows and a ruler at arm’s length use similar triangles to find heights.
Key terms: similar · corresponding · scale factor · enlargement · reduction · congruent · aspect ratios · AA similarity
Review questions
Questions 1 to 6 practice single skills. Questions 7 to 9 combine them.
- Are rectangles 6 by 9 cm and 10 by 15 cm similar? If so, what is the scale factor?
- A triangle with sides 5, 12, and 13 in is enlarged with k = 4. Find the new sides.
- A 3 by 5 in card is reduced with k = 0.6. Find the new size.
- A triangle has angles 30°, 60°, 90°. Another has angles 90° and 30°. Are they similar?
- Is a 2 by 3 ft poster similar to a 24 by 36 in poster?
- A 1.5 m post casts a 2.0 m shadow. A building’s shadow is 26 m. How tall is the building?
- A phone photo has aspect ratio 4:3. Will it fill a 5 by 7 in print without cropping? If not, enlarge it just enough to cover the whole print, and find how much is cropped.
- Flag size 7 in the order is 3.50 by 6.65 ft. Find its scale factor relative to size 9 (3 by 5.70 ft), and the dimensions of its union (7/13 of the hoist by 0.76 of the hoist).
- At arm’s length (65 cm), a 10 m tall tree spans 5 cm on a ruler. How far away is the tree?
Explained answers
1. 9 ÷ 6 = 1.5 and 15 ÷ 10 = 1.5. Similar. k = 10 ÷ 6 = 5/3, about 1.67.
2. 20, 48, and 52 in.
3. 3 × 0.6 = 1.8 and 5 × 0.6 = 3. 1.8 by 3 in.
4. Yes, by AA. The second triangle’s third angle is 60°.
5. 2 by 3 ft is 24 by 36 in. Yes, they are congruent (k = 1).
6. k = 26 ÷ 2.0 = 13. Height 1.5 × 13 = 19.5 m.
7. 4:3 is 1.333 and 7 ÷ 5 = 1.4, so no. If the short side fills 5 in, the long side is only 4 × 5 ÷ 3 = 6.67 in, which leaves a gap. So enlarge until the long side fills 7 in: the short side becomes 3 × 7 ÷ 4 = 5.25 in, and 0.25 in of the short side is cropped (about ⅛ in from each edge). Check: 7 ÷ 5.25 = 1.333. ✓
8. k = 3.50 ÷ 3 = 1.1667 (and 6.65 ÷ 5.70 = 1.1667 ✓). Union: 3.50 × 7/13 = 1.885 ft by 3.50 × 0.76 = 2.66 ft.
9. Scale factor = 10 m ÷ 0.05 m = 200. Distance 0.65 × 200 = 130 m.
Connections
- Chapter 9 uses scale factors for drawings and maps, where k is usually tiny, like 1/48 or 1/24,000.
- Chapter 10 shows what happens to area and volume when lengths scale by k.
- Chapter 11 examines the assumptions in the shadow method.
- Other MORI books: U01 Ratios, Proportions, and Percent covers proportions and cross-multiplication. U30 Geography and GIS: Maps You Can Question builds on scale factors for maps.
Sources consulted for scope and accuracy: Executive Order 10834, “Flag of the United States” (1959), as codified by the National Archives, https://www.archives.gov/federal-register/codification/executive-order/10834.html (checked October 23, 2026); OpenStax, Contemporary Mathematics, Section 10.3, “Triangles” (similar triangles), https://openstax.org/details/books/contemporary-mathematics, CC BY 4.0; Common Core State Standards for Mathematics, 8.G.A.4 and 8.G.A.5, https://www.thecorestandards.org/Math/Content/8/G/. All examples and exercises are original to MORI University. The stick, tree, and building measurements are illustrative.
Chapter 9 · Scale Drawings and Maps
U03 Geometry: Measure, Diagonals, and Scale · MORI University · Foundation level
Time needed: about 75 minutes in total, in five short sections, plus 40 minutes for the activity. Each section ends at a good place to stop. You need: a pencil, an eraser, a ruler marked in both inches and centimeters, graph paper (¼ in squares or 5 mm squares), a calculator, and a tape measure. A printed or on-screen topographic map helps in Section 9.3.
Learning goals
By the end of this chapter, you will be able to:
- Read a scale written as a ratio, in words, or as a bar, and convert between the forms.
- Convert drawing lengths to real lengths and real lengths to drawing lengths.
- Measure distances on a map using its scale.
- Explain why a scale bar still works after a map is enlarged or reduced, but a written ratio does not.
- Choose a scale and make an accurate scale drawing of a room or lot.
Start here
A floor plan, a garden design, a road map, and a model train are all similar to the real thing (Chapter 8), shrunk by a fixed scale factor. Every length is reduced by the same factor, and every angle is unchanged. That is what makes them useful. You can measure a plan with a ruler and know how big the real room is, or plan where furniture fits before you lift anything.
This chapter shows the three ways a scale is written, how to convert in both directions, and how to make your own scale drawing that someone else could measure and trust.
9.1 Three ways to write a scale
A scale drawing is a drawing in which every length is the real length multiplied by the same scale factor. The scale tells you that factor. It can be written three ways.
- Representative fraction (ratio): 1:50 means 1 unit on the drawing stands for 50 of the same unit in reality. 1 cm stands for 50 cm, 1 in for 50 in. No units are needed because they cancel.
- Verbal scale: “¼ inch = 1 foot” or “1 inch = 2,000 feet.” This uses two different units, so it’s easy to read but must be converted before you compare it with a ratio.
- Scale bar (graphic scale): a ruler-like line drawn on the plan, marked with real distances.
Converting a verbal scale to a ratio. Put both sides in the same unit. For ¼ in = 1 ft: 1 ft = 12 in, so ¼ in stands for 12 in. Divide: 12 ÷ ¼ = 48. The ratio is 1:48. This is a common scale for US house plans. A metric house plan often uses 1:50 or 1:100.
Worked Example 9.1 · Comparing scales
Which drawing is larger: one at ½ in = 1 ft, or one at 1:50?
Step 1 · Convert ½ in = 1 ft. 12 ÷ ½ = 24, so the scale is 1:24.
Step 2 · Compare. At 1:24, each real length is divided by 24. At 1:50, it is divided by 50. Dividing by a smaller number gives a larger drawing.
Check: A 12 ft (144 in) wall is 144 ÷ 24 = 6 in at 1:24, and 144 ÷ 50 = 2.88 in at 1:50. ✓
In words: The ½ in = 1 ft drawing is larger, a bit more than twice the size (50 ÷ 24 = 2.08). People sometimes call 1:24 a “larger scale” than 1:50 for this reason, even though 24 is the smaller number.
Check yourself 9.1 Convert the verbal scale “1 in = 10 ft” to a ratio. Answer: 10 ft = 120 in, so 1:120.
Good stopping point.
9.2 Converting in both directions
There are two directions, and they use opposite operations.
- Real → drawing: divide the real length by the scale number (for 1:n, divide by n).
- Drawing → real: multiply the drawing length by the scale number.
Always ask: should the answer be bigger or smaller? A real room is bigger than its drawing.
Worked Example 9.2 · Drawing the project room
The room used in Chapter 12 measures 148 in by 128 in (12 ft 4 in by 10 ft 8 in, about 3.76 m by 3.25 m). Find its size on a plan at ¼ in = 1 ft, and on a plan at 1:50.
Step 1 · Real lengths in feet. 148 ÷ 12 = 12.333 ft. 128 ÷ 12 = 10.667 ft.
Step 2 · At ¼ in = 1 ft. 12.333 × ¼ = 3.083 in. 10.667 × ¼ = 2.667 in. On a ruler marked in sixteenths, these are about 3 1/16 in and 2 11/16 in.
Step 3 · At 1:50, in metric. 148 in = 148 × 2.54 = 375.92 cm, and 375.92 ÷ 50 = 7.52 cm. 128 in = 325.12 cm, and 325.12 ÷ 50 = 6.50 cm.
Check: Use the ratio 1:48 for the first plan: 148 ÷ 48 = 3.083 in. ✓ The two plans should differ by the factor 50 ÷ 48 = 1.042: 7.52 cm = 2.961 in, and 3.083 ÷ 2.961 = 1.041. ✓
In words: At ¼ in = 1 ft, the room is about 3 1/16 by 2 11/16 in on paper. At 1:50, it is 7.52 by 6.50 cm. Both fit easily on a sheet, leaving room for labels. Figure 9.1 shows the outline at ¼ in = 1 ft, with a scale bar.
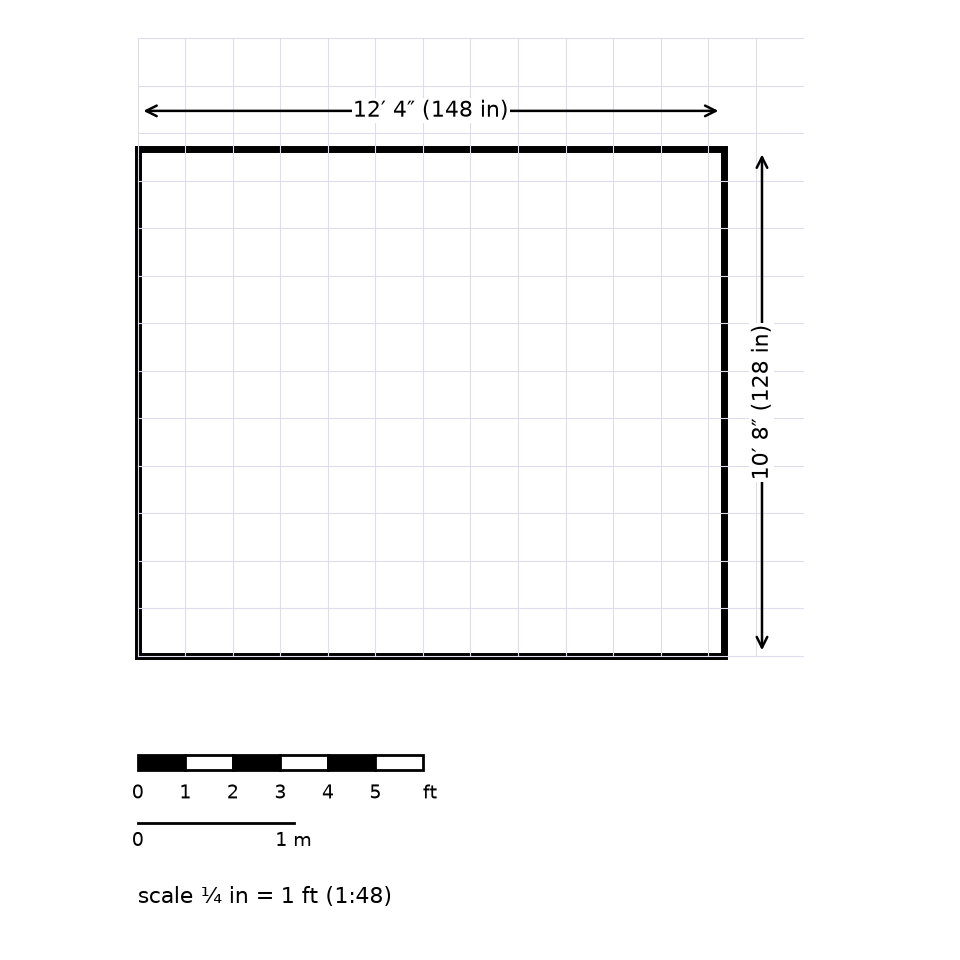
Worked Example 9.3 · Reading a plan
On a 1:50 plan, a kitchen counter measures 4.8 cm long. How long is the real counter?
Step 1 · Multiply. 4.8 × 50 = 240 cm = 2.40 m.
Step 2 · US units. 240 ÷ 2.54 = 94.5 in, about 7 ft 10½ in.
Check: Bigger or smaller? The real counter (240 cm) is bigger than the drawing (4.8 cm). ✓
In words: The counter is 2.40 m, about 7 ft 10½ in, long.
Check yourself 9.2 On a ¼ in = 1 ft plan, a wall measures 2¾ in. How long is it? Answer: 2¾ ÷ ¼ = 11 ft.
Good stopping point.
9.3 Map scales
Maps use the same idea with much smaller scale factors. The US Geological Survey (USGS) fact sheet “Map Scales” (FS-038-00, checked October 23, 2026) explains that the familiar 7.5-minute topographic maps are at 1:24,000, where 1 inch on the map represents 2,000 feet on the ground. It also notes 1:63,360, where 1 inch represents 1 mile, and 1:100,000, where 1 centimeter represents 1 kilometer.
You can check these. 1:24,000 means 1 in stands for 24,000 in, and 24,000 ÷ 12 = 2,000 ft exactly. In metric, 1 cm stands for 24,000 cm = 240 m. And 1 mile = 5,280 × 12 = 63,360 in, which is why 1:63,360 is “an inch to the mile.”
Worked Example 9.4 · How far to the lake?
On a 1:24,000 map, a trail from a parking lot to a lake measures 3.5 in in a straight line. How far is that on the ground?
Step 1 · Using the verbal scale. 3.5 × 2,000 = 7,000 ft. In miles, 7,000 ÷ 5,280 = 1.33 mi.
Step 2 · Metric. 3.5 in = 8.89 cm on the map. 8.89 × 240 = 2,133.6 m, about 2.13 km.
Check: 7,000 ft × 0.3048 = 2,133.6 m. ✓ The two routes agree exactly because both conversion factors (2.54 and 0.3048) are exact.
In words: The lake is about 1.33 mi (2.13 km) away in a straight line. The trail itself winds and climbs, so the walk is longer. A map distance is a horizontal distance between points, not the length of a path along the ground. U30 Geography and GIS: Maps You Can Question examines this and other questions about maps.
Check yourself 9.3 On a 1:100,000 map, two towns are 6.4 cm apart. How far apart are they? Answer: 1 cm = 1 km, so 6.4 km (about 4 mi).
Good stopping point.
9.4 Why scale bars survive copying
Suppose you photocopy a 1:24,000 map at 50%. Every length on the copy is half as long as on the original, so 1 in on the copy now stands for 4,000 ft. The ratio printed in the margin, 1:24,000, is now wrong. The true scale of the copy is 1:48,000.
But the scale bar was copied too, and it shrank by the same 50%. If it was 1 in long and labeled “2,000 ft,” it is now ½ in long and still labeled “2,000 ft,” which is still correct. Figure 9.2 shows this.
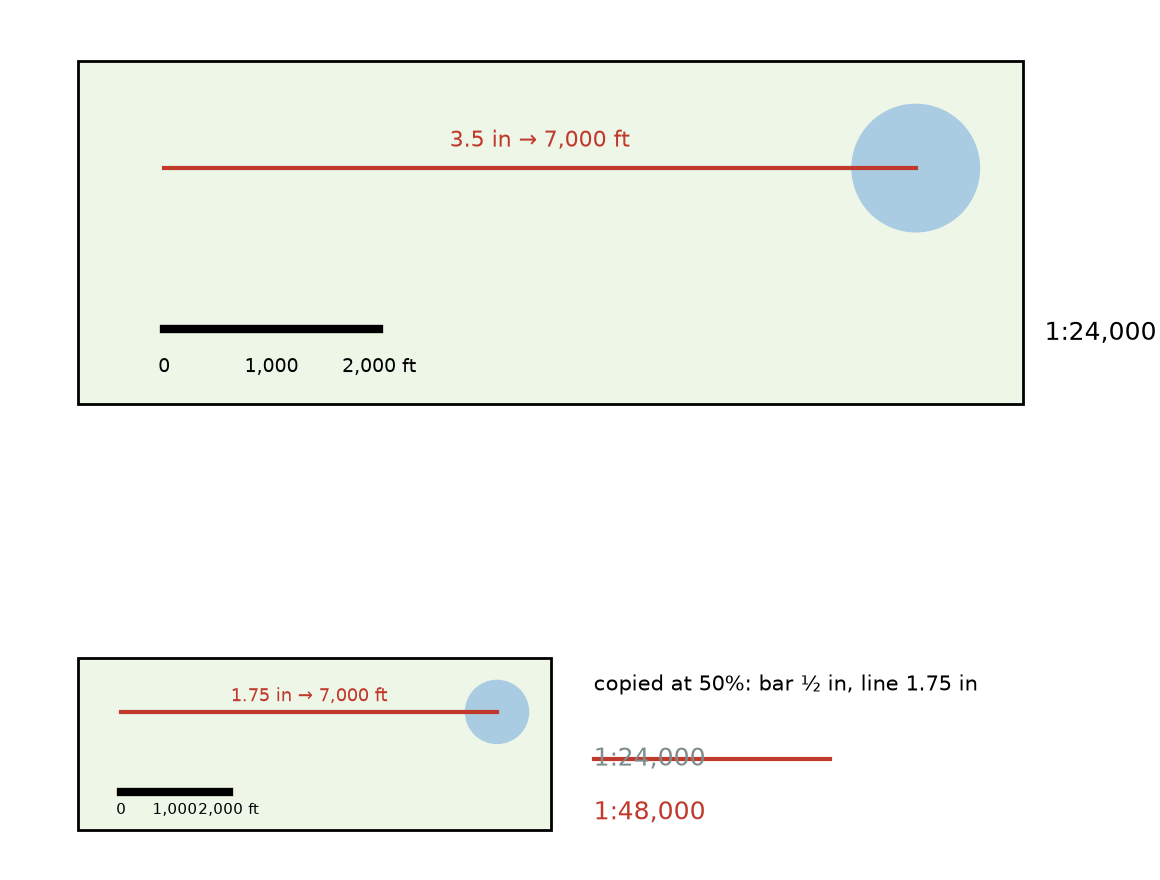
This is why maps on phones and websites show a scale bar rather than a ratio: you zoom in and out, and the bar changes size with the map.
Worked Example 9.5 · Measuring with a bar
On a zoomed map on a screen, the scale bar labeled 500 m is 3.2 cm long on the screen. Two points are 9.6 cm apart on the screen. How far apart are they?
Step 1 · How many bar lengths? 9.6 ÷ 3.2 = 3.
Step 2 · Distance. 3 × 500 = 1,500 m = 1.5 km.
Check: The scale is 3.2 cm to 500 m = 50,000 cm, so about 1:15,625. Then 9.6 × 15,625 = 150,000 cm = 1,500 m. ✓
In words: The points are 1.5 km (about 0.93 mi) apart. You never needed the ratio, which is just as well, since it changes every time you zoom.
Check yourself 9.4 A 1:50 plan is printed at 200%. What is the true scale of the print? Answer: Lengths are doubled, so 1:25.
Good stopping point.
9.5 Making your own scale drawing
A good scale drawing has five things: accurate measurements, a chosen scale, the scale written on the drawing, a scale bar, and labels for the key dimensions.
Choosing a scale. Find the largest real dimension and the space you have on the paper. Divide to find the most real length that 1 unit of paper can hold, then round up to a convenient scale.
Worked Example 9.6 · A scale for a backyard
A backyard is 120 ft by 80 ft. You want to draw it on letter paper (8½ by 11 in) with at least ½ in of margin on each side. Choose a scale.
Step 1 · Space available. 11 − 1 = 10 in by 8½ − 1 = 7½ in.
Step 2 · Most feet per inch. Long side: 120 ÷ 10 = 12 ft per in. Short side: 80 ÷ 7½ = 10.7 ft per in. The tighter fit is 12 ft per inch.
Step 3 · Round up to a convenient scale. 1 in = 20 ft is easy to work with, and as a ratio it is 1:240 (20 × 12 = 240).
Check: At 1 in = 20 ft, the yard is 120 ÷ 20 = 6 in by 80 ÷ 20 = 4 in. That fits in 10 by 7½ in with room for a title and labels. ✓ (1 in = 15 ft would also fit, at 8 by 5.33 in, and would show more detail.)
In words: 1 in = 20 ft (1:240) fits the yard neatly on letter paper. Draw a scale bar of 0, 20, 40, and 60 ft.
Drawing tips.
- Use graph paper and let each square stand for a round number: ¼ in squares at ¼ in = 1 ft means one square per foot.
- Draw lightly first. Measure your drawn lines with a ruler and compare them with the real lengths before inking.
- Angles are not scaled. A 90° corner stays 90°, and a 30° bend stays 30°. Only lengths change.
- Label real dimensions on the drawing, not drawing lengths.
Check yourself 9.5 On graph paper with 5 mm squares, you want each square to be 25 cm in reality. What ratio scale is that? Answer: 250 mm ÷ 5 mm = 50, so 1:50.
Good stopping point.
Practical activity · Draw a room to scale
Time: about 40 minutes. Materials: a tape measure, graph paper, a ruler, a pencil, and a calculator.
- Measure the length and width of a room to the nearest ¼ in or 5 mm. Measure each wall at floor level, and note the positions of doors and windows along each wall.
- Choose a scale using the method of Worked Example 9.6. ¼ in = 1 ft or 1:50 works for most rooms.
- Draw the outline. Then measure your drawn lines with a ruler to check them.
- Add doors and windows in the right positions. Show each door’s swing as a quarter circle (Chapter 5).
- Write the scale, draw a scale bar, and label the real dimensions.
- Measure one diagonal on your drawing, convert it to a real length, and compare it with the room’s diagonal from the Pythagorean theorem (Chapter 7).
Reflect. Keep this drawing. Chapter 12’s project starts from a drawing like it.
Common mistakes
- Multiplying when you should divide. Real → drawing: divide. Drawing → real: multiply. Ask whether the answer should be bigger or smaller.
- Mixing units in a ratio. “1:48” means the same units on both sides. “¼ in = 1 ft” is not 1:4.
- Trusting a ratio after copying. Enlarging or reducing changes the true ratio. Use the scale bar.
- Treating map distance as walking distance. A map shows straight-line horizontal distance.
- Scaling angles. Angles stay the same at every scale.
- Forgetting to write the scale on the drawing. Without it, nobody else can measure the drawing.
Going further (optional) · Formula review, and scale as a scale factor
Formulas. For a scale 1:n: drawing length = real length ÷ n, and real length = drawing length × n. The scale factor from real to drawing is k = 1/n. A verbal scale “a = b” becomes 1:n with n = b ÷ a, after putting a and b in the same unit.
Copying and zooming. Copying a 1:n drawing at a percentage p multiplies every length by p/100. The new scale is 1:(n × 100/p). At 50%, 1:24,000 becomes 1:48,000. At 200%, 1:50 becomes 1:25.
Areas on a plan are not scaled by n. A 1 cm by 1 cm square on a 1:50 plan is 50 cm by 50 cm in reality, which is 2,500 cm², not 50 cm². Chapter 10 explains why the area factor is n², here 2,500.
Summary
- A scale drawing has every length multiplied by the same factor. The scale states it.
- A representative fraction like 1:48 uses the same units on both sides. A verbal scale like ¼ in = 1 ft uses two units. A scale bar is a drawn ruler.
- Real → drawing: divide by n. Drawing → real: multiply by n.
- USGS 1:24,000 maps: 1 in = 2,000 ft, and 1 cm = 240 m.
- A scale bar stays correct when a map or floor plan is copied or zoomed. A written ratio doesn’t.
- Angles are not scaled. Only lengths change.
Key terms: scale drawing · scale · representative fraction · verbal scale · scale bar · floor plan
Review questions
Questions 1 to 6 practice single skills. Questions 7 to 9 combine them.
- Convert “1 in = 8 ft” to a ratio.
- On a 1:100 plan, a wall is 6.3 cm. How long is the real wall?
- A table is 1.8 m long. How long is it on a 1:50 plan?
- On a 1:24,000 map, two peaks are 2.25 in apart. How far apart are they, in feet and miles?
- A 1:24,000 map is enlarged to 150%. What is the true scale of the copy?
- Which drawing is larger: ⅛ in = 1 ft or 1:100?
- A room is 15 ft 6 in by 11 ft 9 in. Draw it (or find its size) at ¼ in = 1 ft, and at 1:50 in centimeters.
- A 1:24,000 map shows a lake roughly as a rectangle 1.5 in by 0.75 in. Estimate the lake’s area in acres. (1 acre = 43,560 ft².)
- A garden 18 m by 11 m is to be drawn on paper with a usable area of 25 cm by 18 cm. Choose a convenient ratio scale and give the drawing’s size.
Explained answers
1. 8 ft = 96 in, so 1:96.
2. 6.3 × 100 = 630 cm = 6.3 m.
3. 180 ÷ 50 = 3.6 cm.
4. 2.25 × 2,000 = 4,500 ft, and 4,500 ÷ 5,280 = 0.85 mi.
5. 24,000 × 100/150 = 16,000, so 1:16,000.
6. ⅛ in = 1 ft is 12 ÷ ⅛ = 1:96. Dividing by 96 gives a slightly larger drawing than dividing by 100, so ⅛ in = 1 ft is larger, but only by about 4%.
7. At ¼ in = 1 ft: 15.5 × ¼ = 3.875 in (3⅞ in) by 11.75 × ¼ = 2.9375 in (2 15/16 in). At 1:50: 15 ft 6 in = 186 in = 472.44 cm, so 472.44 ÷ 50 = 9.45 cm. 11 ft 9 in = 141 in = 358.14 cm, so 358.14 ÷ 50 = 7.16 cm.
8. Real sides: 1.5 × 2,000 = 3,000 ft and 0.75 × 2,000 = 1,500 ft. Area 3,000 × 1,500 = 4,500,000 ft². In acres, 4,500,000 ÷ 43,560 = 103.3 acres, roughly 100 acres. (Since a real lake isn’t a rectangle, this is an estimate, as the question says.) Note that the area factor is 2,000 × 2,000 per square inch, not 2,000.
9. 1,800 cm ÷ 25 = 72 and 1,100 cm ÷ 18 = 61.1. You need at least 72 cm of garden per cm of paper. Round up to a convenient scale, 1:100: the drawing is 18 cm by 11 cm. (1:75 would also fit, at 24 by 14.7 cm.)
Connections
- Chapter 8 showed that a scale drawing is similar to the real thing.
- Chapter 10 explains why areas on a plan scale by n², as in Question 8.
- Chapter 12 turns a measured sketch into a scale floor plan with furniture.
- Other MORI books: U30 Geography and GIS: Maps You Can Question goes much further with map scales, projections, and digital maps. F20 Prospecting, Mineral Resources, and Field Mapping uses topographic maps in the field. U22 Measure and Lay Out Before Making uses scale drawings for building projects.
Sources consulted for scope and accuracy: US Geological Survey, “Map Scales,” Fact Sheet FS-038-00, https://pubs.usgs.gov/fs/0038-00/report.pdf (checked October 23, 2026), a US government work in the public domain; National Institute of Standards and Technology, NIST Handbook 44, Appendix C (1 in = 2.54 cm exactly; 1 ft = 0.3048 m exactly; 1 acre = 43,560 ft²), https://www.nist.gov/pml/owm/nist-handbook-44-current-edition; Common Core State Standards for Mathematics, 7.G.A.1, https://www.thecorestandards.org/Math/Content/7/G/. All examples and exercises are original to MORI University. The room, counter, yard, garden, and map measurements are illustrative.
Chapter 10 · Scaling Length, Area, and Volume
U03 Geometry: Measure, Diagonals, and Scale · MORI University · Foundation level
Time needed: about 75 minutes in total, in five short sections, plus 30 minutes for the activity. Each section ends at a good place to stop. You need: a pencil, graph paper, a ruler, a calculator, and, if you have them, 27 sugar cubes, dice, or building blocks of one size.
Learning goals
By the end of this chapter, you will be able to:
- State and use the rule: when lengths scale by k, areas scale by k² and volumes by k³.
- Find the volume of a rectangular box and convert between cubic units.
- Convert volumes to liters and US gallons.
- Predict how area, volume, and weight change when an object is enlarged or reduced.
- Explain why big and small versions of the same design behave differently.
Start here
Chapter 5 ended with a puzzle: a 20-inch pizza has four times the area of a 10-inch pizza, not twice. Chapter 9 ended with another: on a 1:50 plan, 1 cm² stands for 2,500 cm² of floor, not 50 cm². These aren’t separate tricks. They are one rule, and it extends to volume, where the effect is even bigger.
The rule matters whenever you scale anything: a recipe for a bigger pan, a model of a building, a bigger aquarium, or a larger flag. Lengths, areas, and volumes all change, but by different factors.
10.1 The rule: k, k², k³
Take a square 1 cm on each side. Its area is 1 cm². Enlarge it with scale factor k = 2. It’s now 2 cm on each side, and its area is 2 × 2 = 4 cm². Four of the original squares fit inside it. With k = 3, the side is 3 cm, and the area is 9 cm².
Now take a cube 1 cm on each edge. Enlarge it with k = 2. It becomes 2 by 2 by 2, and holds 2 × 2 × 2 = 8 of the original cubes. With k = 3, it holds 27. Figure 10.1 shows this.
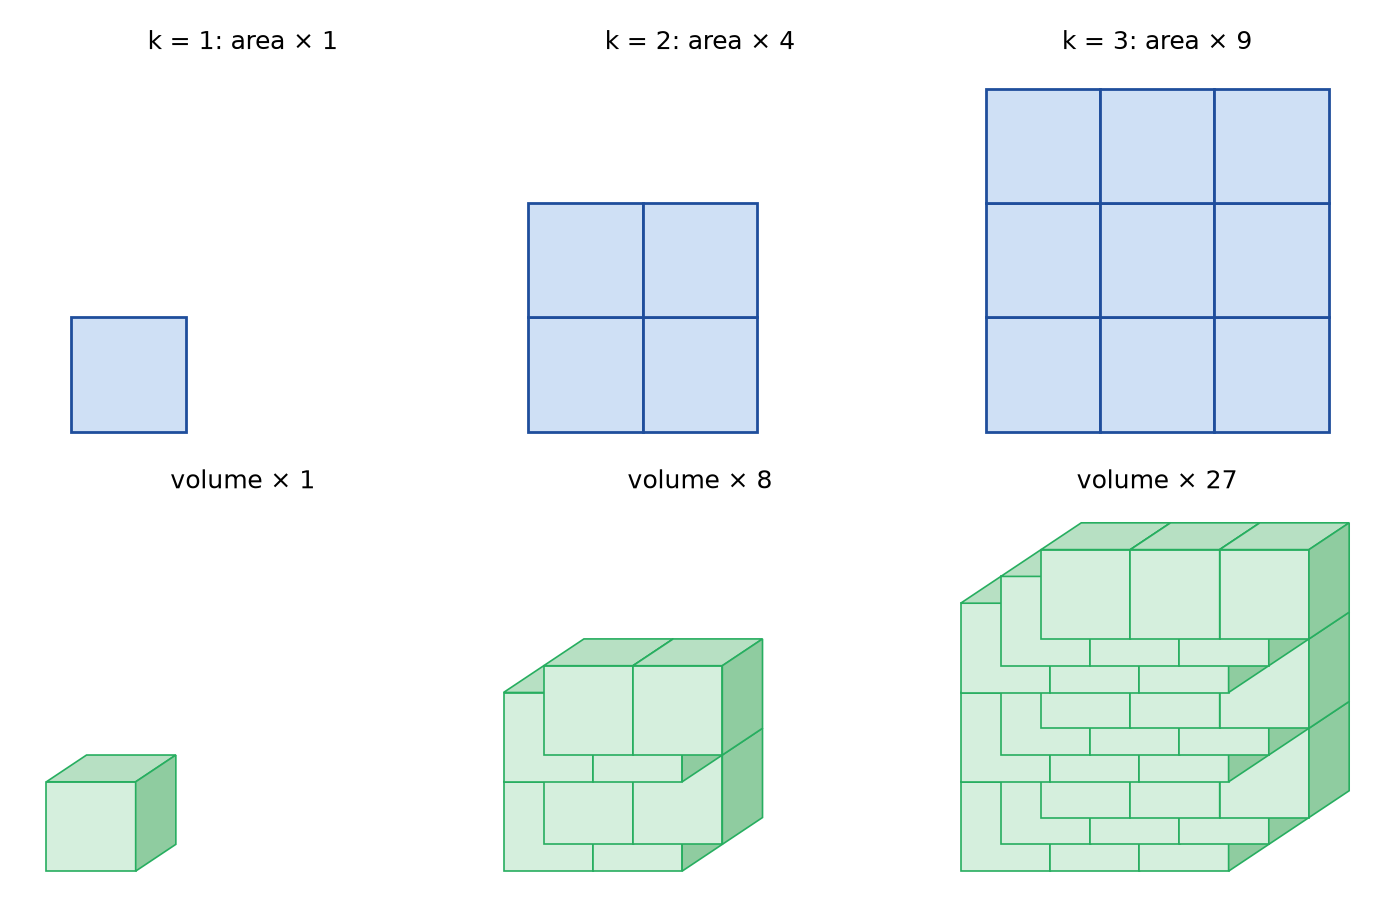
The scaling rule. When a shape is enlarged or reduced with scale factor k:
- every length (sides, perimeter, diameter, height) is multiplied by k;
- every area is multiplied by k², the area factor;
- every volume is multiplied by k³, the volume factor.
It works for every shape, not just squares and cubes, because any shape can be approximated as closely as you like by tiny squares (for area) or tiny cubes (for volume), and every one of them scales the same way.
Worked Example 10.1 · The pizzas again
Compare a 16-inch pizza with a 12-inch pizza using the scaling rule.
Step 1 · Length factor. k = 16 ÷ 12 = 4/3 = 1.333.
Step 2 · Area factor. k² = (4/3)² = 16/9 = 1.778.
Check: From Chapter 5, the areas are 201.06 and 113.10 in², and 201.06 ÷ 113.10 = 1.778. ✓
In words: The 16-inch pizza is only a third wider, but it has 1.78 times the area of the 12-inch. That’s why two 12-inch pizzas (2 × 1 = 2 units of area, against 1.78) are more food than one 16-inch.
Check yourself 10.1 A square tablecloth is enlarged so its sides are 1.5 times as long. How many times as much fabric does it use? Answer: 1.5² = 2.25 times as much.
Good stopping point.
10.2 Areas of scaled shapes
The area factor saves calculation. Find the area of one shape, and you get the area of every similar shape at once.
Worked Example 10.2 · Two flag sizes
From Chapter 8, size 9 of the official flag sizes is 3 by 5.70 ft, and size 2 is 10 by 19 ft. They are similar, with k = 10/3. How much more fabric does the larger flag need?
Step 1 · Area factor. k² = (10/3)² = 100/9 = 11.11.
Step 2 · Area of the larger flag. The small flag is 3 × 5.70 = 17.1 ft². So the larger is 17.1 × 100/9 = 190 ft².
Check: Directly: 10 × 19 = 190 ft². ✓
In words: A flag about 3.3 times as wide needs about 11.1 times as much fabric. (Chapter 6 found the blue union was 3.68 ft² on the small flag. On the large one, it is 3.68 × 11.11 = 40.9 ft².)
Worked Example 10.3 · Area on a plan
On a 1:50 plan, a rug is drawn as a rectangle 4.0 cm by 6.0 cm. What is the real area of the rug?
Step 1 · Area on paper. 4.0 × 6.0 = 24 cm².
Step 2 · Area factor. k = 50 (paper to real), so k² = 2,500.
Step 3 · Real area. 24 × 2,500 = 60,000 cm² = 6 m² (since 1 m² = 100 × 100 = 10,000 cm²).
Check: Real sides: 4.0 × 50 = 200 cm = 2 m, and 6.0 × 50 = 300 cm = 3 m. 2 × 3 = 6 m². ✓
In words: The rug is 2 m by 3 m, 6 m² (about 64.6 ft²). Multiplying the paper area by 50 instead of 2,500 would give 1,200 cm², a rug the size of a doormat.
Check yourself 10.2 A photo is enlarged with k = 3. If the original has area 24 in², what is the area of the enlargement? Answer: 24 × 9 = 216 in².
Good stopping point.
10.3 Volume and its units
Volume is the amount of space inside a solid, measured in cubic units: cubes with edges of one unit. A cubic foot (ft³) is a cube 1 ft on each edge. A cubic meter (m³) is a cube 1 m on each edge.
Volume of a rectangular box = length × width × height. Think of it as layers: the floor area (length × width) tells how many unit cubes fit in one layer, and the height tells how many layers.
Converting cubic units. Because each edge converts separately, the length factor is cubed:
| Conversion | Reason |
|---|---|
| 1 ft³ = 12 × 12 × 12 = 1,728 in³ | 12 in per foot, three times |
| 1 yd³ = 3 × 3 × 3 = 27 ft³ | 3 ft per yard, three times |
| 1 m³ = 100 × 100 × 100 = 1,000,000 cm³ | 100 cm per meter, three times |
| 1 in³ = 2.54³ = 16.387064 cm³ (exact) | 2.54 cm per inch, three times |
Liquid volume. A liter (L) is 1,000 cm³, a cube 10 cm on each edge. So 1 m³ = 1,000 L. A US gallon is defined as exactly 231 in³ (NIST Handbook 44, checked October 23, 2026), which is about 3.785 L.
Worked Example 10.4 · How much does the aquarium hold?
A rectangular aquarium is 30 in long, 12 in wide, and 18 in tall, measured inside. How much water does it hold when full, in gallons and liters? Figure 10.2 shows the tank.
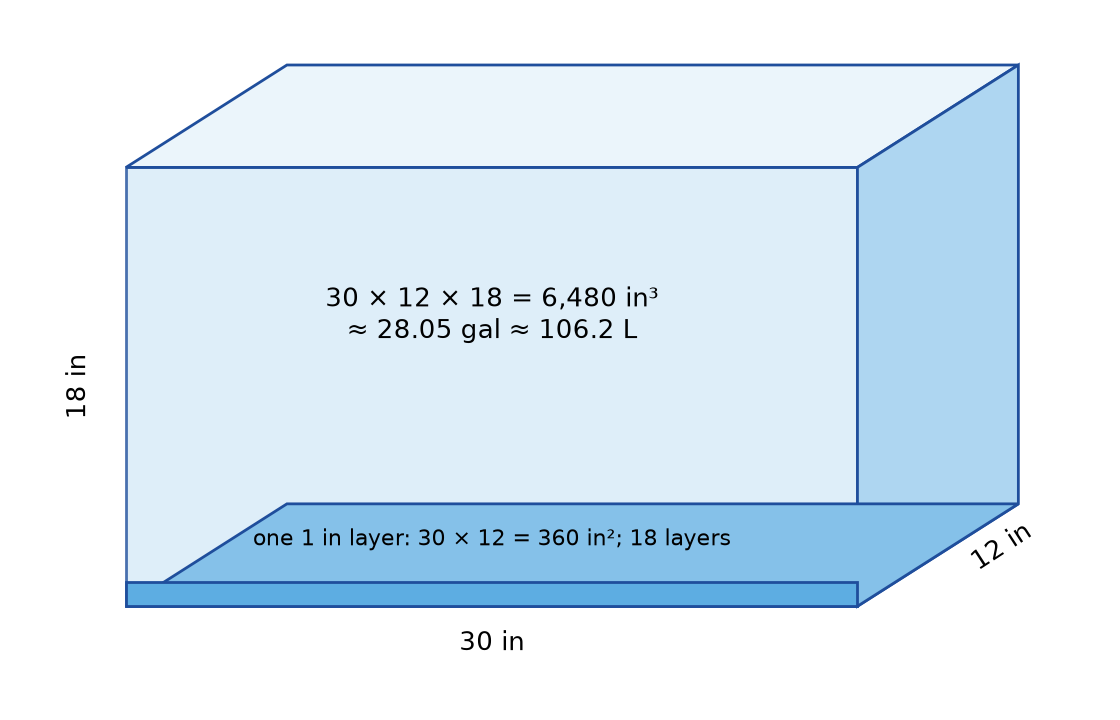
Step 1 · Volume in cubic inches. 30 × 12 × 18 = 6,480 in³.
Step 2 · Gallons. 6,480 ÷ 231 = 28.05 gal.
Step 3 · Liters. 6,480 × 16.387064 = 106,188 cm³, and 106,188 ÷ 1,000 = 106.19 L.
Check: 28.05 gal × 3.785 L per gal = 106.2 L. ✓ And in cubic feet, 6,480 ÷ 1,728 = 3.75 ft³, which is 2.5 × 1.0 × 1.5 ft. ✓
In words: The full tank holds about 28 gal, or 106 L. In practice, you’d fill it an inch or two below the top, and gravel and decorations take up space, so the actual water is less.
Water also has weight. A liter of water has a mass of about 1 kg, so 106 L weighs about 106 kg (about 234 lb), plus the tank. That’s why a large aquarium needs a strong stand.
Worked Example 10.5 · Mulch for a garden bed
A garden bed is 8 ft by 4 ft, and you want mulch 3 in deep. Mulch is sold by the cubic yard. How much do you need?
Step 1 · Same units. 3 in = 0.25 ft.
Step 2 · Volume. 8 × 4 × 0.25 = 8 ft³.
Step 3 · Cubic yards. 8 ÷ 27 = 0.30 yd³.
Check: In yards from the start: 8 ft = 2.667 yd, 4 ft = 1.333 yd, and 3 in = 0.0833 yd. 2.667 × 1.333 × 0.0833 = 0.296 yd³. ✓
In words: You need 8 ft³, about 0.3 yd³. A common mistake is to divide by 3 instead of 27, which would give 2.67 yd³, about nine times too much.
Check yourself 10.3 A box is 2 m by 1.5 m by 0.5 m. Find its volume in m³ and liters. Answer: 2 × 1.5 × 0.5 = 1.5 m³ = 1,500 L.
Good stopping point.
10.4 Volumes of scaled objects
The volume factor k³ grows fast. Doubling every length multiplies volume by 8. Tripling multiplies it by 27.
Worked Example 10.6 · A bigger tank of the same shape
You want a tank similar to the aquarium in Worked Example 10.4, but with every dimension 1.5 times as long: 45 by 18 by 27 in. How much will it hold?
Step 1 · Volume factor. k³ = 1.5³ = 3.375.
Step 2 · New volume. Using the unrounded 28.052 gal, 28.052 × 3.375 = 94.68 gal.
Check: Directly: 45 × 18 × 27 = 21,870 in³, and 21,870 ÷ 231 = 94.68 gal. ✓
In words: A tank only 50% longer in every direction holds about 3.4 times as much water, close to 95 gal, and would weigh about 358 kg (790 lb) of water. Its glass area, though, is multiplied by only 1.5² = 2.25.
Weight follows volume. For objects made of the same material, weight (more precisely, mass) is proportional to volume. A model made at 1:10 scale from the same material as the original weighs (1/10)³ = 1/1,000 as much.
Check yourself 10.4 A cube-shaped box with 30 cm edges holds 27 L. A box with 60 cm edges is similar. How much does it hold? Answer: k = 2, so 27 × 8 = 216 L. (Check: 60 × 60 × 60 = 216,000 cm³ = 216 L. ✓)
Good stopping point.
10.5 Why size changes behavior: the square-cube law
When an object is enlarged, its volume (and weight) grows by k³, but its surface area and the cross-section of its supports grow by only k². This mismatch is called the square-cube law.
Surface area compared with volume. A 1 cm cube has a surface of 6 faces × 1 cm² = 6 cm², for a volume of 1 cm³: 6 cm² of surface per cm³. A 3 cm cube has a surface of 6 × 9 = 54 cm², for a volume of 27 cm³: 2 cm² per cm³. Bigger objects have less surface for each unit of volume.
You can see the consequences every day.
- Crushed ice melts faster than a block of the same weight, because it has much more surface touching the warmer drink.
- Small pots dry out faster than big ones. They have more surface per unit of soil to lose water through.
- Big structures can’t simply be scaled up. The strength of a beam or bone depends on its cross-sectional area (k²), but the weight it carries grows as k³. Double every dimension of a shelf, and it carries 8 times its own weight on supports only 4 times as strong. Engineers make bigger structures with relatively thicker supports for this reason.
Worked Example 10.7 · A shelf scaled up
A small wooden shelf bracket supports a load safely. A designer doubles every dimension of the shelf and the bracket. Compare the new shelf’s own weight with the bracket’s strength.
Step 1 · Weight. Volume factor 2³ = 8, so the shelf’s weight is 8 times as much.
Step 2 · Strength. The bracket’s cross-section scales by 2² = 4, so it is roughly 4 times as strong.
Step 3 · Compare. 8 ÷ 4 = 2. The load on each unit of bracket cross-section is doubled.
Check: For any k, load per unit of cross-section scales by k³ ÷ k² = k. For k = 2, that’s 2. ✓
In words: The bigger shelf is relatively weaker. Every unit of its bracket carries twice the load. This is a simplified model (real strength also depends on shape and material), but it explains why you can’t safely scale a design up just by multiplying its dimensions. F10 Engineering Design and MORI CAD treats this properly.
Check yourself 10.5 Which has more surface per unit of volume: a 2 cm cube or a 4 cm cube? Answer: The 2 cm cube: 24 cm² for 8 cm³ = 3 cm² per cm³. The 4 cm cube has 96 cm² for 64 cm³ = 1.5 cm² per cm³.
Good stopping point.
Practical activity · Build and count
Time: about 30 minutes. Materials: 27 sugar cubes, dice, or blocks (or graph paper and patience), and a calculator.
- Build cubes with edges of 1, 2, and 3 blocks. Count the blocks in each (volume).
- Count the visible square faces on the outside of each cube, including the bottom (surface area).
- Make a table: edge, surface, volume, and surface ÷ volume.
- Measure the inside of a box or a container at home. Calculate its volume in cubic inches or cubic centimeters, and convert to gallons or liters.
- If you can, fill it with water using a measuring jug, and compare the measured volume with your calculation.
Reflect. Did your calculated and measured volumes agree? Which measurement contributed most to the difference? (Hint: the thickness of the container walls, and how full you filled it.)
Common mistakes
- Using k for area or volume. Lengths scale by k, areas by k², volumes by k³.
- Converting cubic units with the length factor. 1 ft³ = 1,728 in³, not 12 in³. 1 yd³ = 27 ft³, not 3 ft³.
- Mixing units in a volume. Put length, width, and depth in the same unit first (3 in = 0.25 ft).
- Measuring the outside of a container. For how much it holds, measure the inside.
- Assuming a bigger copy is just as strong. Weight grows faster than strength.
Going further (optional) · Formula review, and cylinders
Formulas. Lengths × k, areas × k², volumes × k³. Box: V = lwh. Surface of a box: 2(lw + lh + wh). 1 L = 1,000 cm³. 1 m³ = 1,000 L. 1 gal = 231 in³ exactly ≈ 3.785 L.
Cylinders. A cylinder is a circle stacked into layers, so its volume is base area × height: V = πr²h. A can 8.0 cm across and 11 cm tall (the can from Chapter 5, if it were that tall) holds π × 4² × 11 = 552.9 cm³, about 0.55 L. The scaling rule still holds: a similar can twice as wide and twice as tall holds 8 times as much, 4,423 cm³ (about 4.4 L).
A ratio check. The volume factor is the area factor times the length factor: k³ = k² × k. For the bigger tank, 3.375 = 2.25 × 1.5. ✓
Summary
- When lengths scale by k, areas scale by the area factor k², and volumes by the volume factor k³.
- Volume is measured in cubic units. A box’s volume is length × width × height.
- 1 cubic foot = 1,728 in³. 1 yd³ = 27 ft³. 1 cubic meter = 1,000,000 cm³ = 1,000 liters. 1 US gallon = 231 in³ exactly, about 3.785 L.
- A plan at 1:n has an area factor of n².
- The square-cube law: when an object is enlarged, its weight grows faster than its surface or the strength of its supports.
Key terms: area factor · volume factor · volume · cubic units · cubic foot · cubic meter · liter · gallon · square-cube law
Review questions
Questions 1 to 6 practice single skills. Questions 7 to 9 combine them.
- A shape is enlarged with k = 4. By what factors do its perimeter, area, and volume change?
- A rectangle has area 30 cm². A similar rectangle has sides 2.5 times as long. What is its area?
- Find the volume of a box 50 cm by 40 cm by 30 cm, in cm³ and liters.
- Convert 2 yd³ to cubic feet, and 0.5 ft³ to cubic inches.
- A room is 12 ft by 10 ft with 8 ft walls. Find its volume in ft³ and m³.
- A model car is built at 1:18 scale. The real car is 4.5 m long. How long is the model?
- Two similar water tanks have heights 1.2 m and 1.8 m. The smaller holds 400 L. How much does the larger hold?
- A raised bed is 6 ft by 3 ft by 10 in deep. Soil comes in 1.5 ft³ bags. How many bags do you need?
- On a 1:24,000 map, a park is drawn as a square 0.5 in on each side. What is the park’s real area in acres? Use the area factor.
Explained answers
1. Perimeter × 4, area × 16, volume × 64.
2. 30 × 2.5² = 30 × 6.25 = 187.5 cm².
3. 50 × 40 × 30 = 60,000 cm³ = 60 L.
4. 2 × 27 = 54 ft³. 0.5 × 1,728 = 864 in³.
5. 12 × 10 × 8 = 960 ft³. In metric, 960 × 0.3048³ = 960 × 0.0283168 = 27.18 m³.
6. 4.5 ÷ 18 = 0.25 m = 25 cm.
7. k = 1.8 ÷ 1.2 = 1.5, so k³ = 3.375. 400 × 3.375 = 1,350 L.
8. 10 in = 0.8333 ft. Volume 6 × 3 × 0.8333 = 15 ft³. Bags: 15 ÷ 1.5 = 10 bags. (Buy one extra if the soil will settle.)
9. Real side 0.5 × 2,000 = 1,000 ft, so real area 1,000 × 1,000 = 1,000,000 ft². With the area factor: map area 0.25 in², and each square inch is 2,000 × 2,000 = 4,000,000 ft², so 0.25 × 4,000,000 = 1,000,000 ft². ✓ In acres, 1,000,000 ÷ 43,560 = 22.96 acres, about 23 acres.
Connections
- Chapters 5 and 9 raised the puzzles this chapter explains.
- Chapter 11 shows that a small error in each length becomes a larger percentage error in area, and larger still in volume.
- Chapter 12 uses areas for flooring and paint, and could use volume for the room’s air.
- Other MORI books: U01 Ratios, Proportions, and Percent covers the ratios and unit conversions. F18 Sustainable Homes, Water, and Community Infrastructure uses volumes for rainwater tanks and heating. F10 Engineering Design and MORI CAD develops the strength-and-scale argument.
Sources consulted for scope and accuracy: National Institute of Standards and Technology, NIST Handbook 44, Appendix C (1 in = 2.54 cm exactly; 1 US gallon = 231 in³ exactly; 1 L = 1,000 cm³), https://www.nist.gov/pml/owm/nist-handbook-44-current-edition (checked October 23, 2026); OpenStax, Contemporary Mathematics, Section 10.7, “Volume and Surface Area,” https://openstax.org/details/books/contemporary-mathematics, CC BY 4.0; Common Core State Standards for Mathematics, 7.G.B.6, https://www.thecorestandards.org/Math/Content/7/G/. All examples and exercises are original to MORI University. The aquarium, garden bed, shelf, and map measurements are illustrative.
Chapter 11 · Measurement Uncertainty and Checking Spatial Assumptions
U03 Geometry: Measure, Diagonals, and Scale · MORI University · Foundation level
Time needed: about 80 minutes in total, in five short sections, plus 40 minutes for the activity. Each section ends at a good place to stop. You need: a pencil, paper, a calculator, a tape measure, and, if you have them, a carpenter’s level (or a level app on a phone), a length of string, and two helpers or two weights.
Learning goals
By the end of this chapter, you will be able to:
- Describe a measurement as a value with an uncertainty, such as 148 ± ¼ in.
- Use repeated measurements to estimate a measurement’s spread.
- Find the range of possible areas from uncertain lengths.
- Decide whether a difference between two measurements is real or within uncertainty.
- Check the assumptions of straight, square, level, and rectangular before trusting a geometry calculation.
Start here
Every calculation in Chapters 3 to 10 assumed two things: the measurements were right, and the shapes were ideal. The 12 ft by 10 ft room had walls exactly 12 ft and 10 ft long, at exactly 90° to each other, on a perfectly flat floor.
Chapter 1 called these ideal shapes. Real rooms are close to them, but never exact. A careful measurer doesn’t pretend otherwise. Instead, they say how sure they are, check whether the shape really is what the calculation assumes, and decide whether the difference matters for the job. This chapter gives you the tools for all three, and Chapter 12 uses them on a real room.
11.1 Every measurement has an uncertainty
No measurement is exact. A tape measure marked in sixteenths of an inch can’t tell you a length to a thousandth of an inch. The smallest step you can read on an instrument is its resolution. A careful reading is usually good to about half of one division: ±1/32 in on a tape marked in sixteenths, or ±0.5 mm on a tape marked in millimeters.
But reading the tape is rarely the biggest source of error. Others include:
- the tape sagging over a long distance, or not running straight;
- the hook at the end being loose or bent;
- the wall’s surface being uneven, so the length depends on where you measure;
- measuring to the wrong point, such as a baseboard instead of the wall.
So in practice, a room measured with a tape is usually good to about ±⅛ in to ±¼ in, not ±1/32 in.
We write a measurement with its measurement uncertainty like this: 148 ± ¼ in. The number 148 is the nominal value, the best single estimate. The true length is very likely between the lower bound, 147¾ in, and the upper bound, 148¼ in.
This is a simplified approach. NIST Technical Note 1297, Guidelines for Evaluating and Expressing the Uncertainty of NIST Measurement Results (checked October 23, 2026), describes how professional measurers do it: they evaluate some uncertainty components statistically, from repeated observations (“Type A”), and others by other means, such as instrument specifications and experience (“Type B”), then combine them. A simple range is enough for room-scale geometry.
Check yourself 11.1 A wall measures 3.62 m with a tape whose readings you trust to ±3 mm. Write the measurement with its uncertainty and give the bounds. Answer: 3.620 ± 0.003 m. Lower bound 3.617 m, upper bound 3.623 m.
Good stopping point.
11.2 Repeated measurements
How do you know your uncertainty is ±¼ in rather than ±1/32 in? Measure more than once. Measure at different heights on the wall, or have a different person measure. The spread of the readings shows how repeatable the measurement is.
Worked Example 11.1 · Five readings of one wall
You measure the long wall of a room five times, at different heights and from both ends. The readings are 148, 148⅛, 147⅞, 148¼, and 147¾ in. Figure 11.1 plots them.
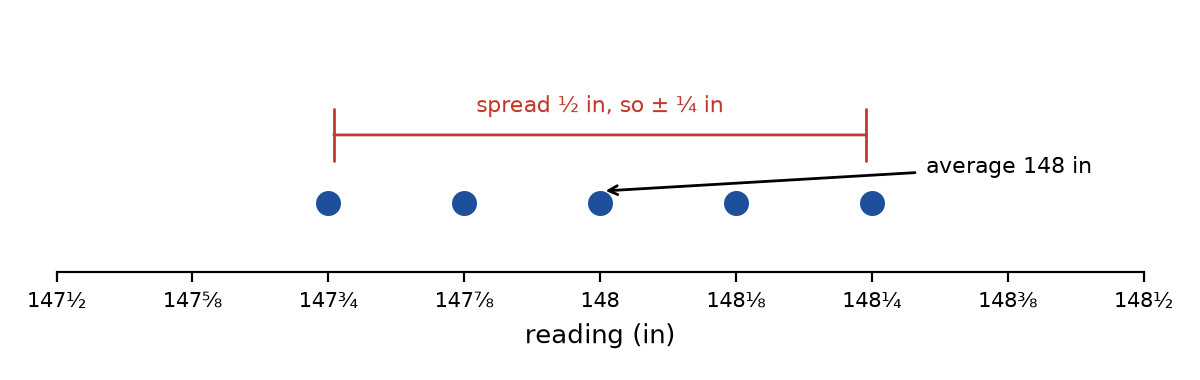
Step 1 · Average. Add the readings: 148 + 148.125 + 147.875 + 148.25 + 147.75 = 740. Divide by 5: 148.0 in.
Step 2 · Spread. The largest is 148¼ and the smallest is 147¾. The spread is ½ in, or ±¼ in around the average.
Step 3 · Report. 148 ± ¼ in, that is, 12 ft 4 in ± ¼ in.
Check: Every reading lies within ¼ in of 148. ✓
In words: The wall is 148 in long, give or take ¼ in. The tape could be read to 1/32 in, but the wall itself, and the way it was measured, limit the result to about ±¼ in.
Check yourself 11.2 Readings of a width are 90.4, 90.6, 90.5, 90.3, and 90.7 cm. Give the average and the uncertainty from the spread. Answer: Average 452.5 ÷ 5 = 90.5 cm. Spread 90.7 − 90.3 = 0.4 cm, so 90.5 ± 0.2 cm.
Good stopping point.
11.3 How uncertainty carries into area
If the lengths are uncertain, so is any area calculated from them. The simplest honest method is to calculate the smallest and largest possible areas.
Worked Example 11.2 · The range of a floor area
A room measures 148 ± ¼ in by 128 ± ¼ in. What is its floor area, with its range? Figure 11.2 shows the idea.
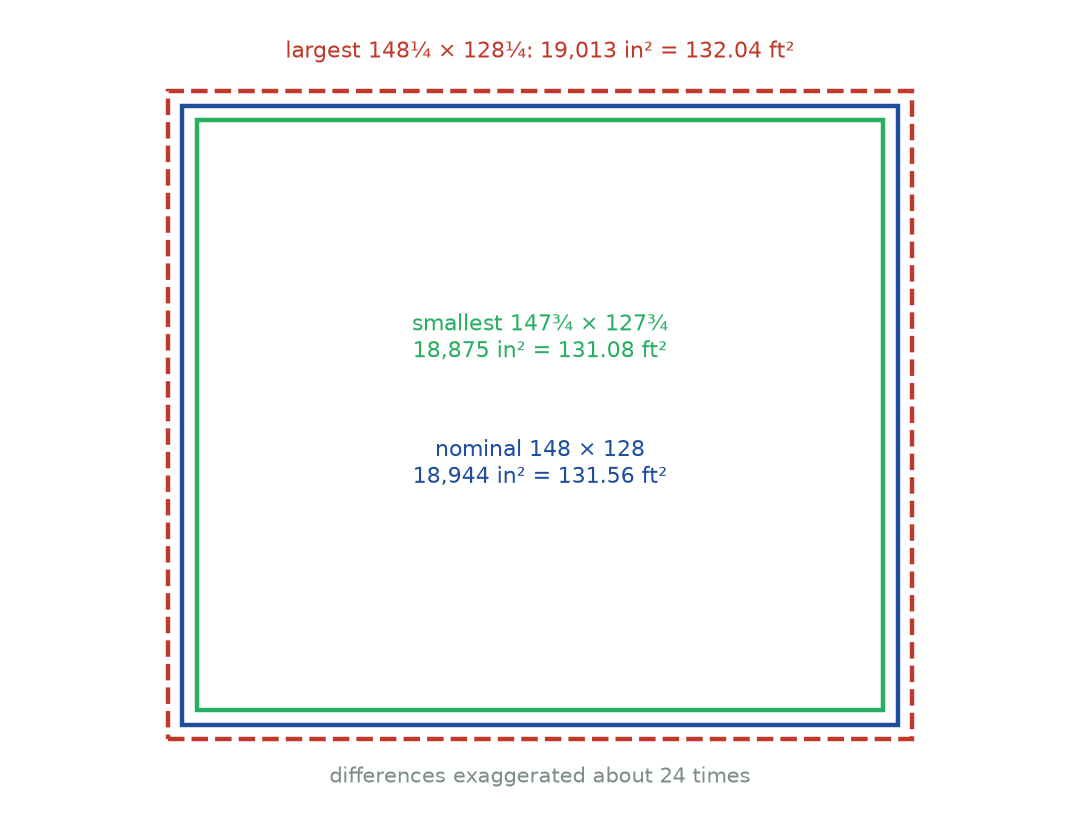
Step 1 · Nominal area. 148 × 128 = 18,944 in². In square feet, 18,944 ÷ 144 = 131.56 ft².
Step 2 · Smallest. 147.75 × 127.75 = 18,875.06 in² = 131.08 ft².
Step 3 · Largest. 148.25 × 128.25 = 19,013.06 in² = 132.04 ft².
Check: The range is about 131.56 ± 0.48 ft². As a percentage, 0.48 ÷ 131.56 = 0.36%. ✓
In words: The floor is between about 131.1 and 132.0 ft² (12.18 to 12.27 m²). Writing “131.56 ft²” suggests more certainty than the measurements support. “About 131.6 ft², give or take ½ ft²” is honest. For buying flooring, which you’ll round up and add 10% for waste anyway, the uncertainty doesn’t matter. For a precise drawing, you’d know which digit to trust.
A shortcut using percentages. The relative uncertainty is the uncertainty as a percentage of the value. Here, ¼ ÷ 148 = 0.17% and ¼ ÷ 128 = 0.20%. When you multiply two measurements, their relative uncertainties approximately add: 0.17% + 0.20% = 0.37%, which matches the 0.36% found above. For a volume, three relative uncertainties add. This is Chapter 10’s lesson again: errors in length are magnified in area and more in volume.
Check yourself 11.3 A table is 1.20 ± 0.01 m by 0.80 ± 0.01 m. Find the smallest and largest possible areas. Answer: 1.19 × 0.79 = 0.9401 m² and 1.21 × 0.81 = 0.9801 m². The nominal area is 0.96 m².
Good stopping point.
11.4 Is the difference real?
Two measurements that should be equal rarely come out exactly equal. When they differ, ask: is the difference bigger than the uncertainty? If two readings are each uncertain by ±¼ in, the difference between them could be as large as ¼ + ¼ = ½ in from measurement error alone.
The rule of thumb: a difference smaller than the combined uncertainty could be measurement error. A difference clearly bigger than it is probably real.
Worked Example 11.3 · Opposite walls
The room’s two long walls measure 148 in and 147⅞ in, each ± ¼ in. Are they really different?
Step 1 · Difference. 148 − 147⅞ = ⅛ in.
Step 2 · Combined uncertainty. ¼ + ¼ = ½ in.
Step 3 · Compare. ⅛ in is well inside ½ in.
Check: If the true lengths were equal, readings ⅛ in apart would be entirely expected. ✓
In words: There is no evidence the walls differ. Treat them as equal, at about 148 in.
Worked Example 11.4 · Is the room square?
The room’s diagonals measure 195⅜ in and 196 in, each ± ¼ in. For a 148 by 128 in rectangle, the diagonal should be √(148² + 128²) = √(21,904 + 16,384) = √38,288 = 195.67 in. Is the room out of square?
Step 1 · Difference. 196 − 195⅜ = ⅝ in.
Step 2 · Combined uncertainty. ½ in, as before.
Step 3 · Compare. ⅝ in is larger than ½ in, but not by much. The room is probably slightly out of square. Measuring the diagonals again, more carefully, would make this firmer.
Step 4 · How much? The average diagonal is (195.375 + 196) ÷ 2 = 195.69 in, close to the ideal 195.67. For a slightly leaning rectangle, the corners are off by about 0.2°. (The Going further box shows how this is calculated.) Over the 148 in wall, that moves the far end about ½ in from where a perfectly square corner would put it.
Check: 148 × 0.0032 = 0.47 in, about ½ in. ✓
In words: The room is probably out of square by about 0.2°, about ½ in over its length. For placing furniture, that is irrelevant. For laying a tile floor parallel to one wall, the grout line at the far wall would drift by about ½ in, so a tiler would want to know.
Check yourself 11.4 Two readings of a doorway width are 32⅛ in and 31⅞ in, each ± ⅛ in. Is the difference real? Answer: Difference ¼ in. Combined uncertainty ⅛ + ⅛ = ¼ in. The difference is not clearly bigger than the uncertainty, so it could be measurement error. Measure again.
Good stopping point.
11.5 Checking the spatial assumptions
Before trusting a geometry calculation about a real space, check the assumptions it makes. There are five common ones.
| Assumption | Quick check |
|---|---|
| Straight | Stretch a string line tight between two points and look along it. Or sight along the edge with one eye. |
| Square (90° corners) | The 3-4-5 check (Chapter 7), or a carpenter’s square for small corners. |
| Rectangular | Opposite sides equal and diagonals equal (Chapters 4 and 7). |
| Level (horizontal) | A spirit level, or a level app. A level is flat when its bubble is centered. |
| Plumb (vertical) | A level held against a wall, or a weight hanging on a string (a plumb line). |
Worked Example 11.5 · A floor that slopes
A 2 ft level placed on a floor has one end ⅛ in too low when the bubble is centered (you measure the gap under the low end). How much does the floor drop across a 12 ft room, if the slope is steady?
Step 1 · Slope. ⅛ in in 24 in, which is 1:192.
Step 2 · Over 12 ft. 144 in ÷ 192 = ¾ in. Equivalently, the 12 ft room is 6 level-lengths long, and 6 × ⅛ = ¾ in.
Check: ¾ ÷ 144 = 1/192. ✓
In words: The floor drops about ¾ in across the room. A bookcase placed against the low wall will lean away unless it is shimmed. Floor area calculations are almost unaffected: the sloped floor is longer than its horizontal plan by only about 0.001%.
Standards allow for this. Real construction is never exact, and standards say so. The 2010 ADA Standards for Accessible Design state: “All dimensions are subject to conventional industry tolerances except where the requirement is stated as a range with specific minimum and maximum end points” (section 104.1.1, US Access Board; checked October 23, 2026). A tolerance is an allowed difference from a nominal value. It is the builder’s version of an uncertainty. When a requirement is stated as a range, though, the range itself is the limit. A real 36 in clear path measured at 35⅞ in should be taken seriously.
Model versus reality. Every calculation in this book uses an ideal model of a real thing. A good final step is to say which assumptions you checked and which you didn’t. For example: “Floor area 131.6 ± 0.5 ft², assuming the floor is flat and the walls are straight; corners checked by diagonals, probably 0.2° out of square.” That one sentence tells a reader exactly how far to trust the number.
Check yourself 11.5 Your shadow method in Chapter 8 assumed the stick and the tree were upright and the ground was level. Which tools from this section could check those assumptions? Answer: A level or plumb line for the stick. A level (or a long straight board with a level on it) for the ground. The tree’s lean can be checked by eye from two directions, or with a plumb line held at arm’s length.
Good stopping point.
Practical activity · An honest measurement
Time: about 40 minutes. Materials: a tape measure, a pencil, paper, a calculator, and a level and string if you have them.
- Choose a room. Measure its length five times and its width five times, at different heights and from different ends. If possible, have someone else take some of the readings.
- For each, find the average and the spread, and write the result as value ± uncertainty.
- Calculate the nominal floor area, and the smallest and largest areas.
- Measure both pairs of opposite walls. Is any difference bigger than the combined uncertainty?
- Measure both diagonals. Compare them with each other and with the ideal diagonal. Is the room out of square?
- Check the floor with a level in three places, and one wall for plumb.
- Write a one-sentence statement of your result, like the one at the end of Section 11.5.
Reflect. Which source of uncertainty was largest: reading the tape, the walls themselves, or the way the tape was held? What would you change to measure more precisely?
Common mistakes
- Giving too many digits. 131.5556 ft² from tape measurements claims a precision you don’t have.
- Using the reading resolution as the uncertainty. A tape marked in sixteenths doesn’t make a room measurement good to 1/32 in.
- Treating every difference as real. Compare a difference with the combined uncertainty first.
- Treating every difference as noise. A difference clearly bigger than the uncertainty is a finding. Report it.
- Measuring once. One reading tells you nothing about the spread.
- Forgetting the assumptions. A calculation is only as good as the shape it assumes. Check straight, square, level, and plumb.
Going further (optional) · Formula review, and how out of square?
Formulas. Measurement = nominal value ± uncertainty. Lower bound = value − uncertainty. Upper bound = value + uncertainty. Relative uncertainty = uncertainty ÷ value. For a product of measurements, relative uncertainties approximately add. Two readings each ± u can differ by up to 2u from error alone.
From diagonals to an angle. For a parallelogram with sides a and b and diagonals d₁ (shorter) and d₂ (longer), it can be shown that d₂² − d₁² = 4ab × cos A, where A is the angle between the sides at either sharp corner. For the room: 196² − 195.375² = 38,416 − 38,171.39 = 244.61. Divide by 4 × 148 × 128 = 75,776: cos A = 0.0032, so A ≈ 89.8°, and the other corners are about 90.2°. Each corner is about 0.2° from square. The sideways shift at the end of a 148 in wall is about 148 × 0.0032 = 0.47 in.
A check on the diagonals. For any parallelogram, d₁² + d₂² = 2(a² + b²). Here, 38,171.39 + 38,416 = 76,587.39 and 2 × 38,288 = 76,576. They agree within about 0.015%, which is consistent with the room being a slightly leaning parallelogram, measured to about ±¼ in.
Summary
- Every measurement has a measurement uncertainty. Write it as nominal value ± uncertainty, with a lower bound and an upper bound.
- An instrument’s resolution limits a reading, but other errors are usually larger.
- Repeated measurements show the spread, which gives a realistic uncertainty.
- Area bounds come from multiplying the bounds of the lengths. Relative uncertainty roughly adds when measurements are multiplied.
- A difference is probably real only when it is clearly bigger than the combined uncertainty.
- Check assumptions: straight (a string line), square, rectangular, level, and plumb. Standards allow a tolerance.
Key terms: measurement uncertainty · resolution · nominal value · lower bound · upper bound · spread · relative uncertainty · tolerance · string line · level · plumb
Review questions
Questions 1 to 6 practice single skills. Questions 7 to 9 combine them.
- Write 2.45 m measured to ±5 mm with its bounds, in meters.
- Five readings of a shelf are 61.2, 61.4, 61.3, 61.1, and 61.5 cm. Find the average and the uncertainty from the spread.
- A square tile is 30.0 ± 0.1 cm on each side. Find its smallest and largest possible areas.
- Two diagonals of a frame measure 85.2 cm and 85.5 cm, each ± 0.1 cm. Is the frame out of square?
- What is the relative uncertainty of 12 ft ± 1 in? Give a percentage.
- A 4 ft level has one end 3/16 in low. What slope is that, as 1:n?
- A room measures 4.20 ± 0.01 m by 3.50 ± 0.01 m. Find the nominal area and its range, and the relative uncertainty using the percentage shortcut.
- A wall is 10 ft 6 in ± ¼ in long. Six 21 in wide cabinets are to fit along it. Will they definitely fit, possibly fit, or definitely not fit?
- A deck is supposed to be 12 ft by 16 ft. Its diagonals measure 19 ft 11¾ in and 20 ft ½ in, each ± ¼ in. Is it out of square? What should the diagonals be?
Explained answers
1. 2.450 ± 0.005 m. Bounds 2.445 m and 2.455 m.
2. Sum 306.5, average 61.3 cm. Spread 61.5 − 61.1 = 0.4, so 61.3 ± 0.2 cm.
3. Smallest 29.9² = 894.01 cm². Largest 30.1² = 906.01 cm². Nominal 900 cm².
4. Difference 0.3 cm. Combined uncertainty 0.2 cm. 0.3 is bigger than 0.2, so the frame is probably out of square. Measure again to be sure.
5. 12 ft = 144 in, so 1 ÷ 144 = 0.69%.
6. 48 in ÷ 3/16 in = 48 × 16 ÷ 3 = 256, so 1:256.
7. Nominal 4.20 × 3.50 = 14.70 m². Smallest 4.19 × 3.49 = 14.6231 m². Largest 4.21 × 3.51 = 14.7771 m². So 14.62 to 14.78 m². Relative: 0.01 ÷ 4.20 = 0.24% and 0.01 ÷ 3.50 = 0.29%, total about 0.52%. Check: 14.70 × 0.00524 = 0.077 m², matching the range of about ±0.077. ✓
8. Cabinets: 6 × 21 = 126 in. Wall: 10 ft 6 in = 126 in, with bounds 125¾ to 126¼ in. The cabinets need exactly the nominal length, so they possibly fit, with no room to spare. In practice, choose a smaller cabinet or a filler strip, and remeasure the wall at several heights, since it may be shorter in places.
9. Ideal: √(144² + 192²) = √(20,736 + 36,864) = √57,600 = 240 in = 20 ft (a 3-4-5 triangle scaled by 4 ft). Measured: 239¾ in and 240½ in. Difference ¾ in, combined uncertainty ½ in. The difference is bigger, so the deck is out of square. Push the corners at the ends of the long diagonal together until both read 240 in.
Connections
- Chapter 1 introduced ideal shapes. This chapter measures how far real ones are from ideal.
- Chapter 7 gave the diagonal and 3-4-5 checks used here.
- Chapter 12 applies every step to a real room and states its results honestly.
- Other MORI books: U01 Ratios, Proportions, and Percent covers percentages and averages. U22 Measure and Lay Out Before Making treats tolerances in building. F20 Prospecting, Mineral Resources, and Field Mapping applies measurement uncertainty in the field.
Sources consulted for scope and accuracy: B. N. Taylor and C. E. Kuyatt, Guidelines for Evaluating and Expressing the Uncertainty of NIST Measurement Results, NIST Technical Note 1297 (1994 edition), https://www.nist.gov/pml/nist-technical-note-1297; US Access Board, 2010 ADA Standards for Accessible Design, section 104.1.1, “Construction and Manufacturing Tolerances,” https://www.access-board.gov/ada/ (both checked October 23, 2026). All examples and exercises are original to MORI University. The room, floor, cabinet, and deck measurements are illustrative.
Chapter 12 · Project: A Measured Room Layout
U03 Geometry: Measure, Diagonals, and Scale · MORI University · Foundation level
Time needed: about 90 minutes to read and follow the worked project, in six short sections, then 3 to 4 hours for your own project. Each section ends at a good place to stop. You need: a tape measure, a pencil, an eraser, graph paper (or plain paper and a ruler), a calculator, scissors, and, if you have them, a level and a helper.
Learning goals
By the end of this chapter, you will be able to:
- Measure a room and record the measurements on a clear sketch.
- Calculate the floor area, perimeter, wall area, and material quantities a real job needs.
- Draw the room to a stated scale with a scale bar.
- Place furniture on the plan, and check paths and clearances.
- Write an honest summary of results, with units, uncertainty, and assumptions.
Start here
This chapter brings the whole book together. You’ll follow one room from tape measure to finished plan: a bedroom about 12 ft by 11 ft (about 3.8 m by 3.3 m) whose owner wants to repaint it, put in a new floor, and fit a bed, a desk, a dresser, and a bookcase without the room feeling cramped.
Every step uses a chapter you’ve already read: measuring (Chapter 2), area and perimeter (Chapters 3 and 6), circles for the door swing (Chapter 5), diagonals for squareness (Chapter 7), scale drawing (Chapter 9), and honest uncertainty (Chapter 11). After the worked project, you’ll do the same for a room of your own.
The room and its furniture are illustrative, but every number in the chapter is calculated from them, and each is checked.
12.1 The measured sketch
Start with a freehand sketch, not to scale, big enough to write on. Then measure and write each measurement where it belongs. Measure each wall at least twice, both diagonals, and the position and size of every door, window, and fixed feature.
Figure 12.1 shows the sketch for the project room. The long walls (north and south) run east to west, and the room is described with its southwest corner as the starting point: x is measured east along the south wall, and y north along the west wall.
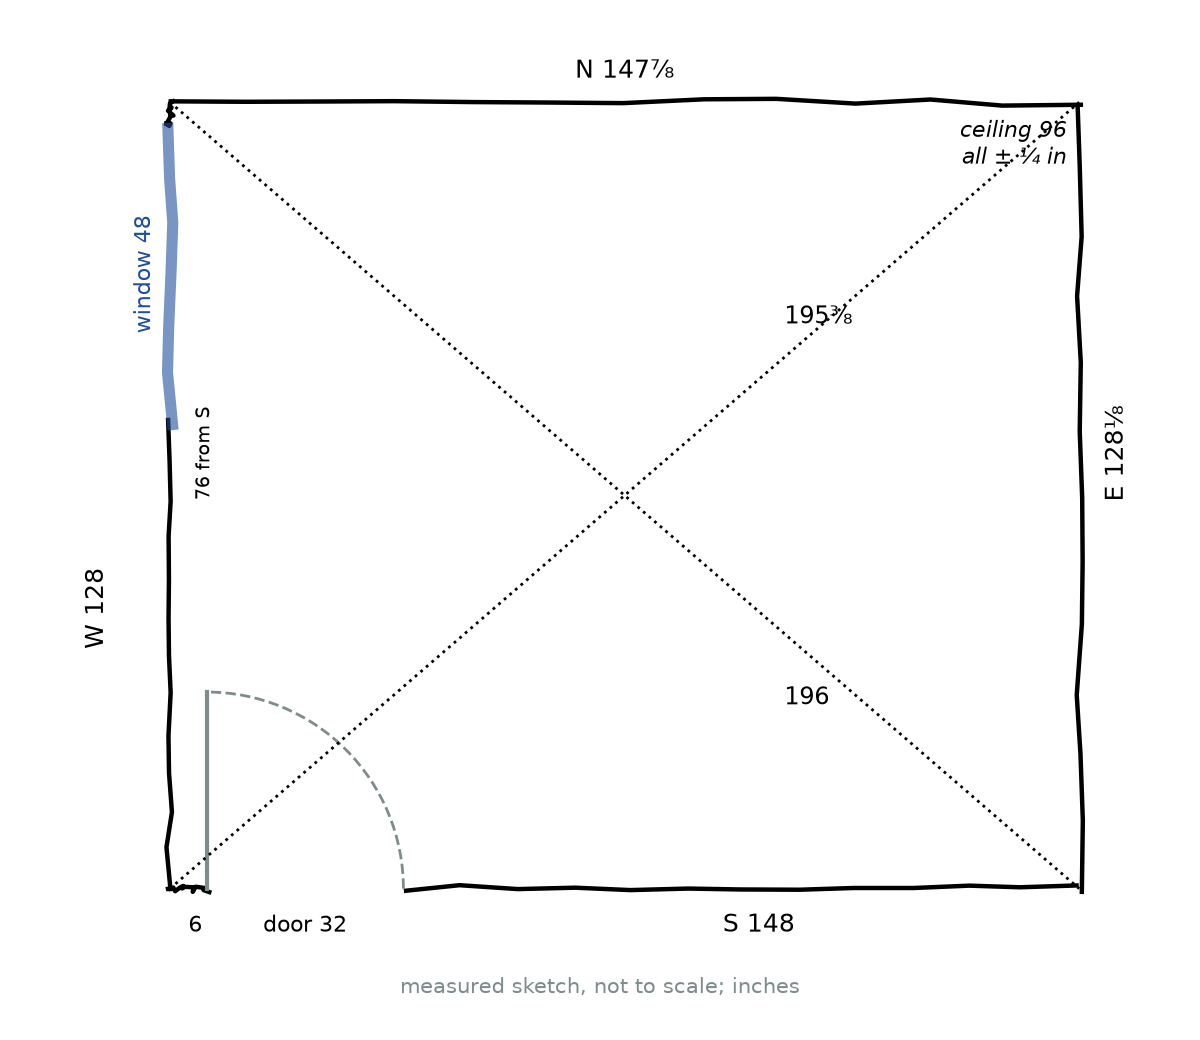
| Feature | Measurement |
|---|---|
| South wall | 148 in |
| North wall | 147⅞ in |
| West wall | 128 in |
| East wall | 128⅛ in |
| Diagonals | 195⅜ in and 196 in |
| Ceiling height | 96 in |
| Door (south wall) | 32 in wide, 80 in tall, starting 6 in from the west wall |
| Window (west wall) | 48 in wide, 36 in tall, starting 76 in from the south wall |
All measurements are ± ¼ in, found from repeated readings as in Chapter 11.
Worked Example 12.1 · Is the room a rectangle?
Step 1 · Opposite sides. 148 and 147⅞ differ by ⅛ in. 128 and 128⅛ differ by ⅛ in. The combined uncertainty is ½ in, so both pairs are equal within measurement error.
Step 2 · Diagonals. They differ by ⅝ in, a little more than ½ in. Chapter 11 found this means the room is probably about 0.2° out of square, about ½ in over the long wall.
Step 3 · Decide. Treat the room as a 148 by 128 in rectangle (12 ft 4 in by 10 ft 8 in) for the layout. Note the slight lean for anyone laying tile.
Check: For a 148 by 128 in rectangle, the diagonal is √38,288 = 195.67 in. The average measured diagonal is 195.69 in. ✓
In words: The room is a rectangle for every practical purpose here. Writing down why we treat it as one is part of the result.
Metric. 148 in = 375.92 cm and 128 in = 325.12 cm, so the room is about 3.76 m by 3.25 m.
Check yourself 12.1 Why measure both diagonals, if the opposite walls already match? Answer: Matching opposite walls only show the room is a parallelogram. Equal diagonals show the corners are square (Chapter 7).
Good stopping point.
12.2 Floor area, perimeter, and baseboard
Worked Example 12.2 · Floor area
Step 1 · Area. 148 × 128 = 18,944 in².
Step 2 · Square feet. 18,944 ÷ 144 = 131.56 ft².
Step 3 · Square meters. 18,944 × 6.4516 = 122,219 cm² = 12.22 m².
Check: In feet: 12⅓ × 10⅔ = (37/3) × (32/3) = 1,184/9 = 131.56 ft². ✓
In words: The floor is about 131.6 ft², or 12.2 m². From Chapter 11, its range is about 131.1 to 132.0 ft².
Worked Example 12.3 · Baseboard
Baseboard runs along the bottom of every wall except across the door. It is sold in 8 ft lengths. How many lengths should you buy?
Step 1 · Perimeter. 2 × (148 + 128) = 552 in = 46 ft.
Step 2 · Minus the door. 552 − 32 = 520 in = 43.33 ft.
Step 3 · Allow for cutting. Add 10% for cuts at corners and mistakes: 43.33 × 1.1 = 47.7 ft.
Step 4 · Lengths. 47.7 ÷ 8 = 5.96, so buy 6 lengths (48 ft).
Check: Each long wall (148 in = 12.33 ft) needs two 8 ft pieces, and each short wall (128 in = 10.67 ft) also needs two, with the south wall reduced by the door. The pieces cut off can fill the short gaps, so 6 lengths is tight but workable. Buying a 7th as a spare is reasonable. ✓
In words: About 43⅓ ft of baseboard is needed. Buy 6 lengths of 8 ft, or 7 to be safe.
Check yourself 12.2 What is the floor area of a room 3.5 m by 2.8 m, in m² and ft²? Answer: 9.8 m², and 9.8 ÷ 0.09290304 = 105.5 ft².
Good stopping point.
12.3 Wall area and paint
Chapter 3 showed how to “unroll” the walls into one long strip. Figure 12.2 shows the strip for this room.
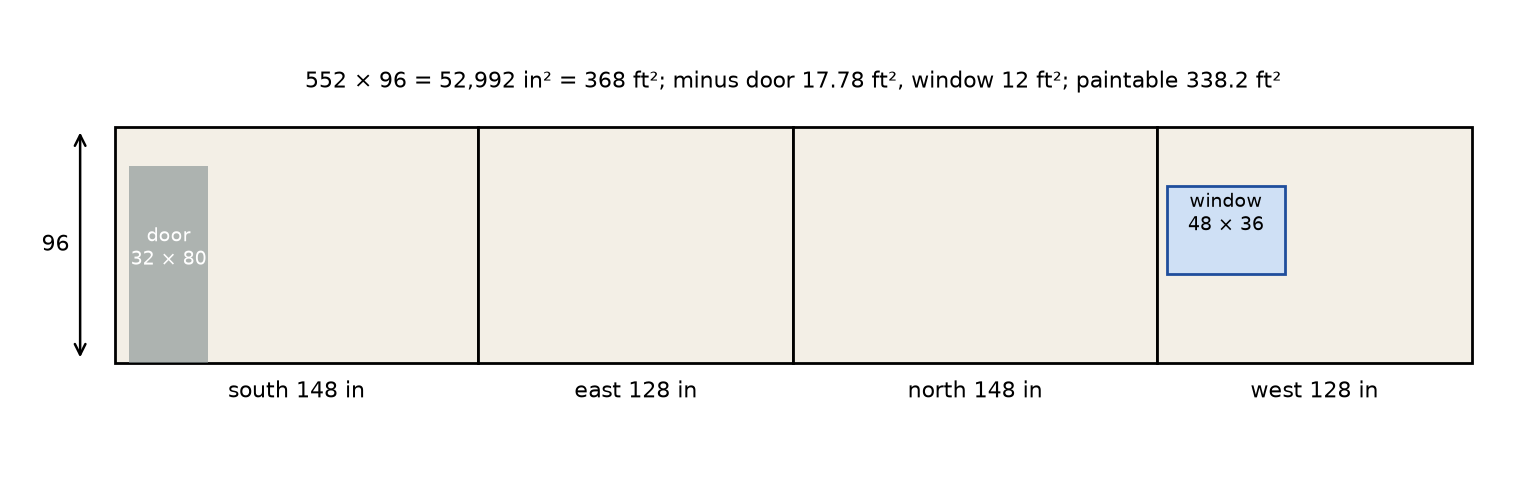
Worked Example 12.4 · How much paint?
Step 1 · Strip area. 552 × 96 = 52,992 in² = 368 ft².
Step 2 · Door. 32 × 80 = 2,560 in² = 17.78 ft².
Step 3 · Window. 48 × 36 = 1,728 in² = 12 ft².
Step 4 · Paintable area. 368 − 17.78 − 12 = 338.2 ft². For two coats, 2 × 338.2 = 676.4 ft².
Step 5 · Gallons. Paint labels give a coverage per gallon. Using an illustrative coverage of 350 ft² per gallon (read the label on the paint you actually buy), 676.4 ÷ 350 = 1.93 gal. Buy 2 gallons.
Check: In feet: perimeter 46 ft × wall height 8 ft = 368 ft². ✓ Metric: 338.2 ft² × 0.09290304 = 31.42 m².
In words: About 338 ft² (31.4 m²) of wall needs paint. Two coats need just under 2 gallons at 350 ft² per gallon, so 2 gallons is enough, with little to spare. At a coverage of 400 ft² per gallon, you’d need 1.69 gal, so 2 gallons is still the right purchase.
Check yourself 12.3 If the ceiling is painted too, with one coat, how much extra area is that? Answer: The same as the floor, 131.56 ft².
Good stopping point.
12.4 Drawing the plan to scale
A plan has to fit the paper and be big enough to work on. Chapter 9’s method: divide the largest real length by the space available.
Worked Example 12.5 · Choosing a scale
Letter paper is 8½ by 11 in. With margins, the drawing space is about 7 by 9 in. Will ½ in = 1 ft (1:24) fit?
Step 1 · Long wall. 148 in ÷ 24 = 6.17 in on paper (12⅓ ft × ½ in = 6⅙ in).
Step 2 · Short wall. 128 ÷ 24 = 5.33 in on paper.
Step 3 · Fit. 6.17 by 5.33 in fits within 7 by 9 in. ✓
Check: At ¼ in = 1 ft (Chapter 9), the plan would be only 3.08 by 2.67 in. Too small to draw furniture clearly. ✓
In words: Use ½ in = 1 ft, which is 1:24. For a metric plan, 1:25 gives 375.92 ÷ 25 = 15.04 cm by 325.12 ÷ 25 = 13.00 cm, which also fits on A4 or letter paper.
What to put on the plan:
- the walls, door, and window at scale;
- the door swing, drawn as a quarter circle (Chapter 5);
- the scale written as a verbal scale and a representative fraction, and a scale bar;
- a north arrow, a title, and the date.
Furniture is easiest to try out as paper cut-outs at the same scale. At 1:24, the 60 by 80 in bed is a rectangle 2.5 by 3.33 in.
Check yourself 12.4 At 1:24, how big is a cut-out for a 36 by 18 in dresser? Answer: 36 ÷ 24 = 1.5 in by 18 ÷ 24 = 0.75 in.
Good stopping point.
12.5 Placing furniture and checking clearances
The owner’s furniture:
| Item | Size (in) | Size (cm) | Area (in²) |
|---|---|---|---|
| Bed (queen) | 60 × 80 | 152 × 203 | 4,800 |
| Desk | 48 × 24 | 122 × 61 | 1,152 |
| Dresser | 36 × 18 | 91 × 46 | 648 |
| Bookcase | 30 × 12 | 76 × 30 | 360 |
| Total | 6,960 |
Clearance benchmarks. A bedroom in a private home isn’t required to meet accessibility standards, but the 2010 ADA Standards for Accessible Design give useful, carefully tested benchmarks (US Access Board; checked October 23, 2026):
- a clear walking width of 36 in (915 mm) minimum (section 403.5.1);
- a 60 in (1525 mm) diameter circle of floor space to turn a wheelchair (section 304.3.1);
- a clear floor space of 30 by 48 in (760 by 1220 mm) for one wheelchair (section 305.3).
A layout that meets them is comfortable for everyone, and easy to adapt later.
The trial layout. After trying several arrangements with cut-outs, the owner chose the one in Figure 12.3. Positions are given as (x, y) ranges from the southwest corner.
| Item | x (in) | y (in) | Placement |
|---|---|---|---|
| Bed | 68 to 148 | 68 to 128 | head against the east wall, one side against the north wall |
| Desk | 0 to 24 | 80 to 128 | against the west wall, under the window |
| Bookcase | 0 to 12 | 40 to 70 | against the west wall |
| Dresser | 100 to 136 | 0 to 18 | against the south wall |
| Door swing | 6 to 38 | 0 to 32 | quarter circle, radius 32 in, hinge at (6, 0) |
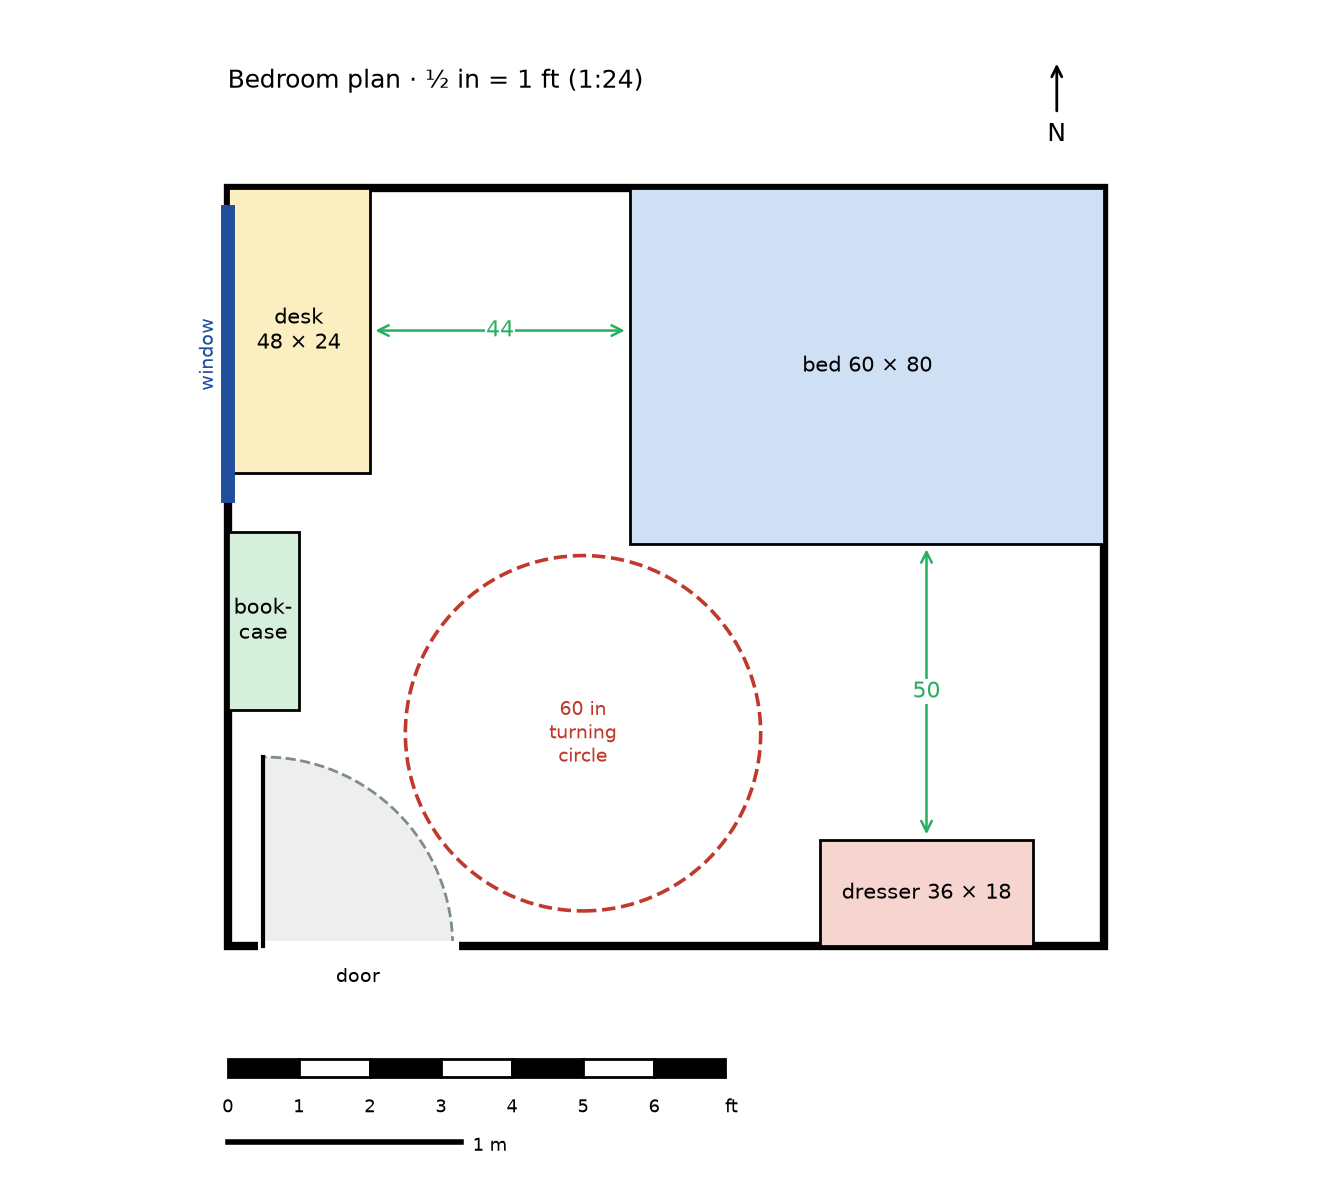
Worked Example 12.6 · Check the paths
Step 1 · Desk to bed. The desk’s front edge is at x = 24, and the bed’s west side is at x = 68. Clear width 68 − 24 = 44 in, at least 36 in. ✓ That leaves room for a desk chair (about 30 in of depth) with 14 in to spare. It’s tighter when the chair is pushed back, which is acceptable.
Step 2 · Dresser to bed. The dresser’s front is at y = 18, and the bed’s south side is at y = 68. Clear width 68 − 18 = 50 in. ✓ The dresser’s drawers open about 16 in, leaving 34 in to walk past an open drawer.
Step 3 · Door swing. The swing covers x 6 to 38, y 0 to 32. The bookcase starts at y = 40, 8 in beyond the door’s reach. The dresser starts at x = 100. Nothing blocks the door. ✓
Check: Every path is at least 36 in wide. ✓
In words: You can walk from the door to the desk, the bed, and the dresser along paths at least 44 in wide, more than the 36 in benchmark.
Worked Example 12.7 · Is there a turning circle?
A circle of radius 30 in fits if its center is at least 30 in from every wall and piece of furniture, and its distance from the door’s hinge is more than 30 + 32 = 62 in (so the swing and the circle don’t overlap). Try the center (60, 36).
Step 1 · Walls. The circle reaches x 30 to 90 and y 6 to 66. Inside the room. ✓
Step 2 · Furniture. Bed: the nearest point is its corner (68, 68). Distance √(8² + 32²) = √1,088 = 33.0 in, more than 30. ✓ Dresser starts at x 100, beyond 90. ✓ Bookcase ends at x 12, below 30. ✓ Desk starts at y 80, above 66. ✓
Step 3 · Door swing. Distance from the hinge (6, 0): √(54² + 36²) = √4,212 = 64.9 in, more than 62. ✓
Check: All distances clear. ✓ A 30 by 48 in clear floor space also fits easily beside the bed, in the 80 by 50 in area between the bed and the dresser wall.
In words: There is a full 60 in turning circle in the middle of the room, clear of the furniture and the door swing.
How much floor is left? The furniture covers 6,960 in² = 48.33 ft², which is 6,960 ÷ 18,944 = 36.7% of the floor. The open floor is 131.56 − 48.33 = 83.2 ft², about 63% of the room.
A note on the door. The door leaf is 32 in wide, but its clear opening (measured with the door open 90°, from the face of the door to the stop) is less than 32 in, because the door itself and the stop take up space. ADA section 404.2.3 sets a minimum clear width of 32 in, so a 32 in door leaf alone doesn’t meet that benchmark. That’s a useful reminder: always check what a standard actually measures.
Check yourself 12.5 If the bed were moved 10 in west (x 58 to 138), would the desk path still be at least 36 in? Answer: 58 − 24 = 34 in. No, it would be 2 in too narrow.
Good stopping point.
12.6 Flooring and the final report
Worked Example 12.8 · How much flooring?
Flooring planks are sold in boxes covering 20 ft² each (an illustrative size; check the box). Installers usually add about 10% for cutting waste.
Step 1 · Floor area plus waste. 131.56 × 1.10 = 144.7 ft².
Step 2 · Boxes. 144.7 ÷ 20 = 7.2, so buy 8 boxes (160 ft²).
Check: 7 boxes cover 140 ft², less than 144.7. 8 boxes cover 160 ft². ✓
In words: Buy 8 boxes. The 0.2° lean noted in Section 12.1 doesn’t affect the quantity, but the installer should know the last row may be about ½ in wider at one end.
The final report. A good project ends with a short summary that a reader can trust. Here is the one for this room.
Room layout report · Bedroom, measured October 2026 Size: 148 × 128 in (12 ft 4 in × 10 ft 8 in; 3.76 × 3.25 m), all measurements ± ¼ in. Opposite walls agree within ⅛ in. Diagonals 195⅜ and 196 in: probably about 0.2° out of square. Ceiling 96 in. Floor: 131.6 ft² (12.2 m²), range about 131.1 to 132.0 ft². Paint: 338 ft² (31.4 m²) of wall; two coats need 2 gallons at 350 ft² per gallon. Baseboard: 43⅓ ft; buy 6 to 7 lengths of 8 ft. Flooring: 144.7 ft² with 10% waste; 8 boxes of 20 ft². Layout: bed, desk, dresser, and bookcase cover 37% of the floor. All paths 44 in or wider; 60 in turning circle clear. Assumptions: floor checked level in three places; walls assumed straight and plumb; furniture sizes from the manufacturer. Plan: ½ in = 1 ft (1:24), scale bar in feet and meters.
Checklist for your own project
- Measured sketch with every wall, both diagonals, doors, windows, ceiling height.
- Repeated measurements and a stated uncertainty.
- A decision about whether the room is a rectangle, with the reason.
- Floor area in ft² and m². Perimeter.
- Wall area, and the quantity of paint, flooring, or trim you’d need.
- A plan at a stated scale, with a scale bar, north arrow, and door swing.
- Furniture cut-outs at the same scale, and a chosen layout.
- Path widths and a turning circle checked with numbers.
- A short report with units, uncertainty, and assumptions.
Check yourself 12.6 Why does the report give the floor area as 131.6 ft² rather than 131.5556 ft²? Answer: The measurements are only good to ± ¼ in, which makes the area uncertain by about ± ½ ft² (Chapter 11). Extra digits would claim a precision we don’t have.
Good stopping point.
Practical activity · Your measured room layout
Time: 3 to 4 hours, in several sittings. Materials: everything listed at the start of the chapter.
- Choose a room you can measure: a bedroom, kitchen, workshop, or classroom. Ask permission if it isn’t yours.
- Make the measured sketch (Section 12.1). Measure each wall at least twice and both diagonals.
- Decide whether the room is a rectangle. If it’s an L-shape or has a bay, break it into rectangles (Chapter 6).
- Calculate the floor area, perimeter, and wall area (Sections 12.2 and 12.3).
- Choose a real job: repainting, new flooring, or new baseboard. Work out the quantity.
- Choose a scale and draw the plan (Section 12.4).
- Measure the furniture, make cut-outs, and try at least two layouts. Check paths and the turning circle (Section 12.5).
- Write the report (Section 12.6), and compare it with the checklist.
Reflect. What surprised you about your room? Which measurement was hardest to take, and how sure are you of it? If you changed the layout in real life, did it work as the plan predicted?
Common mistakes
- Not measuring diagonals. Without them, you don’t know the corners are square.
- Forgetting the door swing. Furniture placed in the swing stops the door opening.
- Drawing without a stated scale. A plan without a scale can’t be measured.
- Cutting furniture at a different scale from the plan. Every cut-out must use the same scale.
- Buying exactly the area. Flooring, paint, and trim need allowances for waste and cutting.
- Mixing units. Keep one unit through each calculation, and convert at the end.
- Overstating precision. Round the results to match the measurements.
Going further (optional) · Formula review for the project
Area and perimeter. Rectangle: A = lw, P = 2(l + w). Composite shapes: add or subtract rectangles (Chapter 6).
Walls. Wall area = perimeter × height − openings. Coats multiply the area.
Circles. Door swing: a quarter circle, area ¼πr², arc ½πr. For the 32 in door: 804.2 in² (5.59 ft²) and 50.3 in (Chapter 5).
Diagonals. Rectangle: d = √(l² + w²) (Chapter 7). Distance between two points (x₁, y₁) and (x₂, y₂): √((x₂ − x₁)² + (y₂ − y₁)²).
Scale. Paper length = real length ÷ n at 1:n. Areas scale by n² (Chapter 10).
Allowances. Quantity to buy = area × (1 + waste), rounded up to whole units.
Summary
- A measured sketch records every wall, both diagonals, and every opening before any calculation.
- Opposite sides and diagonals decide whether the room can be treated as a rectangle.
- Floor area, perimeter, and wall area give quantities of flooring, baseboard, and paint, with a waste allowance and the area of openings removed.
- A plan at a stated scale, with furniture cut-outs at the same scale, lets you try layouts on paper.
- Clearances are checked with numbers: path widths, the door swing, and a turning circle.
- A room layout report gives the results with units, uncertainty, and assumptions.
Key terms: measured sketch · openings · waste allowance · cut-outs · clearances · room layout report
Review questions
Questions 1 to 6 practice single skills. Questions 7 to 9 combine them.
- A room is 11 ft 6 in by 9 ft 9 in. Find its floor area in ft².
- Find the perimeter of a room 4.2 m by 3.6 m.
- A room’s walls are 8 ft tall and its perimeter is 50 ft. It has one door (3 by 7 ft) and two windows (each 4 by 3 ft). Find the paintable area.
- At 1:24, how long is a 90 in sofa on the plan?
- Floor tiles come in boxes covering 15 ft². With 10% waste, how many boxes do you need for 120 ft²?
- A desk’s front is 26 in from the wall, and a bed’s side is 60 in from the same wall. What is the clear width between them?
- A room is 3.8 m by 3.1 m with 2.4 m walls, a door 0.9 by 2.0 m, and a window 1.2 by 1.0 m. Two coats are planned, and a liter of paint covers 10 m² (illustrative). How many liters are needed?
- A turning circle of diameter 60 in is centered at (50, 50) in a room. A bookcase’s corner is at (20, 20). Does the circle overlap the bookcase corner?
- A room’s walls measure 150, 149¾, 120, and 120¼ in, and its diagonals 192⅛ and 191⅞ in, all ± ¼ in. Can it be treated as a rectangle? What is the ideal diagonal?
Explained answers
1. 11.5 × 9.75 = 112.1 ft² (112.125).
2. 2 × (4.2 + 3.6) = 15.6 m.
3. Walls 50 × 8 = 400 ft². Door 21 ft². Windows 2 × 12 = 24 ft². Paintable 400 − 21 − 24 = 355 ft².
4. 90 ÷ 24 = 3.75 in.
5. 120 × 1.1 = 132 ft². 132 ÷ 15 = 8.8, so 9 boxes.
6. 60 − 26 = 34 in, below the 36 in benchmark.
7. Perimeter 2 × (3.8 + 3.1) = 13.8 m. Walls 13.8 × 2.4 = 33.12 m². Door 1.8 m², window 1.2 m². Paintable 33.12 − 1.8 − 1.2 = 30.12 m². Two coats 60.24 m². Paint 60.24 ÷ 10 = 6.02 L, so about 6 L, or buy a little more (6.5 L) since the result is just over 6.
8. Distance √(30² + 30²) = √1,800 = 42.4 in, more than the radius 30 in. No overlap.
9. Opposite walls differ by ¼ in, within the combined ½ in. Diagonals differ by ¼ in, also within ½ in. Yes, treat it as a 150 by 120 in rectangle. Ideal diagonal √(22,500 + 14,400) = √36,900 = 192.1 in, matching the average measured diagonal, 192.0 in.
Connections
- Every chapter of this book contributes a step to this project: see the list in Start here.
- Other MORI books: U22 Measure and Lay Out Before Making takes measured layouts onto real building sites. F10 Engineering Design and MORI CAD turns a plan like this into a dimensioned digital drawing. F18 Sustainable Homes, Water, and Community Infrastructure and U01 Ratios, Proportions, and Percent use the same quantities and percentages for costs and materials.
Sources consulted for scope and accuracy: US Access Board, 2010 ADA Standards for Accessible Design, sections 304.3.1, 305.3, 403.5.1, and 404.2.3, https://www.access-board.gov/ada/; National Institute of Standards and Technology, NIST Handbook 44, Appendix C, https://www.nist.gov/pml/owm/nist-handbook-44-current-edition (both checked October 23, 2026). All examples and exercises are original to MORI University. The room, its furniture, the paint coverage, and the flooring box size are illustrative; use the figures on the products you buy.
Glossary
Each entry gives a short definition and the chapter where the term is introduced.
3-4-5 check — A way to test a corner for square: mark 3 units along one side and 4 along the other; the distance between the marks should be 5. (Ch. 7)
AA similarity — The rule that two triangles with two pairs of equal angles are similar. (Ch. 8)
acre — A US unit of land area equal to 43,560 ft². (Ch. 2)
acute angle — An angle of more than 0° and less than 90°. (Ch. 1)
angle — The amount of turn between two rays that share an endpoint. (Ch. 1)
arc — Part of a circle between two points on it. (Ch. 5)
area — The amount of flat surface a shape covers, measured in square units. (Ch. 2)
area factor — The number every area is multiplied by when lengths are scaled by k: k². (Ch. 10)
aspect ratios — The ratio of the long side to the short side of a rectangle, such as 16:9. Rectangles are similar exactly when these match. (Ch. 8)
base — The side of a triangle or parallelogram chosen as the bottom, from which the height is measured. (Ch. 4)
border strip — A band of even width around a shape, such as a path around a lawn; its area is outer area minus inner area. (Ch. 6)
bounding rectangle — The smallest rectangle that encloses a shape; subtracting the missing pieces from it gives the shape’s area. (Ch. 6)
center — The point inside a circle that is the same distance from every point on it. (Ch. 5)
centimeter — A metric unit of length: 1 cm = 10 mm = 1/100 m. (Ch. 2)
chord — A segment joining two points on a circle. The longest chords are diameters. (Ch. 5)
circle — All the points in a plane at the same distance from one point, the center. (Ch. 5)
circumference — The distance around a circle: C = πd = 2πr. (Ch. 5)
clearances — The open spaces needed around furniture and doors for walking, turning, and reaching. (Ch. 12)
composite shape — A shape made of simpler shapes such as rectangles, triangles, and parts of circles. (Ch. 6)
congruent — Having the same shape and the same size; similar with scale factor 1. (Ch. 8)
converse — The reverse of a statement. The converse of the Pythagorean theorem says that if a² + b² = c², the triangle has a right angle. (Ch. 7)
conversion factor — A fraction equal to 1, such as 12 in / 1 ft, used to change units without changing a quantity. (Ch. 2)
corresponding — Describes sides or angles that are in matching positions in two figures. (Ch. 8)
coverage rate — How much area one unit of material covers, such as square feet per gallon of paint. (Ch. 3)
cubic foot — The volume of a cube 1 ft on an edge: 1 ft³ = 1,728 in³. (Ch. 10)
cubic meter — The volume of a cube 1 m on an edge: 1 m³ = 1,000 L. (Ch. 10)
cubic units — Units of volume, each the volume of a cube one unit on an edge: in³, ft³, cm³, m³. (Ch. 10)
cut-outs — Paper shapes of furniture drawn at the same scale as a plan, moved around to try layouts. (Ch. 12)
decompose — To split a composite shape into simpler pieces whose areas you can find and add. (Ch. 6)
degree — The unit of angle measure: a full turn is 360°, so one degree is 1/360 of a full turn. (Ch. 1)
diagonals — Segments joining opposite corners of a quadrilateral. A parallelogram with equal diagonals is a rectangle. (Ch. 7)
diameter — A segment through the center joining two points on a circle, or its length: d = 2r. (Ch. 5)
dimensions — The measurements that fix a shape’s size, such as the length and width of a rectangle. (Ch. 3)
enlargement — A similar copy with scale factor greater than 1. (Ch. 8)
equilateral triangle — A triangle with all three sides equal; each angle is 60°. (Ch. 4)
exact conversion — A conversion that follows from a definition, such as 1 in = 2.54 cm, so it introduces no rounding. (Ch. 2)
floor plan — A scale drawing of a room or building seen from above. (Ch. 9)
foot — A US customary unit of length: 1 ft = 12 in = 30.48 cm exactly. (Ch. 2)
gallon — The US liquid gallon, defined as exactly 231 in³ (about 3.785 L). (Ch. 10)
grid estimate — An area estimate made by counting full grid squares plus half of the partly covered squares. (Ch. 3)
hectare — A metric unit of land area equal to 10,000 m², the area of a square 100 m on a side. (Ch. 2)
height — The perpendicular distance from a base to the opposite vertex or side. (Ch. 4)
hypotenuse — The longest side of a right triangle, opposite the right angle. (Ch. 4)
ideal shape — A perfect geometric figure, such as a line with no thickness or an exact square corner, used as a model for real objects that are never quite perfect. (Ch. 1)
inch — A US customary unit of length, defined as exactly 2.54 cm. (Ch. 2)
isosceles triangle — A triangle with at least two equal sides; the angles opposite them are equal. (Ch. 4)
kite — A quadrilateral with two pairs of equal adjacent sides. (Ch. 4)
legs — The two sides of a right triangle that form the right angle. (Ch. 7)
level — Exactly horizontal; also the tool with a bubble vial used to check it. (Ch. 11)
line — A straight path with no thickness that goes on forever in both directions. (Ch. 1)
line segment — The part of a line between two endpoints. It has a length you can measure. (Ch. 1)
liter — A metric unit of volume: 1 L = 1,000 cm³. (Ch. 10)
lower bound — The smallest value a quantity could reasonably have, given its uncertainty. (Ch. 11)
measured sketch — A freehand drawing of a room labeled with every measured wall, diagonal, and opening, made before any calculation. (Ch. 12)
measurement uncertainty — The range within which the true value of a measurement is expected to lie, written as value ± amount. (Ch. 11)
meter — The base metric (SI) unit of length: 1 m = 100 cm = 1,000 mm. (Ch. 2)
millimeter — A metric unit of length: 1 mm = 1/1,000 m = 1/10 cm. (Ch. 2)
mixed units — A length written in two units together, such as 5 ft 7 in, which must be converted to one unit before calculating. (Ch. 2)
nominal value — The stated or best-estimate value of a measurement, before the uncertainty is attached. (Ch. 11)
obtuse angle — An angle of more than 90° and less than 180°. (Ch. 1)
openings — Doors, windows, and other gaps in a wall, whose area is removed from paint estimates and whose width is removed from trim. (Ch. 12)
out of square — Describes a frame or room whose corners are not right angles, shown by unequal diagonals. (Ch. 7)
parallel — Describes lines in a plane that never meet; they stay the same distance apart. Symbol ∥. (Ch. 1)
parallelogram — A quadrilateral with both pairs of opposite sides parallel. (Ch. 4)
perimeter — The total distance around the outside of a shape, measured in units of length. (Ch. 3)
perpendicular — Describes lines or segments that meet at a right angle. Symbol ⊥. (Ch. 1)
pi — The number π ≈ 3.14159, the ratio of any circle’s circumference to its diameter. (Ch. 5)
plane — A flat surface with no thickness that goes on forever, such as an idealized floor or sheet of paper. (Ch. 1)
plumb — Exactly vertical, as shown by a weight hanging on a string. (Ch. 11)
point — An exact location with no size, labeled with a capital letter such as A. (Ch. 1)
precision — The size of the smallest step you can read on a measuring tool, such as 1/16 in or 1 mm. (Ch. 2)
protractor — A half-circle or full-circle tool marked in degrees, used to measure and draw angles. (Ch. 1)
Pythagorean theorem — In a right triangle with legs a and b and hypotenuse c, a² + b² = c². (Ch. 7)
Pythagorean triples — Sets of three whole numbers that satisfy a² + b² = c², such as 3, 4, 5 and 5, 12, 13. (Ch. 7)
quadrilateral — A closed shape with four straight sides. Its angles add to 360°. (Ch. 4)
quarter circle — One quarter of a circle, bounded by two perpendicular radii and an arc. (Ch. 5)
radius — The distance from the center of a circle to the circle, or a segment of that length. Plural: radii. (Ch. 5)
ray — Part of a line that starts at one endpoint and goes on forever in one direction. (Ch. 1)
rectangle — A four-sided shape with four right angles. Its opposite sides are equal and parallel. (Ch. 3)
reduction — A similar copy with scale factor between 0 and 1. (Ch. 8)
reflex angle — An angle of more than 180° and less than 360°. (Ch. 1)
relative uncertainty — The uncertainty divided by the nominal value, often written as a percent. (Ch. 11)
representative fraction — A scale written as a ratio with the same units on both sides, such as 1:48 or 1:24,000. (Ch. 9)
resolution — The smallest step you can read on an instrument. (Ch. 11)
rhombus — A parallelogram with all four sides equal. (Ch. 4)
right angle — An angle of exactly 90°, a square corner. (Ch. 1)
right triangle — A triangle with one right angle. (Ch. 4)
rigid — Unable to change shape without changing a side length. Triangles are rigid; four-sided frames are not unless braced. (Ch. 4)
room layout report — A short document giving a room’s measurements, areas, material quantities, and layout, with units, uncertainty, and assumptions. (Ch. 12)
scale — The ratio between a length on a drawing or model and the real length it represents. (Ch. 9)
scale bar — A drawn ruler on a map or plan, marked in real distances. It stays correct when the drawing is enlarged or reduced. (Ch. 9)
scale drawing — A drawing in which every length is the same fraction of the real length. (Ch. 9)
scale factor — The number k that every length is multiplied by to go from one figure to a similar one. (Ch. 8)
scalene triangle — A triangle with no two sides equal. (Ch. 4)
sector — A slice of a circle bounded by two radii and an arc, like a slice of pizza. (Ch. 5)
semicircle — Half of a circle, cut along a diameter. (Ch. 5)
shared edge — An edge where two pieces of a composite shape meet. It is inside the shape, so it is not part of the perimeter. (Ch. 6)
similar — Having the same shape but possibly a different size: corresponding angles are equal and corresponding lengths share one ratio. (Ch. 8)
slope — The steepness of a line or surface: rise ÷ run, often written as a ratio such as 1:12. (Ch. 7)
spread — The difference between the largest and smallest of repeated readings. (Ch. 11)
square — A rectangle with all four sides equal. (Ch. 3)
square-cube law — When an object is scaled by k, its area grows by k² and its volume (and weight) by k³, so larger versions carry more weight per unit of cross-section. (Ch. 10)
square foot — The area of a square 1 ft on a side: 1 ft² = 144 in². (Ch. 2)
square meter — The area of a square 1 m on a side: 1 m² = 10,000 cm² ≈ 10.76 ft². (Ch. 2)
square root — The number that, multiplied by itself, gives a given number: √25 = 5. (Ch. 7)
square units — Units of area, each the area of a square one unit on a side: in², ft², cm², m². (Ch. 2)
straight angle — An angle of exactly 180°: the two rays point in opposite directions and form a straight line. (Ch. 1)
string line — A string pulled tight between two points, used as a straight reference. (Ch. 11)
tolerance — The allowed difference between a specified dimension and the built or made one. (Ch. 11)
trapezoid — A quadrilateral with at least one pair of parallel sides (this book uses the inclusive definition). (Ch. 4)
triangle — A closed shape with three straight sides and three angles that add to 180°. (Ch. 4)
triangle inequality — The rule that any two sides of a triangle together must be longer than the third side. (Ch. 4)
unit of length — An agreed length, such as the meter or the inch, used to measure other lengths by counting how many fit. (Ch. 2)
upper bound — The largest value a quantity could reasonably have, given its uncertainty. (Ch. 11)
verbal scale — A scale stated in words with two different units, such as ¼ in = 1 ft. (Ch. 9)
vertex — The shared endpoint of the two rays of an angle, or a corner of a shape. Plural: vertices. (Ch. 1)
vertical angles — The two opposite angles formed where two lines cross. They are always equal. (Ch. 1)
volume — The amount of space a solid takes up or a container holds, measured in cubic units. (Ch. 10)
volume factor — The number every volume is multiplied by when lengths are scaled by k: k³. (Ch. 10)
wall area — The area of a wall’s surface, found as wall length times wall height, usually with doors and windows subtracted. (Ch. 3)
waste allowance — Extra material, often about 10%, bought to cover cutting, mistakes, and pattern matching. (Ch. 12)
Notation guide
| Symbol or form | Read it as | Example |
|---|---|---|
| A, B, C | points (capital letters) | point A |
| AB (segment) | the segment from A to B, or its length | AB = 5 cm |
| ∠ABC | the angle with vertex B | ∠ABC = 35° |
| ° | degrees | a right angle is 90° |
| ∥, ⊥ | is parallel to, is perpendicular to | the long walls are ∥ |
| △ABC | triangle ABC | △ABC ∼ △DEF |
| ∼ | is similar to | same shape, possibly different size |
| ≅ | is congruent to | same shape and size |
| ″ and ′ (on drawings) | inches and feet | 12′ 4″ = 148 in |
| in², ft², cm², m² | square inches, square feet, … | 1 ft² = 144 in² |
| in³, ft³, cm³, m³ | cubic inches, cubic feet, … | 1 ft³ = 1,728 in³ |
| π | pi, about 3.14159 | C = πd |
| √ | the square root of | √25 = 5 |
| x², x³ | x squared, x cubed | 3² = 9, 3³ = 27 |
| k | scale factor | k = 2 doubles every length |
| 1:48 | a representative fraction scale: 1 unit on the drawing = 48 units real | ¼ in = 1 ft |
| ± | plus or minus: the measurement uncertainty | 148 ± ¼ in |
| ≈ | is approximately equal to | π ≈ 3.14 |
| (x, y) | a point on a plan, x across and y up from a corner | the turning circle is centered at (60, 36) |
| ✓ | checked | 3² + 4² = 25 = 5² ✓ |
House style. “3 times as large” means × 3. This book never uses “times more” (see U01 Ratios, Proportions, and Percent). Every measurement carries its unit, and every answer is given in both US customary and metric units where it matters. Figures marked illustrative are made-up examples, not real data.
Formula card
Angles (Chapters 1 and 4). Angles on a straight line add to 180°. Vertical angles are equal. The angles of a triangle add to 180°; the angles of a quadrilateral add to 360°.
Perimeter (Chapter 3). Add all the sides. Rectangle: P = 2(l + w). Square: P = 4s.
Area (Chapters 2 to 4). Rectangle: A = l × w. Square: A = s². Triangle: A = ½ × b × h. Parallelogram: A = b × h. Trapezoid: A = ½ × (a + b) × h. The height is always perpendicular to the base.
Circles (Chapter 5). d = 2r. Circumference C = πd = 2πr. Area A = πr². Semicircle: half; quarter circle: one quarter. A sector with angle θ has area (θ/360) × πr².
Composite shapes (Chapter 6). Add the pieces, or subtract the missing pieces from a bounding rectangle. A border strip has area outer − inner. Shared edges are not part of the perimeter.
Right triangles (Chapter 7). a² + b² = c², so c = √(a² + b²) and a = √(c² − b²). If a² + b² = c², the corner is square (converse). 3-4-5 check: 3, 4, 5 or any multiple (6, 8, 10; 9, 12, 15). A rectangle w × l has diagonal √(w² + l²); equal diagonals mean a parallelogram is a rectangle. Slope = rise ÷ run.
Similarity (Chapter 8). Similar figures: equal corresponding angles, and every corresponding length multiplied by the same scale factor k = new ÷ old. Two equal angles are enough for triangles (AA). Rectangles are similar when their aspect ratios (long ÷ short) match.
Scale drawings (Chapter 9). Real length = drawing length × scale number; drawing length = real length ÷ scale number. ¼ in = 1 ft is 1:48; ½ in = 1 ft is 1:24; 1 cm = 1 m is 1:100.
Scaling (Chapter 10). Lengths × k, areas × k², volumes × k³. Box volume V = l × w × h. Cylinder volume V = πr²h.
Uncertainty (Chapter 11). Value ± u gives a lower bound (value − u) and an upper bound (value + u). Bounds of an area: multiply the lower bounds, then the upper bounds. Relative uncertainty = u ÷ value; for a product, add the relative uncertainties (approximately).
Room layout (Chapter 12). Paintable area = perimeter × height − openings. Trim = perimeter − door widths. Order = need × (1 + waste allowance), rounded up to whole units.
Unit conversion card
Exact values come from definitions (NIST Handbook 44, Appendix C). Rounded values are marked ≈.
| Length | Area | Volume |
|---|---|---|
| 1 in = 2.54 cm (exact) | 1 ft² = 144 in² | 1 ft³ = 1,728 in³ |
| 1 ft = 12 in = 30.48 cm (exact) | 1 yd² = 9 ft² | 1 yd³ = 27 ft³ |
| 1 yd = 3 ft = 0.9144 m (exact) | 1 m² = 10,000 cm² | 1 m³ = 1,000 L |
| 1 mi = 5,280 ft ≈ 1.609 km | 1 m² ≈ 10.764 ft² | 1 L = 1,000 cm³ |
| 1 cm = 10 mm | 1 acre = 43,560 ft² | 1 US gal = 231 in³ (exact) ≈ 3.785 L |
| 1 m = 100 cm ≈ 39.37 in | 1 hectare = 10,000 m² ≈ 2.471 acres | 1 in³ = 16.387064 cm³ (exact) |
Fractions of an inch. ⅛ = 0.125, ¼ = 0.25, ⅜ = 0.375, ½ = 0.5, ⅝ = 0.625, ¾ = 0.75, ⅞ = 0.875; 1/16 = 0.0625.
Area and volume conversions use the length factor squared or cubed: 1 m² = (100 cm)² = 10,000 cm²; 1 ft³ = (12 in)³ = 1,728 in³.
Bibliography
All of these sources were consulted for scope and accuracy. Their links were checked on October 23, 2026. No text was copied from them.
Open textbooks
- OpenStax. Contemporary Mathematics. Houston, TX: OpenStax, Rice University, 2023. CC BY 4.0. https://openstax.org/details/books/contemporary-mathematics (Chapter 10, Sections 10.1 to 10.4, 10.6, and 10.7; used for Chapters 1, 3, 4, 8, and 10).
- OpenStax. Prealgebra 2e. Houston, TX: OpenStax, Rice University, 2020. CC BY 4.0. https://openstax.org/details/books/prealgebra-2e (Sections 9.3 to 9.5; used for Chapters 2 to 7).
Standards, regulations, and government references
- National Institute of Standards and Technology. NIST Handbook 44: Specifications, Tolerances, and Other Technical Requirements for Weighing and Measuring Devices, current edition, Appendix C, “General Tables of Units of Measurement.” https://www.nist.gov/pml/owm/nist-handbook-44-current-edition (exact definitions: 1 in = 2.54 cm; 1 ft = 0.3048 m; 1 US gallon = 231 in³; 1 acre = 43,560 ft²; Chapters 2, 9, 10, and 12).
- National Institute of Standards and Technology. Special Publication 811: Guide for the Use of the International System of Units (SI). https://www.nist.gov/pml/special-publication-811 (Chapter 2).
- Taylor, B. N., and C. E. Kuyatt. Guidelines for Evaluating and Expressing the Uncertainty of NIST Measurement Results. NIST Technical Note 1297, 1994 edition. https://www.nist.gov/pml/nist-technical-note-1297 (Type A and Type B evaluations; Chapter 11).
- US Access Board. 2010 ADA Standards for Accessible Design. https://www.access-board.gov/ada/ (sections 104.1.1, 304.3.1, 305.3, 403.5.1, 404.2.3, 405.2, and 405.6; Chapters 5, 7, 11, and 12).
- Occupational Safety and Health Administration. 29 CFR 1926.1053(b)(5)(i), ladder angle (the 1:4 rule). https://www.ecfr.gov/current/title-29/subtitle-B/chapter-XVII/part-1926/subpart-X/section-1926.1053 (Chapter 7).
- Executive Order 10834, “Flag of the United States” (August 21, 1959), as codified by the National Archives. https://www.archives.gov/federal-register/codification/executive-order/10834.html (official flag proportions; Chapters 6 and 8).
- US Geological Survey. “Map Scales.” Fact Sheet FS-038-00, 2000. https://pubs.usgs.gov/fs/0038-00/report.pdf (1:24,000 means 1 in = 2,000 ft; Chapter 9). A US government work in the public domain.
- Common Core State Standards Initiative. “Grade 7: Geometry (7.G).” https://www.thecorestandards.org/Math/Content/7/G/
- Common Core State Standards Initiative. “Grade 8: Geometry (8.G).” https://www.thecorestandards.org/Math/Content/8/G/
License
- Creative Commons. “Attribution 4.0 International (CC BY 4.0).” https://creativecommons.org/licenses/by/4.0/
Illustrative values. All rooms, furniture, gardens, maps, and objects in this book are made-up examples. The paint coverage rate of 350 ft² per gallon and the 20 ft² flooring box are illustrative; use the figures printed on the products you buy.
Related MORI University courses. U01 Ratios, Proportions, and Percent; U02 Algebra: Expressions, Equations, and Models; U22 Measure and Lay Out Before Making; U30 Geography and GIS: Maps You Can Question; F10 Engineering Design and MORI CAD; F18 Sustainable Homes, Water, and Community Infrastructure; F20 Prospecting, Mineral Resources, and Field Mapping.
Index of key terms
Bold chapter numbers show where a term is introduced. Other numbers show chapters where it is used again.
- 3-4-5 check: 7; 4, 11
- AA similarity: 8
- acre: 2; 9–10
- acute angle: 1
- angle: 1; 3–9, 11
- arc: 5; 1, 6, 12
- area: 2; 1, 3–12
- area factor: 10; 2, 9
- aspect ratios: 8
- base: 4; 1, 6, 8, 10
- border strip: 6
- bounding rectangle: 6
- center: 5; 1, 12
- centimeter: 2; 3, 9–10
- chord: 5
- circle: 5; 1, 3, 6, 9–10, 12
- circumference: 5; 4
- clearances: 12
- composite shape: 6; 3–5, 12
- congruent: 8
- converse: 7
- conversion factor: 2; 9
- corresponding: 8
- coverage rate: 3
- cubic foot: 10
- cubic meter: 10
- cubic units: 10; 2
- cut-outs: 12
- decompose: 6
- degree: 1; 5, 7
- diagonals: 7; 1–6, 8–12
- diameter: 5; 6, 10, 12
- dimensions: 3; 6–11
- enlargement: 8; 5, 10
- equilateral triangle: 4
- exact conversion: 2
- floor plan: 9; 1
- foot: 2; 3, 7, 9–10
- gallon: 10; 3, 12
- grid estimate: 3
- hectare: 2
- height: 4; 1, 3, 5–8, 10–12
- hypotenuse: 4; 7
- ideal shape: 1; 11
- inch: 2; 5, 7–11
- isosceles triangle: 4
- kite: 4
- legs: 7; 4
- level: 11; 1–10, 12
- line: 1; 4, 6–9, 11–12
- line segment: 1
- liter: 10; 12
- lower bound: 11
- measured sketch: 12; 9
- measurement uncertainty: 11; 7
- meter: 2; 3, 8–12
- millimeter: 2; 1, 11
- mixed units: 2
- nominal value: 11
- obtuse angle: 1; 4
- openings: 12; 3
- out of square: 7; 11–12
- parallel: 1; 4, 8, 11
- parallelogram: 4; 7, 11–12
- perimeter: 3; 2, 4–6, 8, 10, 12
- perpendicular: 1; 4
- pi: 5; 6, 10, 12
- plane: 1; 5
- plumb: 11; 12
- point: 1; 2–12
- precision: 2; 11–12
- protractor: 1; 4, 7–8
- Pythagorean theorem: 7; 9
- Pythagorean triples: 7
- quadrilateral: 4
- quarter circle: 5; 6, 9, 12
- radius: 5; 6, 12
- ray: 1; 8
- rectangle: 3; 1–2, 4–12
- reduction: 8
- reflex angle: 1
- relative uncertainty: 11
- representative fraction: 9; 12
- resolution: 11
- rhombus: 4; 8
- right angle: 1; 3–8
- right triangle: 4; 7–8
- rigid: 4; 7–8
- room layout report: 12
- scale: 9; 1–8, 10–12
- scale bar: 9; 12
- scale drawing: 9; 12
- scale factor: 8; 5, 9–10
- scalene triangle: 4
- sector: 5
- semicircle: 5; 6
- shared edge: 6
- similar: 8; 9–10
- slope: 7; 1, 8, 11
- spread: 11; 4
- square: 3; 1–2, 4–12
- square-cube law: 10
- square foot: 2
- square meter: 2; 12
- square root: 7
- square units: 2; 3, 5–6
- straight angle: 1; 4
- string line: 11
- tolerance: 11
- trapezoid: 4; 3
- triangle: 4; 1, 3, 6–8, 11
- triangle inequality: 4; 7
- unit of length: 2
- upper bound: 11
- verbal scale: 9; 12
- vertex: 1
- vertical angles: 1
- volume: 10; 2, 8, 11
- volume factor: 10; 2
- wall area: 3; 6, 12
- waste allowance: 12; 3, 6